dungeon mapping 2
Community Forums/Showcase/dungeon mapping 2
| ||
| Been quiet for a bit, while I worked on the interiors. They now have different colours, some contents, and dressing - all procedural. Here's a quick look around some of the rooms This is the original version without any further decorating:  And now the current one with particle lighting, particles, lighting, more decoration:  and the rest      You might have noticed that there are also stairs going up, trapdoors, etc. these are all placed so that there is no exit blocking:  Rooms currently do not have designations (they are just rooms), but there is a definite personality coming through, which will be exploited |
| ||
Further work has now lead to different light situations like night: And the random room generation is starting to throw up interesting results like A Library (note the books are all random too):  some sort of dusty forge area  and a cloister (attached to churches) If you look closely you can see a trapdoor under the cobwebs  |
| ||
| Very nice work mr Strange! Although the cobwebs need to be smaller and used less. Not sure what the green plants are 2nd last pic. Questions! Have you thought of using spot lights to add more ambience? How do you do the night lighting; fog? Also where do you get your textures from? |
| ||
| Hi Munch. Currently there is no actual lighting being used, although I do have a system I need to implement (it's a bit theory at the moment) I do have per model/square control and can change the light colors as I need - hence the dark blue for night. Fog is the storm particle system - create in Rameses 3d editor and use just the same as any 3d model, with further control over size, color, alpha, etc Textures come frame a single 1.5mb png file. this contains all the textures from the game in a 42x27 matrix. Each texture can be any size within this matrix. Rameses controls how you use these textures with the in-built mapping. You can have up to 2 textures per model, with loads of subtle differences in how they are displayed, bump mapped, etc so how does a model have different textures? in 2 basic ways: 1. it doesn't. 1 model = 1 texture, but a group of models have different textures 2. break down the final model in smaller models and group them E.G. the chair in the last pic is one model, but it is actually a group of models (legs, seat, back) - each of these (in a group) can have a completely different texture applied if needed, also what base colours are used can also be changed without altering the original model So, take a simple model and give it a base color. then pick a bitmap texture. use the mapping to fit it how you want, use the controls to add bump mapping, remove rgb (just leaving the base color and bump mapping) add some shine if wanted, desaturate the rgb bitmap on channel 1. use a bitmap with alpha, add a second bitmap, desaturate, etc, etc. So a set of very simple images becomes a very powerful texturing system |
| ||
| OK, I upped a new blog post detailing how Rameses does it's texturing https://vjointeractive.wordpress.com/2015/09/01/rameses-texturing/ We take a simple cube:  Texture it:  alter the vertex colors, modify UV face mapping, add bump and second texture to get:  I think the key thing here is not to think about how other 3d packages do it (create model, apply uv, export uv map, paint the finished map, apply to model). But... Think about what you want, say a crate. model the crate so that the model sorta resembles a 3d crate and color the vertexes. Using the available textures see if one gives you a crate look, and use it. tweek the uv map, mess with the bump, pick another texture - play with it till it's nice. maybe change the color. or separate the crate into its parts and model each of them? |
| ||
| Hi Adam, thanks for the explanations and I always enjoy reading your blog posts, always very interesting and inspiring. Actually, I loved your rat tutorial; it's just the kind of style I'd like to use in my game if it ever makes it. You really do seem to get things done well in your own unique, original way. So well done and best wishes for the game or games you're working on. I have to admit when I wrote/said "where do you get your textures from" I actually meant what website do you source, rather than how do you handle textures; but your answer was much more interesting anyway! I do find it strange that you don't have standard lighting and can't imagine that lighting per block/square could be seamless. Also could you explain what you mean by 42x27 matrix? Lastly, I wonder why you limit yourself to 2 textures per mesh, since up to 4 (and even 8) is supported. Cheers! |
| ||
| no problem. Where do I get the textures - I make them. Here's the process: I need a certain type of texture - lets say rock. 1. go to google and type "rock texture" 2. pick the ones I like the look of 3. decide what size the final texture will be 4. assemble in photoshop and edit, fade, copy, color, draw until it fits. what's a texture matrix (Also called texture atlas) this is a single texture that contains all the textures being used. E.G.  this has a matrix (the underlying squares) 8x8 The textures can be any rectangular size conforming to this grid matrix I do find it strange that you don't have standard lighting and can't imagine that lighting per block/square could be seamless. mmm, well i'm not strictly being true here. there is a light reference point - but it's not actually a light, it's used internally to give the normals a base reflection point. so if a face points toward it it's light, away from it it's dark So it's more a direction source than a light source - i think? There's also other lighting stuff going on. E.G. the further away from the central figure the square get darker, the further away (in 3d) from the front (depth) things get darker. There is also some subtle SSAO going on (well my version of it anyway). you can see this really well in the library pic: Look at the bookcases - there is a dark edge effect going on the further up the bookcase I wonder why you limit yourself to 2 textures per mesh, since up to 4 (and even 8) is supported. It's just a choice. it's all shader based so I can have as many textures as I want: 48, 128, 9, etc. But... there is a cost involved. each texture will need variables to control it. and i would also need to add these controls to the Rameses UI (you can see my single texture here):   So for each model I need to send texture details. the more textures, the more I need to send. plus I then need to work out how these textures will operate. Here are the material settings for a bitmap:  the top options: mono 0, fade 1, bump 0, shine 0 refer to the 2 bitmaps 0 and 1 Everything below is how the material reacts. So if I add a third bitmap I will need to figure out how to integrate it into the ui, the 3d engine, the shaders, etc. I found that 2 is (currently) just fine :) I think the last thing to consider is the rendering is under shader control and none of it is strictly right or correct (and defiantly not how you read it should be done). I had to create it all, and did it all visually (for the look). So the SSAO is sorptive how it works, but my version of it. The materials sort of work, but not quite the way maya or unity does things. They are not right or wrong, just different. Some of the code was accidental, some of it tweeked until i liked the result E.G. Heres some of the shader code dealing with particles complete with tests and edits:
//		if (depth < deferredDepth.r || deferredDepth.r < 0.000001){
//		if (killDepth < 0 || deferredDepth.r < 0.000001){

		if ((killDepth < 0 && killDepth > -3)){
//			diffuse = vec3(1,0,0);
		}else if (killDepth < 0.5){
//			diffuse = vec3(0,1,0);
			fade = 1.0-(killDepth * 2);
			if (fade < 0){
				discard;
			}
			if (fade > 1) fade = 1;
		}else{
			if (deferredDepth.r > 2){
//				diffuse = vec3(1,0,0);
				discard;
			}else{
				alpha *= 0.5;
//				diffuse = vec3(0,1,0);
//				discard;
			}
//			if (alpha < 0.8){
//				diffuse = vec3(1,0,0);
//			}
//				discard;
		}

		fadealpha = fade * alpha * gl_Color.a;


/*
//		if (deferredDepth.r < 0.001){
//			diffuse = vec3(1,0,1);
//		}{

			if (deferredDepth.r > 0.000001){
				float dp = depth - deferredDepth.r;
				if(dp > 0){
					if (dp < 0.25){
//						diffuse = vec3(0,1,0);
						fade = 1.0-(dp*4);
					}else{
						discard;
					}
				}
			}

	float fadealpha = fade * alpha * gl_Color.a;
//	if (fadealpha > gl_FragData[3].r){
//		diffuse = vec3(0,1,0);
//		gl_FragData[3].r = fadealpha;
//}
|
| ||
| @Munch You pc or mac based? blitzMax? |
| ||
| Highly entertaining. Thanks Adam!! |
| ||
| Very well done. |
| ||
| Shaping up nicely...Somehow I'm reminded of Atic Atac on the speccy :) |
| ||
| Thanks guys :) @Steve The secondary concept was Nightshade: 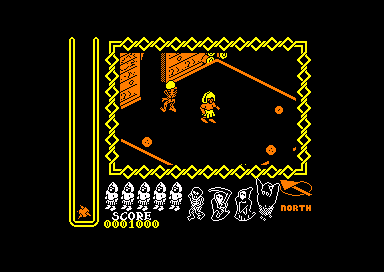 http://gamesdbase.com/game/sinclair-zx-spectrum/nightshade.aspx Which is by the same company (Ultimate). Although I've not added monsters, etc. it can still go any direction :) |
| ||
| @Munch Have you thought of using spot lights to add more ambience? OK, as stated there are no traditional lights being used. I also said that I had a concept for adding (sort of) lights based on a particle system. But it needed to be proved. It was very simple! All I needed to add was a single parameter to Rameses and didn't need to update any loading saving routines, as the amendment was already taken care of (don't ask) So after a quick tinker with a new shader and modifying the existing particle code, here is the initial result:  This shows a single particle light (at the candle) coloured red/yellow (it flickers too) - note how the lighting changes the central character And the second one:  This is more subtle - MuShu has the exact same particle light (only a bit bigger and white and very feint). you can see that MuShu now has a sort of light around him |
| ||
| I cant wait to play this. I really like the artistic style. |
| ||
| I'm working on BlitzMax+Openb3d in Linux but I test briefly on Win/Mac. Thanks for the explanations, it's very helpful to know how you do things. The particle point light is looking great! Btw, when I said spot light I meant point light. |
| ||
| The particle point light is looking great! thanks, but remember it's not a point light. its a particle light. I am currently using a simple orb as the particle , but proper coloured particles can be used. even particles that have multiple points. so one particle could draw several lights... Ohh my head hurts now I think there is base support for 700 particle lights per frame? Heres a teeny tiny animation showing the tropical (animated) jungle, lights, map popup  You can also see that fences/garden walls are treated differently from house walls. Also note how only the area you are in is displayed, so going from the garden to inside, would fade the garden till it is completely not there! And that Green shimmery trail? Well its magic remnants from the staff he's holding (Heal in this case) |
| ||
| The map popup is amazing! |
| ||
| Amazing with triple Z, capital A and "!!!"'s. |
| ||
| I love that map pop-up as well. If this is Mac only I may have to buy a Mac :^) |
| ||
| It looks good but I don't see any normal/bumps effect even though you mentioned you used normal maps. |
| ||
| @Videz mmmm, it is there but very subtle. I've also not used any shine on any of the textures. You raise an interesting point though. I noticed that the moment you use both the bump and bitmap there is a sort of cancelling effect. I'll see what can be done with the new particle lighting and report back my findings |
| ||
| ok, tiny tweek to the particle light code to give them a better look with bump mapping Also redrew the cobwebs by hand so they are much finer. also did some minor work on the web display code to make them less 'white' |
| ||
| Looks good. From my previous tests, it seems that the more you use textures with a lot of details, the less you see the progressive shades of a light (in the case of an omnilight or a spotlight) |
| ||
| mmmm, it is there but very subtle. I've also not used any shine on any of the textures. You raise an interesting point though. I noticed that the moment you use both the bump and bitmap there is a sort of cancelling effect. I'll see what can be done with the new particle lighting and report back my findings yea, I mean what's the point? you go through this whole process, explain your techniques and add more texture layers but still you end up getting this visual where it look like you don't care with lighting and detail. I wouldn't blame you though, as I'm also having a hard time getting my normal maps to display properly with b3d. ..and maybe try adding baked AO maps, cause it really looks flat. keep it up. |
| ||
| <double post> |
| ||
| ..and maybe try adding baked AO maps, cause it really looks flat. Baked AO is a good suggestion, but wouldn't work here as the models are material based. but it is a good place to start :) |
| ||
Some slight work on the lighting. Here's a quick peek of multiple lights (as lanterns) and vegetation - good for showing that the lighting is in 3d and not just a flat blob... Also ig you look really close at the top lantern post, you will notice that the textures are not "flat", but there is depth and bump mapping in operation ;) I like the way the vegetation hides the light too... |
| ||
| Looks smart, makes me think big-time of 'Fairlight' for the good old speccy from the 80's. |
| ||
| Also ig you look really close at the top lantern post, you will notice that the textures are not "flat", but there is depth and bump mapping in operation ;) Sorry AdamStrange but I really dont see it. Maybe it doesn't suit this view to have this kind of detail like normal maps. Otherwise, it really stands out and produce more depth visually. It's either the resolution you have here is not that high to see those details or it's not worth the effort including those detail/normal maps into your pipeline. Just calling it as I see it. The orb/light trail looks nice though. |
| ||
| Quick update to show the new lighting effects in random room settings with particles, particle light, etc :) If you look closely you can see that MuShu now has a shield - this is customisable, so expect different ones. there is also provision for a bag, although I've not quite decided how it should operate   Object layering is also now possible, so a map tile could have a table, with items on the table. opening a chest spawns gold which will drop on top of nearby objects - stoves, etc it is also possible tracery small objects like chairs, tables, pots, etc, so if a way is blocked, then you could pick up the blockage and move it |
| ||
| Looking better all the time! |
| ||
| What he said ;) |
   |