Fast 2D Blobby Objects/Metaballs with Max2D
BlitzMax Forums/BlitzMax Tutorials/Fast 2D Blobby Objects/Metaballs with Max2D
| ||
| This is a tutorial to help you to get started with drawing blobby objects using simple Max2D commands. Normally when you draw an image on the screen you see it as it is, pixel for pixel. If it were an image of a sphere you would simply paste it down and you would then see a sphere on the screen. The shape of it doesn't change because its appearance is fixed in place already - stored in the pixels. Adding more spheres doesn't change the shape of each one. The difference with blobby objects is that their shape, which starts out usually as a sphere, changes depending on how close the objects are to each other. Two objects can go from being completely separate to completely unified - appearing to be one. Blobby objects are cool! If you draw more than one blobby sphere and they are close enough together, they start to influence each other. As they approach they begin to bulge in the direction of each other as if being sucked together by gravity. As the shapes get even closer they eventually begin to merge together as one shape with a smoothly curved surface. You can adequately describe that shape as a `blob`, hense the name. If the objects end up in exactly the same location they form one single larger sphere as representative of their final union. Sometimes blobby objects are called metaballs because that describes them well also - a ball that is more than just a ball. You can think of each individual blob as being an atom with an electrical energy field around it. The closer to the atom you get the stronger the energy field is. The circular shape of an actual atom is usually produced by electrons orbiting it at such a high speed that the `blur` of movement gives the impression of a sphere. As the atoms get closer to each other this apparent shape deforms as the electrons start to be affected by the pull of the other nearby atoms. Eventually the electrons start to break out of the orbit of the original atom and circle the other atom for a while, maybe moving back and forth. This creates more of a `blob`. This is why blobby objects are often used in science to model the behavior of atoms and molecules (and it's a handy metaphor). The question for us is how can we draw these constantly flexible shapes on the screen and make them interact when they get close. Another big question that seems to arise is how to draw the shapes with nice smooth curves, and to do it fast. There have been a number of algorithms invented to render blobby objects. The most well known is the `marching cubes` algorithm. You can read up more about it on the web. It has a patent attached so we can't very well use it (figures). However, certain individuals have produced spinoffs such as marching triangles and other base shapes which are more accessible. The basic idea of the algorithm is to subdivide a given set of `atoms` and their combined energy fields into cubes. You then work out, on increasingly small levels, where within the cube a polygon should be generated perpendicular to the surface of the energy field. You needn't worry about understanding how that works, because we won't be using it. It's usually used to generate 3D polygon meshes with a specific level of detail which can be rendered on 3D hardware. Most commonly a polygon will be generated by these algorithms at any location where the energy-field's intensity is at about half strength. This is referred to as a threshold. Since the algorithm needs to be aware of all the possible locations where the energy it at this `threshold` of half strength, a lot of computation is involved, especially working in 3D. One of the prime uses for blobby objects therefore is to model organic shapes in 3D, and is a feature of higher-end 3D modelling software. For the most part it is hard to do it usefully in realtime - hense its appearance as a demo effect produced by highly specific, hardwired code. What we are interested in first of all is taking a look at the combined energy fields of several blob objects, or atoms. Imagine several atoms hanging in the air near to each other. They are emitting energy fields of a given strength which dissipates with distance. Where any two atoms are near to each other the energy fields overlap and add their strength together. Where they overlap, the strength of the energy at that location is the sum total of contributions from both energy fields. What you want to work out first of all is, given the location of all the atoms, how much energy emission there is at every location. Obviously in 3D that is a lot of locations. In 2D things are simpler, and especially since we are dealing with a limited number of pixels on a screen. So we just want to know what this energy field looks like on a per-pixel basis. Traditional algorithms, like the marchine cubes, has a lot of math going on to work out where the energy field is. Since it usually deals with 3D it has to take a 3D grid of points of a particular resolution and work out the energy field at each point - actually where along the edge of each side of each cube the energy field is at a specific strength. It usually does this with various formulas and, in the case of the marching algorithm, it tries to refer to a certain number of possible permutations of results in order to optimize things. But all of this has to be calculated by the CPU. Since we are going to create 2D blobby objects, we want to know what the combined energy field looks like in 2D. We are basically going to start off by actually drawing an image of the energy field in grayscale (shades of gray). All we need to do is draw the energy field of each atom and make sure that where they overlap, the energy from each contributing atom is added together. Since we are only working in 2D and figuring out the points on our `mesh` in one step, each individual pixel can be used to represent a location in the energy field. We are taking a simple 2D cross section - a snapshot of a slice of the energy surrounding all these atoms. Instead of using some 2D array to store the energy field, or using math to work it out in realtime, we're going to use an image on the screen. A screen is basically an array of data, it just happens to be turned into colors by the display hardware depending on the value of the data. And the joyful thing is this: Because we're treating it as an image, we can get the GPU (graphics processing unit) of your graphics card involved. GPU=visual speed. In BlitzMax, there are several rendering modes which allow you to draw images in different ways. You set what mode you want using `SetBlend`. Usually you would draw an image as solid, using SOLIDBLEND which is the default. With SOLIDBLEND, the content of the source image totally replaces the content of the screen. What we are interested in for our purposes is our trusty friend, LIGHTBLEND! This is simply an `add` mode. It performs a mathematical addition of the value of each source pixel and the value of each screen pixel. When the sum of the two pixels gets to be more than 255 (in color), or 1.0 (in floating point color), or white, the color just gets turned into white. So we can use the LIGHTBLEND mode to handle the overlapping parts of each energy field. It also doesn't hurt to use LIGHTBLEND where there is no overlap - since it would be drawing onto a black background it will just draw that part of the energy field as if drawn with SOLIDBLEND. So we can use LIGHTBLEND to combine the energy fields of each atom. We will also be using a simple call to `DrawImage`to draw each individual atom's energy. We will store a pre-calculated 2D image of an atom's energy field in our Image object. The precalculation of that image is an important factor in allowing us to have enough time, at runtime, to generate the blobby objects with enough speed. If we had to generate every single energy field, and combine them, all in realtime, that would be a lot more work. So the question now is how to generate the energy field of an atom, and draw it as a grayscale image. Well, like I said earlier, the further away you get from the atom the less strength the energy field has. The energy field, therefore, is basically a ball with decreasing density the further you get away from the center. The center is the hotspot and the outer edges of the area are almost non-existant. What we're going to do is draw each energy level as a different color, and since we're working in grayscale we will use 256 shades of gray. To draw the energy field of one atom is pretty simple, you would think. All you have to do is start of by setting the color to black and drawing a large circle equal to the size of the energy field. Then you just keep repeating that in a loop making the circle smaller and smaller each time, increasing the color by adding 1 to it (to Red Green and Blue equally). What you end up with is a sphere with a gradient of gray colors fading out the further away you get from the center. It looks like this: 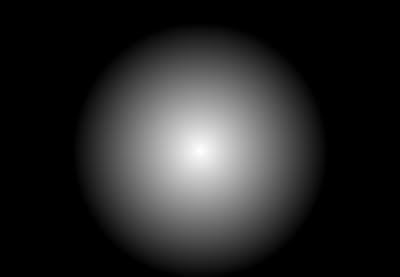 If we grab this into an `Image`, and then draw it more than once to represent two atoms, we get this: 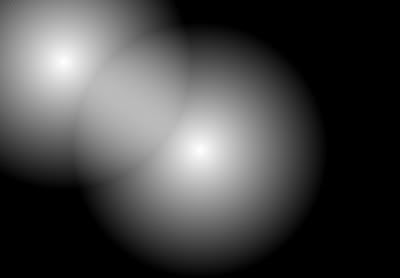 You'll notice that this does not exactly give us a blobby object. While the energy field areas do overlap and are added together, there is no smoothly curved surface being produced. This is made all the more evident by hiliting some of the `bands` that are the same color in a contrasting color, as follows: 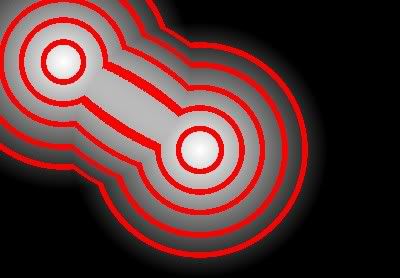 Here you can see what kind of shape is actually being produced. A `bridge` is seemingly formed between the two energy fields, but it is not very curvacious. In fact, it's almost totally straight. Why? This straightness is a direct result of even incrementation of color in our source image. Since we drew circles that increased in brightness by `1` at every diameter, this produces a completely `linear` gradient as shown in the ball image above. The amount of change in this gradient is shown below:  As the color progresses from black to white, it is incremented in steady steps proportional to the diameter of the circles being drawn. It is because of this `linear` gradient that we get the effect of a straight bridge between the two composite energy fields. The energy fields do, technically, combine, and they do form a connection between them when they get close, but the connection is a sudden immediate bridge between them with a width directly proportional to their proximity. It's not very useful as a representation of blobby objects. What we need to do is generate a curved surface. We want our two objects to interact with a nice gradual `approach` so that a smooth curve is formed, and not all at once. To do this we simply need to modify the shape of the gradient, it has to be a curve rather than linear. What this means is, for each circle that we draw in a shade of gray, instead of incrementing the shade by 1 for each circle we have to slowly accelerate the rate of incrementation over the course of the circles. A curved gradient is similar to suggesting that our atom, with its energy field, is much harder to escape from when you are close to it, but the further from it you get the easier it becomes. When you are close to the center there isn't much difference in the strength of the gravity, but the further away you get the less it pulls. Drawing a curved gradient is included in the sourcecode below. Basically what we do for blobby objects is increase our color intensity based on a curve produced by squaring a number by itself (rather than just adding a number to itself.) When the number is small, the curve obviously doesn't move much but as it increases the curve gets increasingly curvy. It ends up looking like this: 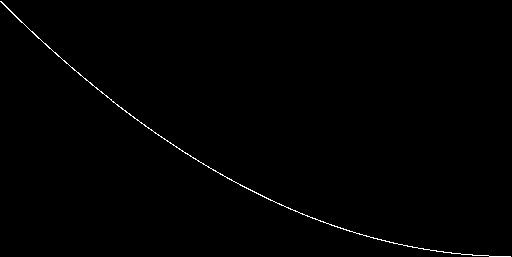 And when you've drawn the actual energy field of one atom, it looks like this: 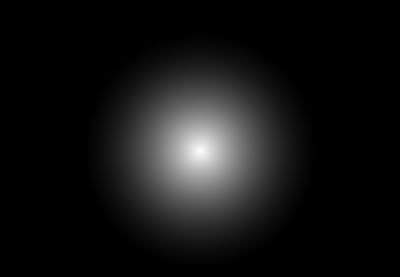 If you compare this to the original linear image, you'll notice not only that the overal brightness seems a lot less but also there is more of a `peak` of brightness nearer the center. The brightness quickly falls away and then you're left with a gradually decreasing amount of dimming the further you get. This is the ideal shape for our blobby objects and the way that they need to interact with each other. The side effect of generating an image with this kind of curved gradient is that the curvature directly translates to the way that the intensities of the energy fields combine. When you draw several of these images in LIGHTBLEND, where their values are added together, it forms not only smoothly curved shapes but also different degrees of curvature based on proximity. With the linear gradient we get a sudden total switching on of the `bridge` between the two atoms, whereas with a curved gradient we get different amounts of bulging. So, drawing two curved-gradient energy fields, added together, we get this: 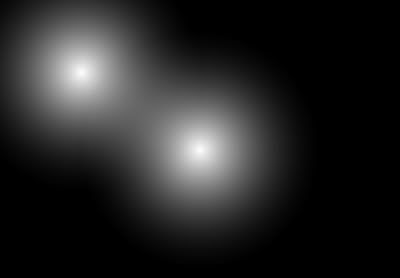 Now, it doesn't look a whole lot different at first glance to the original linear combination. But if you take a look at what is happening here you will notice there are actually completely smooth curves at every energy intensity level. We can hilite these again by showing some of these intensities with a contrastsing color: 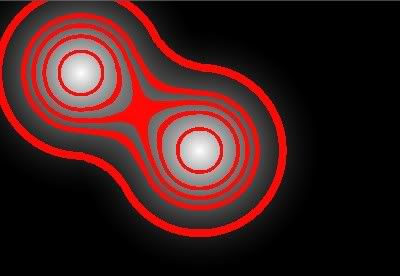 As you can see, the energy field actually is forming proper blobby object perimeters. Areas closer to each atom have not yet `blobbed out` since they are out of reach of the influence of each other. But the parts of the energy field that do influence each other (by overlapping) begin to bulge toward each other and unify. Solely because of our curved gradient we get a curved shape instead of a rectangular shape. There you have it, blobby objects rendered on-screen! The great thing is, this is actually a very very simple technique compared with the marching cubes algorithm. It is especially great that we are doing all the `processing` using image data and even more great that we can therefore use hardware acceleration to perform all the computation. The simple combination of a pre-rendered energy field using the correct curvature of the gradient, along with an additive blend mode, gives us blobby objects. There are other curves of gradient that can be used based on other formulae. The number*number formulae is the simplest and produces standard blobby objects. Other formulas produce perhaps flatter curves, or accentuate the area nearer the middle. Changing the curves in these ways can make the blobs appear to be more `sticky` or more reluctant to disconnect, so that when they do disconnect they seem to `snap back` into place more quickly. The main idea of producing blobby objects is that you first of all generate the combined energy fields - officially known as an `isosurface` - and then you interpret that surface by rendering only at a certain threshold. In my example above I simply took a paint program, a flood fill tool with a treshhold of 5 pixel values, and clicked on the image in several places. What this shows you is that if you vary the threshold you vary how much energy needs to be present in order to make a perimeter. Usually blobby objects will be drawn in this way, rendering only the pixels that have values of, say, between 120 and 140. This would produce a single `band` around all the blobs. In this tutorial I am just showing you the basics of how to generate some blobby objects. What you need to do next is take the data that is generated - ie the resulting image on your screen, and find ways to manipulate that image to produce an effect that you like. In its more advanced incarnation I have taken this basic BlitzMax program and converted everything to direct OpenGL programming. This allows me to set up some blend modes and operations which are not currently implemented as part of Max2D. I use these additional modes to cover the screen several times with a filled rectangle, where each pass performs some `math` on the pixel color. The end result is that you can get bands of color to form. In this tutorial example, there is an inbuilt threshold of 255 whereby, any areas that contain energy intensity at 255 simple remain that color. It never gets any brighter. You can use this fact and with a little further manipulation/post-processing let your blobs be formed only by the white pixels. In addition you can draw a rectangle over the whole screen in LIGHTBLEND mode with a color of $80,$80,$80 (mid-gray), which will cause the treshold to be formed at half-strength energy levels rather that at the white level. With a bit of clever manipulation you can come up with something looking like this: 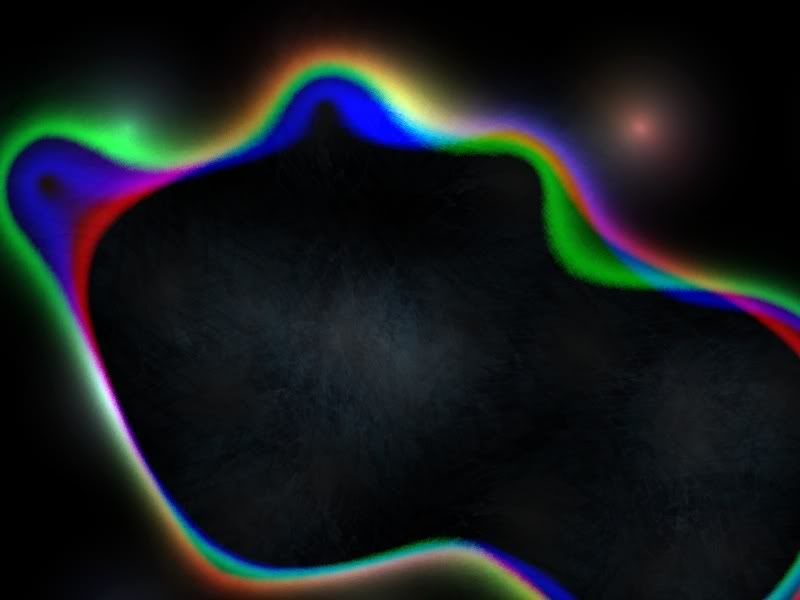 So far all we've done is use a spherical energy field. You may have noticed we are now working with images here, and an image of a spherical energy field is precalculated before being used. For your further enjoyment you may wish to save that image and load it into your favorite graphics package. There is absolutely nothing stopping you from performing image processing functions on that image and then loading it into the blob-rendering routine. It only has to be loaded once at the start instead of generating the blob image from scratch. There are many interesting ways you can warp, twist and otherwide deform the basic blob image. When it comes to rendering it in the blob program, blobs will still be formed as before - combining and merging based on proximity - but now the energy field is simply a different shape. This can make for some pretty interesting effects! There's also nothing stopping you from adding a `tint` to each image that you render, by using `SetColor` for each one. You will find that individual blobs form in each of the separate Red, Green and Blue channels, and that their shapes will overlap without interacting, as in the above image. Have fun, play around with it. You can add as many blob objects to the screen as you like, this `algorithm` supports an unlimited number of combinations at no extra charge. ....... <- get it, *extra charge* ..... electrical fields,..... *ahem*. I hope this has been clear and understandable. Feel free to ask questions. The very simple final sourcecode is below, no strings attached. As it stands it generates blob fields that occupy a 512x512 space. It can also do 256x256 and 128x128, but any size other than that you'll have to work out the balldivider and lineardivider values - I'm sure there is a formulae that would generate them properly but I couldn't figure it out. 'Blobby objects with BlitzMax using Max2D only 'Some special numbers Local ballsize:Int=512 Local ballsizehalf:Int=ballsize/2 'Set up the display Graphics 800,600,0 Cls 'Work out what the dividers needs to be Local balldivider:Float If ballsize=128 Then balldivider=64 '8x8 If ballsize=256 Then balldivider=256 '16x16 If ballsize=512 Then balldivider=1024 '32x32 Local lineardivider:Float If ballsize=128 Then lineardivider=0.5 If ballsize=256 Then lineardivider=1 If ballsize=512 Then lineardivider=2 'Render the gradient image For Local r:Float=1 To ballsize-1 Step 0.5 Local level:Float=r level:*level level=level/balldivider SetColor level,level,level 'For blobby gradient shape 'SetColor r/lineardivider,r/lineardivider,r/lineardivider 'For linear gradients DrawOval r/2,r/2,ballsize-r,ballsize-r Next 'Turn it into an image AutoMidHandle True Local img:TImage=CreateImage(ballsize,ballsize,1,FILTEREDIMAGE) GrabImage(img,0,0,0) 'Set the drawing mode SetBlend LIGHTBLEND 'Keep drawing the image until you press Escape Repeat Cls DrawImage img,400,300 DrawImage img,MouseX(),MouseY() Flip Until KeyHit(KEY_ESCAPE) Please see below for part two of this tutorial :-) Regards, AngelDaniel. |
| ||
| Blobby objects are indeed cool! Thanks AngelDaniel, Nicolas. |
| ||
| Nice -- and so little code required! |
| ||
| This is an extension to the above tutorial. In the images above you can see an example of what the blobby object looks like when you flood-fill some of the `bands` of color using a paint program. This was great for quickly showing how the effect is working, but obviously we want to be able to do something similar in BlitzMax in realtime! Although the previous program produced blobby objects, it rendered all the energy intensity levels rather than just a few. Rendering only a few of the levels would produce a `band` or boundary around the objects - similar to how the marching cubes algorithm produces a thin polygon mesh around the metaballs. Since we are working with pixels as our blobby objects, we need a way of changing the pixel colors to turn the image into something more useful. At the moment we are rendering every level of energy intensity all at once, from 0 to 255 (black to gray). We need a way of drawing, or changing the drawing, to show only a certain range of intensities - a threshold or range of thresholds. A threshold is simply some numerical limit that we compare with the color of the pixel to decide whether to draw it or not. We can use two thresholds, also, to draw only within a range of values. This currently isn't so easy with basic Max2D commands. We don't have a fast flood-fill command and using a flood-fill is not usually very efficient anyway. What we want to do is do some more `math` on the pixel values to change them into something useful. We want to take the image that we already have and draw more stuff on top of it that changes the pixel values, filters out pixels of certain colors and leaves more of a single `band` around the objects. We can augment the basic Max2D commands with some extra direct OpenGL calls. These OpenGL commands, in particular glBlendFunc, define the rendering mode being used. BlitzMax's `LIGHTBLEND`, for example, is actually the same as `glBlendFunc GL_SRC_ALPHA,GL_ONE. You need not necessarily understand what this does. To simplify, it is telling OpenGL that all following drawing operations should blend the colors you are drawing with the colors that already exist, in various ways. In the case of LIGHTBLEND, the color of the rectangle being drawn is multiplied by the alpha value of the rectangle (usually 255 or white), and added to the destination color. In the modified sourcecode below I have added several extra operations that use direct OpenGL calls. Using glBlendFunc I set up the drawing modes directly. The OpenGL calls used here are simple enough that they work well alongside standard Max2D routines, so I am still using DrawImage and DrawRect. As it stands, the OpenGL commands used here should not disrupt or interfere with Max2D's efforts to keep track of its own settings. DrawRect is being used to draw a rectangle that covers the entire screen. With a certain blend mode active, drawing such a rectangle changes the values of the pixels accross the screen based on the effect of the `mode` and the color values of the rectangle. glColor4b is almost exactly the same as Max2D's `SetColor`, except it also sets the alpha value of what we're drawing. glEnable(GL_BLEND) and glDisable(GL_BLEND) simply switch on and off the blending operation (like switching between LIGHTBLEND and SOLIDBLEND). The basic steps being performed in this new program are: Draw the images of the energy fields with LIGHTBLEND. This creates our basic blobby object display, based on a curved blob gradient. Add a value ($40) to each of the Red Green Blue and Alpha color components. This actually gets translated into $80 due to the blend mode and basically adds $80 to every pixel value. Since all the pixels brighter than white get turned into white, I am using this side-effect to act as a threshold to filter out all the energy levels higher than half strength - ie the areas inside the blobs. By adding $80 to the pixels, the threshold (the color band around the blobs) is formed where the energy level is at half strength, rather than where it is as full strength (white). Next the screen is covered with 3 (or more) rectangles whose blend mode causes the pixel color values to be amplified. The effect of this is that the remaining gradient in our image is `compressed` from a wide band into a narrow band. This compression forms a more `solid` looking inner edge to the blob areas while still having several levels of gradient outside that area. The remaining image is then inverted (like a `negative` effect) so that the areas that are now bright white, inside the blob, turn into black. It also flips the direction of the gradient so that the edges inside are fairly well defined and the areas outside form a gradual gradient. The final step is to `brighten` the image by adding it to itself a few times, this just enhances the overall appearance and makes it more balanced, otherwise it appears to be dim as a result of the first step we did. By adding $40 ($80) to the values, and then inverting the screen, that acted to dim the color intensities so they need to be brightened. What we're then left with is something looking like this:  If you were to add more `passes` of the saturation step, which amplifies the colors and shrinks the gradient width, you can make this perimeter be even thinner and sharper. Anything beyond about 5 passes is usually a waste. Please note that in this program, although we are setting the blend modes ourselves, we still need `SetBlend LIGHTBLEND` outside of the loop. Max2D has to keep track of the state of certain internal switches, and in this case it has to manage the state of the OpenGL `alpha test`. I don't want to interfere with or confuse Max2D so I am keeping that line in the program to swtich off the alpha test in a Max2D friendly way. If you remove it you get blobs filled with white instead of with black. Otherwise we would have to add extra code to preserve and restore the internal state. One other thing you can try is to generate an energy field image based on squares instead of circles. It gives surprisingly different results than you might expect - which I discovered by accident. Blobs appear to form with concave boundaries rather than convex, as if the blob objects are actually outside the blobs. It also forms blobs of infinite different sizes and curves, where the blobs seem to `bubble up` out of nowhere like bubbles. You will likely need to render several blob objects at once to see the coolness of the effect. And of course, there is animation. You could save the energy field image as a picture and load it into a graphics package. You can manipulate the image with image processing and, if possible, animate that manipulation. The resulting animation sequence then translates directly into a modification of the blob shapes. Cyclic animations are probably best in terms of memory use. You need to modify the image using operations that `move the pixels around` because you want to still have the proper gradient curve being used. You should now have a program that will draw nice bands around blobby objects, which you could use for example in a game or for some other purpose. Enjoy.
'Blobby objects with BlitzMax using Max2D and some direct OpenGL

'Some special numbers
Local ballsize:Int=512
Local ballsizehalf:Int=ballsize/2

'Set up the display
Graphics 800,600,0
Cls

'Work out what the dividers needs to be
Local balldivider:Float
If ballsize=128 Then balldivider=64 '8x8
If ballsize=256 Then balldivider=256 '16x16
If ballsize=512 Then balldivider=1024 '32x32
Local lineardivider:Float
If ballsize=128 Then lineardivider=0.5
If ballsize=256 Then lineardivider=1
If ballsize=512 Then lineardivider=2

'Render the gradient image
For Local r:Float=1 To ballsize-1 Step 0.5
	Local level:Float=r
	level:*level
	level=level/balldivider
	SetColor level,level,level 'For blobby gradient shape
	'SetColor r/lineardivider,r/lineardivider,r/lineardivider 'For linear gradients
	DrawOval r/2,r/2,ballsize-r,ballsize-r
Next

'Turn it into an image
AutoMidHandle True
Local img:TImage=CreateImage(ballsize,ballsize,1,FILTEREDIMAGE)
GrabImage(img,0,0,0)

'Set the blend mode
SetBlend LIGHTBLEND 'Still need this to deal with the alpha test

'Keep drawing the image until you press Escape
Repeat
	Cls
	glEnable(GL_BLEND)
	glBlendFunc(GL_SRC_ALPHA,GL_ONE)
	DrawImage img,400,300
	DrawImage img,MouseX(),MouseY()
	glBlendFunc(GL_SRC_ALPHA,GL_ONE)
	glColor4b($40,$40,$40,$40)
	DrawRect 0,0,800,600
	glBlendFunc(GL_SRC_ALPHA_SATURATE,GL_DST_COLOR)
	glColor4b(0,0,0,$FF)
	Local Counter:Int
	For Counter:Int=1 To 3
		DrawRect 0,0,800,600
	Next
	glBlendFunc(GL_ONE_MINUS_DST_COLOR,GL_ONE_MINUS_DST_COLOR)
	glColor4b($0,$0,$0,$0)
	DrawRect 0,0,800,600
	glBlendFunc(GL_DST_COLOR,GL_DST_COLOR)
	glColor4b($FF,$FF,$FF,$FF)
       SetColor $FF,$FF,$FF
	For Counter:Int=1 To 3
		DrawRect 0,0,800,600
	Next
	glDisable(GL_BLEND)
	Flip
Until KeyHit(KEY_ESCAPE)
Regards, AngelDaniel. |
| ||
| I added these two programs to the code archives. :-) it is in the `Graphics` section under blitzmax code (.bmx). |
| ||
I haven't looked at the second part but I really enjoyed the first part. I played a bit whit the code and this is my result. All 75 blobs have motion, de screenshot was taken in window mode (the "low" frame rate). Thanks again AngelDaniel, Nicolas. |
| ||
| Hey that's awesome! It's rewarding to see people using my program and making something new with it. I like the parts of the image where it looks like there is a sort of `line` in amongst the gradients ... I believe it happens when you have a metaball of one color near enough on top of another metaball of another color. It's cool that you have it in motion, I didn't want to include code that moves objects around as that would only complicate the explaination. Good job! Did you notice how you seem to get entirely separate blobs in the Red, Green and Blue channels? ie, blobs of those colors or including those components in the color, form seperately of the other components? It's pretty interesting and a nice way to color things as opposed to the drab greyscale results. It's kind of like an RGB plasma :-) I'm glad you liked the tutorial, I hope you'll find some good uses for it. |
| ||
| The first code works fine, the second just shows a blank screen, moving the mouse does not result in any change. |
| ||
| Really? Sorry to hear that. It's working fine on both my Mac's here, with and without hardware acceleration. Perhaps if you comment out each of the DrawRect operations and then add them back in one by one you can tell which part might not be working right? Let us know what you find out. You could also try changing each DrawRect to only draw size 400,600, then you should see the first part of it working in one half of the screen to compare. |
| ||
| if I add SetColor(255,255,255) before the last For loop in the main code it works fine. |
| ||
| Oh. That's interesting, especially since glColor4b is right there already setting the color to white. I wonder why the difference? Some problem with the alpha value? Well, glad you at least got it to work for you. :-) |
| ||
| I found that a little confusing myself, unfortunately I can't find the actual code that sets the colour when using SetColor to see what it is doing differently, I got as far as discovering that it is an abstract function of the Max2D Driver. |
| ||
nice job - ooperized and extended: ;PStrict Type Blob Field X,Y,r,g,b Const size=128, sizehalf=64 Global img:TImage Function Init() Local divider:Float If size=128 Then divider=64 '8x8 If size=256 Then divider=256 '16x16 If size=512 Then divider=1024 '32x32 Local lineardivider:Float If size=128 Then lineardivider=0.5 If size=256 Then lineardivider=1 If size=512 Then lineardivider=2 'Render the gradient image For Local r:Float=1 To size-1 Step 0.5 Local level:Float=r level:*level level=level/divider SetColor level,level,level 'For blobby gradient shape DrawOval r/2,r/2,size-r,size-r Next AutoMidHandle True img=CreateImage(size,size,1,FILTEREDIMAGE) GrabImage(img,0,0,0) End Function End Type Type HumpingBlob Extends blob Global List:TList Field vx#,vy# Method New() If List=Null Then List=New TList List.Addlast(Self) End Method Function Update() For Local b:HumpingBlob=EachIn list For Local b2:HumpingBlob=EachIn list If b2<>b And (b2.x<>b.x Or b.x<>b2.x) Then Local dx#=b2.x-b.x, dy#=b2.y-b.y, d1#=Sqr(dx*dx+dy*dy) If d1<64 Then d1=.01*(d1-40)/d1 dx:*d1 dy:*d1 b.vx:+dx b2.vx:-dx b.vy:+dy b2.vy:-dy EndIf EndIf Next b.x:+b.vx b.y:+b.vy If b.x<20 Or b.x>780 Or b.y<20 Or b.y>580 Then b.y=Rand(30,570) b.x=Rand(30,770) b.vx=Rnd(-1,1) b.vy=Rnd(-1,1) EndIf b.vx=b.vx*.99'+Rnd(-.5,.5) b.vy=b.vy*.99'+Rnd(-.5,.5) SetColor b.r,b.g,b.b DrawImage img,b.x,b.y Next End Function End Type Graphics 800,600 blob.init Cls SeedRnd MilliSecs() 'Set the drawing mode SetBlend LIGHTBLEND For Local i=0 To 100 Local g:HumpingBlob=New HumpingBlob g.x=Rand(10,800) g.y=Rand(10,600) g.vx=Rnd(-1,1) g.vy=Rnd(-1,1) g.r=Rand(128,255) g.g=Rand(128,255) g.b=Rand(128,255) Next 'Keep drawing the image until you press Escape Repeat Cls HumpingBlob.update Flip Until KeyHit(KEY_ESCAPE) |
| ||
| Bot Builder that would be a very nice screensaver. Thanks Angel Daniel. |
| ||
| The first code works fine, the second just shows a blank screen, moving the mouse does not result in any change Same for me, Radeon 9600Pro BotBuilder's version does work (looks nice!) |
| ||
| this is amazing. AngelDaniel ! you are elite ! |
| ||
| Hey I get the blank screen on the second piece of code too! :( I'll try the manual 255,255,255, color setting and see if that works! Course, I tried it on my XP, so we'll see on my Mac. |
| ||
| Thanks Angel Daniel! This is pretty dang neato! Thanks Bot Builder for the OOPified version too! |
| ||
| Booticus, did the SetColor modification work for you? Glad you like it. Hey, Bot Builder, that's a groovy effect :-D Good job! I added in the SetColor to the sourcecode above, hopefully it'll work first time for new people trying it. I will have to investigate more why that wouldn't work in the original format. |
| ||
| If somebody would like to try this .... try generating a blob object made of squares rather than ovals. You'll find it makes for some very interesting effects. Contrary to what you'd expect, it makes curves of many different sizes and shapes and kind of `inverts` the blob field to make it seem like the blobs are actually `outside` the blob areas rather than inside. It looks like the blobs bubble up. Also if you add a `twist` image processing operation to the image it makes the bubbles smaller. :-) |
| ||
| I got a black screen on the first version AngelDaniel.. but it works great now, after you added the setcolor... :D btw: running on Ubuntu Linux |
| ||
| Good to hear it, and on linux too. Wowza! If you got a black screen on the first version, I am wondering, is your system kind of slow with OpenGL? It does take a little while to draw all the ovals and turn it into an image. There is a black screen to start off with. ??? |
| ||
| I am wondering if the problem needing that SetColor is that the DrawImage, at the top of the loop, needs the color to be set back to white so that the image is rendered properly. Perahaps a SetColor white, after the clearscreen, would work.? |
| ||
| putting setcolor anywhere above the line it is currently on does nothing. |
| ||
| I wonder if it's to do with a BlitzMax bug ... I remember there was some issue with using `byte` sized information, that might be it. Anyway, no biggue. :-) |
| ||
| this stuff is awsome, how did you get that wonderful rainbow effect ? |
| ||
| DAMMIT I CANT STOP PLAYING WITH YOUR CODE!! FOR TWO DAYS! ;) |
| ||
| lol, same here, it is beautiful ! |
| ||
| It's cool that you're having so much fun with it. It is pretty absorbing, I've already spent a lot of time just staring at the screen. The rainbow effect is very simple. It's the same as the second program, above. The only difference really is that you draw each of the blobs in a different color. Their colors will get amplified and split into separate RGB channels. Just use the standard circular blob image and draw about 25 of them on the screen. The blobs in that example at 512x512 each. With regards to the textured fill inside the blob areas, that is simple pasting down a 256x256 texture that has an alpha channel so that the edges fade out, pasted down in the exact same position centered on each blob object. You should be able to easily reproduce it with the second program's code. When your blob images are grayscale you get a single band forming of shades of gray. When you add color, you get individual bands in each of the color channels, separate red green and blue. These of course overlap and then produce color combinations like a plasma. Nicolas's screenshot is a very similar example, you just add a color to each image you draw, except if he had used the second program instead of the first you'd be seeing a large black hole in the middle of the blob areas instead of white. Lut us see when you get it working! :-) It is a beautiful effect. One version I have has an animated blob image with about 20 frames of a cyclic animation - I drew lightblended lines (of a very dim grey color) over the circular image to produce a star-like effect, and then applied a wave ripple effect in Gimp animated with the ripples spreading out. When see it moving it's actually very soothing and relaxing, kind of like watching the gentle swaying in an aquarium. I think it's because, like in nature, there is big movement (the blobs move around) as well as micro movement (the edges animate and move even if the shape doesn't change). .. sorta reminds me of trees blowing or grass waving. Ahhhhh :-) |
| ||
I finally fixed the problem of not showing any metaballs. This is the code of the screenshot I showed earlier, maybe someone is interested, I don't know.Strict Framework BRL.GLMax2D Import BRL.Basic Import BRL.System '** Constants ************************************************************************************** Const WIDTH:Int = 800 Const HEIGHT:Int = 600 Const DEPTH:Int = 0 Const SIZEONE:Int = 128 Const SIZETWO:Int = 256 Const SIZETHREE:Int = 512 Const MAXIMUMMETABALLS:Int = 75 '** End Constants ********************************************************************************** Graphics WIDTH, HEIGHT, DEPTH AutoMidHandle True '** Types ****************************************************************************************** Type TMetaball Const SPEED:Int = 2 Field x:Float Field y:Float Field dx:Float Field dy:Float Field size:Int Field image:TImage '** newTMetaball:Int(size:Int, divider:Int, red:Int, green:Int, blue:Int) ****************** Function newTMetaball:Int(size:Int, divider:Int, red:Int, green:Int, blue:Int) Local metaball:TMetaball = New TMetaball metaball.initialise(size, divider, red, green, blue) ListAddLast(metaballList, metaball) EndFunction '** End newTMetaball:Int(size:Int, divider:Int, red:Int, green:Int, blue:Int) ************** '** initialise:Int(sizeMetaball:Int, red:Int, divider:Int, green:Int, blue:Int) ************ Method initialise:Int(sizeMetaball:Int, divider:Int, red:Int, green:Int, blue:Int) size = sizeMetaball x = Rnd(size / 2, WIDTH - size / 2) y = Rnd(size / 2, HEIGHT - size / 2) dx = Rnd(-SPEED, SPEED) dy = Rnd(-SPEED, SPEED) image = CreateImage(size, size) Cls Local r:Float For r = 1 To size - 1 Step .5 Local level:Float = r level :* level level :/ divider SetColor level * red, level * green, level * blue DrawOval r / 2, r / 2, size - r, size - r Next Flip GrabImage(image, 0, 0) EndMethod '** End initialise:Int(sizeMetaball:Int, divider:Int, red:Int, green:Int, blue:Int) ******** '** draw:Int() ***************************************************************************** Method draw:Int() SetBlend LIGHTBLEND DrawImage image, x, y SetBlend SOLIDBLEND update() EndMethod '** End draw:Int() ************************************************************************* '** update:Int() *************************************************************************** Method update:Int() x :+ dx y :+ dy If x > WIDTH - size / 2 Or x < size / 2 Then dx = -dx x :+ dx EndIf If y > HEIGHT - size / 2 Or y < size / 2 Then dy = -dy y :+ dy EndIf EndMethod '** End update:Int() *********************************************************************** EndType '** End Types ************************************************************************************** '** Global variables ******************************************************************************* Global FPS:Int Global FPSCounter:Int Global playing:Int = True Global FPSTime:Int = MilliSecs() Global metaballList:TList = New TList '** End Global variables *************************************************************************** newGame() '** Main loop ************************************************************************************** While playing Cls getFPS() draw() getInput() Flip FlushMem Wend '** End Main loop ********************************************************************************** '** newGame:Int() ********************************************************************************** Function newGame:Int() Local counter:Int For counter = 0 To MAXIMUMMETABALLS SeedRnd MilliSecs() Local divider:Int Local size:Int = Rand(1, 3) If size = 1 Then size = SIZEONE divider = 64 ElseIf size = 2 Then size = SIZETWO divider = 256 ElseIf size = 3 Then size = SIZETHREE divider = 1024 EndIf Local red:Int = Rand(0, 1) Local green:Int = Rand(0, 1) Local blue:Int = Rand(0, 1) If red = 0 And green = 0 And blue = 0 Then red = 1 green = 1 blue = 1 EndIf TMetaball.newTMetaball(size, divider, red, green, blue) Next SetColor 255, 255, 255 EndFunction '** End newGame:Int() ****************************************************************************** '** getFPS:Int() *********************************************************************************** Function getFPS:Int() FPSCounter :+ 1 If MilliSecs() > FPSTime + 1000 Then FPS = FPSCounter FPSCounter = 0 FPSTime = MilliSecs() EndIf EndFunction '** End getFPS:Int() ******************************************************************************* '** draw:Int() ************************************************************************************* Function draw:Int() Local metaball:TMetaball = New TMetaball For metaball = EachIn metaballList metaball.draw() Next DrawText "FPS " + FPS, 10, 10 EndFunction '** End draw:Int() ********************************************************************************* '** getInput:Int() ********************************************************************************* Function getInput:Int() If KeyHit(KEY_ESCAPE) Then playing = False EndIf If KeyHit(KEY_P) Then WaitKey EndIf EndFunction '** End getInput:Int() ***************************************************************************** Same here, I've bean experimenting whit the second part of the tutorial and I think I came up whit an interesting idea to implement this effect in a game. Nicolas. |
| ||
| Looks great Nicolas! It works fine here. I am wondering though why you draw each ball in a given color first ... why not just use SetColor to give each one a tint right before you DrawImage? It would have the same effect. You only need to store one metaball image if you are not animating them. You can also use SetScale to draw smaller versions. That would at least use up a lot less videoram. Either way, it looks neat... glad to see I'm not the only one that is constantly doing graphics tests with objects that just bounce off the sides of the screen, too ;-) :-) Good luck with it. |
| ||
| You have a point, I totally forgot you could tint an image. Thanks for the tip. It's indeed just fun to just watch at it, al the blobs that bounce off the sides, it's like some sort of lava lamp. One thing that is giving me a headachy is collision. I can't do pixel perfect collision on the blobs because that's to expensive and pixel imperfect collision gives me strange collision but I'm not going to hive up on this one. Any ideas would be greatly appreciated. Nicolas. |
| ||
| Excellent Tutorial and examples! I've always adored metaballs and Mr Blobby! And this is indeed wonderful stuff :) Well done AngelDaniel and Co.! |
| ||
| Thanks Thumbz! You are most welcome. |
| ||
| Mr Nicolas Sir, I had thought a little about collision detection issues. One big issue is that *reading* the framebuffer is really very slow compared to the terrific speed of drawing to it with textures. Even to do something like read the color of one pixel requires quite a bit of setting up and a glReadPixels call which has to translate the data format and all kinds of stuff before it will even come up with a single value. It's also not particularly efficient to dump the whole framebuffer off to main memory to work on it - it's just too slow and the framerate takes an immediate significant hit even when copying just a small area. Shows you just how much faster the hardware-based stuff is. So what I was planning to do was to somehow do a routine in the CPU with a regular program which `mimics` what is going on on the screen. I was going to, say, select what coordinate I want to test for collisions, then work out which blobby object images/rectangles overlap that pixel, and then manually add the values of the pixels from those images (taken from pixmap I guess) to see if they are above a certain value, and if so then you know the pixel is overlapping a blob boundary, otherwise if it's below the threshold you are in `open space`. I guess I was going to do this at several points around each particular object to try and detect when it was hitting the blob edges. This would be a basic simulation in the CPU, nothing to do with rendering - just sort of using the image data in main memory as a lookup table of sorts, and letting the OpenGL part handle all the drawing. That's one way of going about it. I presume you are trying to collide regular images with the blob shapes, right? Not to collide blobby objects with each other? Or are you? To do that you would probably want just a bounding circle and check with a CPU program to see if they are colliding. You and I both are exploring this as a new area, it hasn't been done much before so this is where you gotta use your imagination to come up with new algorithms. Good luck! Also, yes, using a SetColor before each DrawImage doesn't take any more time than to be adding a simple OpenGL call, because all of the blobs are already being tinted with white by default, it's no extra work for the GPU. |
| ||
| Btw I meant to say thanks more to Bot Builder for the nice OOP code, very elegant. :-) I am still procedurally minded in many ways. ;-) |
| ||
| Well, I have to say its not really oop - its still procedural for speed. I could have thrown in a draw method for each blob, but it was more efficient to just put it in with the humping blob update function XD |
| ||
| i realise it looks like metaballs, but are they infact metaballs ? The 3d implementation is hairy to say the least. This is, well, simple :) |
| ||
| Yes these are metaballs. It's deceptively simple. It looks simpler than in 3D because they are much easier to do in 2D using this technique. And if it looks like they are metaballs, and you can't tell the difference, it IS metaballs! ;-) But don't worry, it really is a metaball since the individual balls do merge into each other just like they should and the curvature shape is correct. But note there are other curves that can be used which produce other variations on the metaballs - some individauls have specified that there are different types depending on the curve - blobby objects, metaballs, soft objects, etc. They all do the same thing - interpret an isosurface and render it at a threshold. You might think this algorithm is simple but maybe you are underestimating how much processing is going on here. It is significant! Just because we're having the GPU do all the work doesn't mean there isn't a lot happening. That's the beauty of the GPU - if you can do something using pixels and color changes, the GPU can process it all with massive parallelism and do it all in hardware. The math is simple but there is a lot of it. Think about it, you first of all have to build a `field` (isosurface) which is the sum total of the combined contributions from all of the energy fields at every pixel. This algorithm doesn't optimize anything (which is why it so simple) to try to cut down on the number of combinations of objects. Instead it is, effectively, adding the contributions from EVERY metaball to EVERY other metaball, for EVERY pixel. You could have 100 metaballs on top of each other and it would be adding together all of the pixels of all of those. That alone is a lot of additions! Also I have simply taken the fact that the energy field is usually a fixed `shape` and translated that to mean that it can be precalculated and stored as an image. Usually this can't be precalculated for 3D because of the fact that the Z positioning changes the size of things. If it weren't precalculated you would have to draw, say, 128 ovals (for a 256x256 ball) for every metaball every frame, which is obviously a lot more work. Once the isosurface is generated, ie there is an array of data holding the summed totals of every metaball's contribution to the overall field (stored as image data just so that the GPU can work on it), you then have these additional rendering passes which do more `math`. Not to be underestimated, an 800x600 screen has 480,000 pixels, which for one pass of one fullscreen rectangle drawn is 480,000 calculations. So for example the first pass that adds $40 to each of the R G and B components, is about 1.44 million `add` operations. You have 3 passes to saturate, 3 passes to increase brightness, a pass to inverse as well ... looking at about 12 million extra calculations on the pixel values. Overall, that second program up there is getting towards 15 million calculations PER FRAME and probably internally at a low level it's many times that amount. So there is no shortage of activity going on here. Just because all you see are these really `simple` DrawOval, DrawImage, SetColor etc commands doesn't mean it isn't a very computationally intensive operation. Not to mention that for each metaball you add you add another bunch of pixel calculations since all of them (in lightblend) have to be added to the existing pixel values. For an example I have routines at 1024x768 resolution, with 25 512x512-size metaballs objects, and about 8 full-screen render passes. Just because the GPU is doing stuff `with pixels` doesn't mean it isn't doing math, it's all additions and multiplications and subtractions. That example would need throughput of about 40,000,000 (40 million!) calculations every frame, which at 30fps is just over 1.1 billion calculations per second on the individual color components. That's close to where my graphics card maxes out. So it's not exactly short on work involved, it just happens to be very simplified work done lots of times. There are two small differences between this effect and 3D metabals: 1) This is in 2D not 3D so we can forget about using polygons or other complicated techniques. 2) The above programs render every level of energy intensity rather than just those at a given threshold and then does post-processing to try to make use of that data rather than trying to just render at one intensity level only, which is what happens in 3D to generate a hollow mesh. See, what I first actually did was create a routine using a CPU algorithm that rendered the metaballs and then rendered the brighter half of the energy intensities as just one solid color - either you're inside the ball or you're not. But that isn't very useful for a game. It looks flat and is boring, and also somewhat slower. So then I changed it to do remapping of colors in realtime, using the CPU, where specific energy intensities were rendered as specific colors - had myself a little dynamic rainbow dancing around. But again that wasn't fast enough for gaming purposes - only a few frames per second (but looked cool). So then I migrated everything to the be hardware accelerated with OpenGL, and it took a lot of searching and experimenting to find the `loopholes` (features) in OpenGL that would let me get this working. So now it is hardware accelerated, then from there I added the extra passes to massage the image into something more akin to how the original program looked. 3D metaballs ARE complicated to generate. For one thing, because it's 3D you have to consider that the object could move closer to the camera and in that case you would be needing to see a lot more resolution and detail in order for the metaballs to remain smooth. Otherwise as you get close you will be looking a polygon mesh. So doing 3D metaballs with an `infinite` amount of detail is almost impossible except perhaps using splines or raytracing. There are some algorithms that create custom spline surfaces which remain smooth when zoomed, but at a significant speed penalty. I think it's called `marching splines`. Second, to generate an object in three dimensions you currently have to use polygons. If you have two balls near to each other and you want to wrap a mesh over their mutual surface like shrink-wrapping them, you have to bring the threshold concept into play. That is, you generate polygons that are perpendicular to the surface and only where the energy intensity level is a set specific amount, say half strength. That creates a hollow polygon mesh object which can then of course be rendered with 3D hardware. Usually you have to do that on a large-scale level first, then break that down into smaller cubes or whatever to refine the details, and apply smoothing algorithms. Actually 3D metaballs that you see are probably usually less accurate than what you see here in 2D. In this 2D program there is no loss of resolution because we don't have to zoom in and we can model every single visible pixel independently. If we were to only draw the pixels that are at, say, mid-grey, you would see a simple thin outline bending around the objects. This would be the exact equivalent of what you'd see if you took a 2D cross-section of any part of a 3D metaball system. It's a slice of three-dimensionality, and it is pixel-perfect. Actually it would be a little more accurate if it was all worked out using floating point numbers for each pixel's value, which is what OpenGL does internally, but this is scaled to an 8-bit integer range so there is a slight `noise` present. However, that noise is only a variation between one pixel brightness and the exactly adjacent brightness, ie 1 color value off, so is pretty much not noticeable whatsoever to the human eye, especially when you get into color objects. The only difference with the above program I think is that you're not used to seeing all of the energy levels rendered at once, to create a gradient. That's why I have posted the second program which takes a step towards presenting you with something that looks a bit more like how a 3D mesh metaball would look if you took a cross-section. You can increase the number of `src_alpha_saturate` passes from 3 to like 5 or 6 and you will end up with a very thin band of color, if that's what you're looking for. I find the gradient of many levels more useful to manipulate into something appealing. Seeing a thing band isn't particularly exciting unless you wanted to use it as some kind of lassoo tool or something. So yes this is simple, because this is all you need to do to generate metaballs in 2D. If you tried to use this algorithm in 3D, you could maybe have it generate a 3D texture with multiple cross-sections that are then rendered, but that would be a lot less efficient even than the polygon algorithms. Simple means it is efficient and clever ;-) |
| ||
| awsome :) you rock dude, seriously, hope we see somem ore awsome tuts from you ! |
| ||
| (summing up angel's massive post ;)) Yeah, with 3d metaballs you'd have to approximate the "3d energy field" with polygons. Really a hard task once you start thinking about how you would go about it. This is why the 2d is so simple. What is rendered is the energy field itself. |
| ||
| Thanks for abbreviating my soul, man! lol just kidding. I just want to expand a bit on what an isosurface is. We do indeed simply render the energy field, first and foremost. How this enery field is then thought of as a `surface`, is to say that if you select a certain energy strength as the location of an `edge`, you are extracting a `surface` (or mesh, or band of color) from the whole energy field. I guess isosurface could otherwise be called a metasurface. |
| ||
I got some basic collision working today. Also I realised that I need a faster computer :D. Nicolas. |
| ||
| Gee, looking good Nicolas. Yes these blobs still do take quite some computing power to render, especially with doing extra passes. You might be able to find a different way to `massage` the basic blob field image to get the results you want in a faster way. It's nice to see someone got it working okay with the banded blobs. I think your GeForce 2 and 700Mhz G4 isn't too bad for speed, though. I use a GeForce 4 with a 1GHz G4. It is definitely horrendously slow on my Ibook - erm, 3 frames a minute? lol You don't necessarily need a faster computer - a faster graphics card would speed this up immediately. The CPU doesn't actually DO much in this routine other than pass the few OpenGL calls. Most of the time is spent rendering texels. I dabbled with other ways of doing it. For example grabbing the backbuffer into a texture and pasting it down using an Alpha Test so that it only draws a small range or specific energy levels - but the grab is too slow. [Edit] ... if you wanted a static blob shape, which could for example represent a `coastline` where the blob bands are `surf` breaking at the shoreline, you could draw the image, grab it into a texture, then use the alpha test on a per-frame basis to raise and lower the threshold at which the image is drawn. This would make the band of color `lap` at the shoreline back and forth. Just one idea. It should be faster than the current technique if you don't want the blob object centers to move. |
| ||
| Whit a faster computer I wanted to say a faster graphics card but I can't easily change it. I rewrote a serious part of my code and I followed your suggestion (tinting the metaball) and yes it uses less VRAM but for some unknown reason it's also a lot slower. Also it works perfect in windowed mode but not in fullscreen. Nicolas. |
| ||
| Hmm! Well, with extra SetColor's there'd be extra OpenGL calls going on but I wouldn't have thought that would be enough to make much impact on the speed. Maybe your graphics card in particular optimizes the rendering when the color is white, so that when the color is something non-white it has to compute more? What doesn't work about it in fullscreen? |
| ||
| Could be, I gave no idea. I'll check it tomorrow. The strange thing is that it works perfect in windowed mode but in the only thing I see in fullscreen are the drawtext commands. Maybe it's something BlitzMax related or maybe it's my graphics card or maybe it's just me :). Anyway thanks for helping me AngleDaniel. Nicolas. |
| ||
| This project looks really cool. :) Could the code be ported to BB, or does it rely on some commands that BB doesn't have? |
| ||
| The first program could be easily converted to most languages and I'm sure the other Blitz's have enough graphics support to be able to draw ovals, turn them into images you can paste to the backbuffer, and draw them in a `lightblend` mode (same as `Add` mode). That would get the first program working. The second program is more complicated using OpenGL calls with specific blending modes, but probably DirectX has similar stuff, I don't know enough about the other Blitz's to say any more than that. |
| ||
| JEEZUS CHRISTA I've never seen anything like that!!!!!!! You guys are geniuses!!!!!! |
| ||
| Well, there you go. :-) Enjoy. |
| ||
| This thread topic has been "in service" for only about a month and a half and there have already been more posts made to this discussion than most threads started a year ago. This is a remarkable feat in and of itself; especially considering the fact that the contributing posts made to this thread thus far have been clear adaptations off of the original post, which is proof of the amazingly positive reaction shown by those who have visited this thread. AngelDaniel (if that IS your real name!), you are a true testament to the overwhelming power of imagination possible with computer programming. I feel that up and coming programmers everywhere should consider themselves in debt to you (metaphorically speaking of course) for your shockingly impressive contribution made here. Further proof of the impression made by your contribution is the fact that others have used and adapted your code instantaneously and with little to no hassle, and spawned their own brilliant creations; all because of your original programmatic contribution. If there was a "Most Valuable Contribution" award for computer programming, you would certainly be among the most eligible, I'd say... Ok, now that I'm done with the proverbial "kissing of the ass" I can conclude my post and finally thank you for this thread and for your esteemed contribution to this community. I apologize if I went overboard with this, but when I thank someone (who I feel truly deserves thanks) I tend to go all out! Take care, - Aaron Misner |
| ||
| AngelDaniel, I think you now have enough devout followers to start up some sort of deranged cult. =] |
| ||
| Heh, well it's certainly been a jolly good experience all round. Thanks so much, Aaron for your kind and appreciative words. I too am very pleased that people were able to take the basic programs and adapt them into new effects. Experimentation is the name of the game! I hope somehow this all has some practical purpose that someone can use in some kind of game or demo or whatever. But even if not, it's been lots of fun! AngelDaniel is the name of my Higher Self, it's not my everyday name. Let the worshipping begin! ;-D |
| ||
| yeah angel, some of your posts make you look totally wierdo, but when one sees this stuff one must admit that your a wierdo... with some serious talent :P |
| ||
| I have been known to be a little wierd, a little unusual, a little different, and a little original. Not all bad :-) Besides, it's the wierd things I talk about that inspire my creations. Without that I would be run of the mill. |
| ||
| Just bumping this tutorial, newcomers to Max in the past 12 months might find it interesting. |
| ||
| this is very cool stuff AngelDaniel. I am sure we'll see some new examples from newcomers |
| ||
| Here's version translated to Russian by Maniak_dobrii: http://blitzetc.boolean.name/articles/blobs.htm |
| ||
| Hey cool. I can't read it, but it looks neat. |
| ||
| This is so cool. I will make a run with this and adopt it for my new game. I will post the results here! |
| ||
| You have some cool original ideas so I'm sure you'll come up with something interesting. I'm planning to eventually make a game based on this stuff too but I've got quiet a lot of work to do on my engine first. |
| ||
| First result is up on my blog right now. I will add animated blob shapes to the system really soon... Excellent stuff this :) |
| ||
| Hey I read your blog Wiebo, nice shield plasma effects going on there, and thanks for the mention. I do like to think that I pioneered this technique of doing 2d blobby objects so I'm glad to see it's spreading around and finding some use. I presume you are using Max2D for this? |
| ||
| Yeah, I am using Max. I've been beautifying the effect yesterday and it looks a lot sharper now. I'm extending the smooth gradients into my 2d artwork (why limit yourself to blobs? :] )so everything blends together more smoothly. It really is looking nice already. I'll post more in the coming days. |
| ||
| This is great stuff man! The first example works perfectly though, very clever simple trick. Just want to point out, your second example needs SetGraphicsDriver GLMax2DDriver() right before Graphics in order to work. Things have probably changed in BlitzMax since you wrote that code. |
| ||
| Its not really a "tutorial" but an example what else is possible using blobby objects (and, in this case: render2texture as also available for BlitzMax): (Blobby bacteria rendered in realtime and looking quite organic)  I haven't used the exact mathematic operations but they'll give you an idea of the specific OpenGL BlendFunc. If anyone wants to reconstruct this, I can send him the source as little help. It looks a little more organic if in animation / movement. I'd like to play a game with this as main character. |
| ||
| Its not really a "tutorial" Then why are you posting it in the Tutorials section? (or for that matter, this thread).Isn't 'ZweiDe' C# only anyways? no relevance to BlitzMax whatsoever. |
| ||
| Well, I'm posting it here because it is directly related to the blobby objects technique described above and I also wrote that the same affect is possible to achieve with BlitzMax. It gives you an idea of what more "practical" use blobby objects have e.g. rendering organic materials / shapes. I could have also posted this in the graphics showcase as I'm showing a graphic technique here but I thought, it belonged here. You see, it's basically blobby objects / metaballs again. |
| ||
| hmmm...."render2texture" Do you have stable versions of this for both DriectX and OpenGL? If so, could you upload them? Thanks! |
| ||
| No, but I think, they're available somewhere here in the forums. :) |
| ||
| Interesting use of the blobby objects idea, and nice to see your process step by step for how you construct the final image. Quote a number of steps, but it looks good and I'm sure it moves interestingly. |
| ||
| Sorry to dig this up after so long but it's still useful. Here's an adaptation that uses a FBO and gets away with just two render passes, one to draw the individual blobs to a texture and the other to render that texture to the screen. It does combine Max2D & OpenGL but appears to work ok (for now). |
| ||
| Pretty neat, and fast too :-) I had no idea you posted this a month ago, I missed it. I am just playing with the blobs again myself, that's how I happened to bump into this. |
   |