In the mood for Mode 7?
BlitzMax Forums/BlitzMax Programming/In the mood for Mode 7?
| ||
| I was looking around the web for sources related to that old Nintendo graphic kind of things. I noticed some ideas here on this forum about "mode 7" and the solution was to put pixels on the screen with some math, one by one. So I was thinking.. would it not be possible to do this better using textured quads instead? Quads is what Im working with anyways so that would be perfect. _screenshot.png) 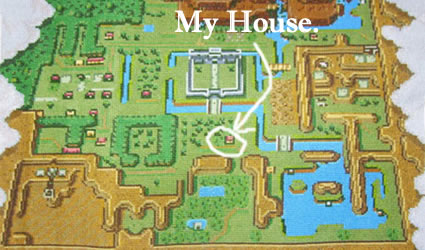 Simple quads? Maybe some kind of line-per-line technique? Using scale and rotation or just directly warping the 4 points? Stitching several quads together maybe? I have so many ideas right now but not very much time to try things out. I´m wondering how your take on the problem would be? |
| ||
| If i had access to some 3D api, quads definitely ;) Doing it in software is of course more fun. I have done this in software before, many years ago. But cant for the life of me remember how anymore hehe. I did find an old thread though, that has some code you can look at: http://www.blitzbasic.com/Community/posts.php?topic=81569 |
| ||
| Wikipedia's take on it seems fairly clear: https://en.wikipedia.org/wiki/Super_Nintendo_Entertainment_System_technical_specifications#Video https://en.wikipedia.org/wiki/Mode_7 You just apply one affine transformation to the coordinates. Do this line-by-line, changing the scale with each line, and you can create fake perspective. You could use quads instead. Sounds like it would be missing the fun though. With quads, there is no "technique", you can just use real perspective. |
| ||
| @Yasha Thanks. I'm no skipping the pixel version oh no, I´m interested in both. This was just an idea I wanted to explore. I guess I was told that affine transfoimation would be not Ortho but GLUsomething I have to check that again, it was a different perspective in OpenGL. @Grable You want a Quad? It just takes about 13 instructions to draw a quad and 2 additional ones to load and init them so that's no problem. You just need to add some technique to handling the style of warping and projection etc aswell. Right now I´m using simple vertex and no arrays, as It's just a Quad but I will change that.
' Init Graphics ------------------------------------------------------------------------------------
Global xres:Int = DesktopWidth() ; yres:Int = 1080 ; SetGraphicsDriver GLMax2DDriver(),0 ' Add the 0 when you want to use frontbuffer directly instead of backbuffer
' It Seem To give about 30% additional performance without tearing And making the difference from 30 fps And 60 fps at
' times especially in windowed mode where opengl is weaker than, fullscreen are given a boost aswell.
xres=800 ; yres = 600 ; Graphics xres,yres,0,60,GRAPHICS_BACKBUFFER + GRAPHICS_DEPTHBUFFER ; glewinit ; AutoImageFlags MASKEDIMAGE

' Load Images --------------------------------------------------------------------------------------
exampleimage:TImage = LoadImage(LoadBank("http::icons.iconarchive.com/icons/google/chrome/64/Google-Chrome-icon.png")) ; If Not exampleimage Then RuntimeError "Unable to download file" ; End

Cls
DrawImage exampleimage,0,0
DrawQuad exampleimage,32,32,350,64,512,380,32,318
glflush ; Flip ; WaitKey
End

Function DrawQuad(tex:TImage,x0:Float,y0:Float,x1:Float,y1:Float,x2:Float,y2:Float,x3:Float,y3:Float)
id = TGLImageFrame(tex.frame(0)).name ; glEnable GL_TEXTURE_2D ; glBindTexture GL_TEXTURE_2D,id
glBegin GL_QUADS
glTexCoord2f 0.0,0.0 ; glVertex2f x0,y0
glTexCoord2f 1.0,0.0 ; glVertex2f x1,y1
glTexCoord2f 1.0,1.0 ; glVertex2f x2,y2
glTexCoord2f 0.0,1.0 ; glVertex2f x3,y3
glEnd
glDisable GL_TEXTURE_2D
End Function
|
| ||
| That's a lovely QUAD you have there, Casaber. I asked about this earlier for myself. Unfortunately it is warping incorrectly despite the code looking correct. |
| ||
| That one is not working on Imac? Why do i get a gray window? Heres's one that paints to canvas using opengl by the way. It might come handy.
Import maxgui.drivers
Global xres:Int = DesktopWidth() ; yres:Int = 1080 ; xres=800 ; yres = 600
AutoImageFlags MASKEDIMAGE

Global img:TImage = LoadImage(LoadBank("http::icons.iconarchive.com/icons/google/chrome/64/Google-Chrome-icon.png"))

Global MyWindow:TGadget=CreateWindow("OpenGL in MaxGUI Canvas Gadget",400,400,640,480,Null,WINDOW_TITLEBAR | WINDOW_CLIENTCOORDS | WINDOW_RESIZABLE | WINDOW_STATUS)
Global c:TGadget=CreateCanvas(0,0,GadgetWidth(MyWindow)-200,GadgetHeight(MyWindow),MyWindow)
Local GraphicContext:TGraphics=CanvasGraphics(c) ; SetGraphics GraphicContext

SetGraphicsDriver GLMax2DDriver(),0 ; glewinit ; glMatrixMode GL_PROJECTION ; glLoadIdentity ; gluOrtho2D 0,GadgetWidth(c),GadgetHeight(c),0
glMatrixMode GL_MODELVIEW ; glLoadIdentity ; glClearColor 0,0,0,1

Global x:Int=0 ; Global y:Int=0 , Vertices:Float[] = [-20.0,-20.0,0.0,-20.0,20.0,0.0,20.0,20.0,0.0,20.0,-20.0,0.0]
global Colors:Float[] = [1.0,0.0,0.0,0.0,1.0,0.0,0.0,0.0,1.0,0.0,0.0,1.0]
ActivateGadget(c) ; AddHook EmitEventHook,HookManager

Repeat
	WaitEvent
Forever
End

Function HookManager:Object(id:Int,data:Object,context:Object)
Local event:TEvent = TEvent(data) ; If event = Null Then Return Null
Select event.source
	Case c
		Select event.id
			Case EVENT_MOUSEENTER ; HideMouse
			Case EVENT_MOUSELEAVE ; ShowMouse
			Case EVENT_MOUSEMOVE ;	x=event.x ; y=event.y ; RedrawGadget c
			Case EVENT_GADGETPAINT ; drawcanvas
		End Select
	Case MyWindow
		Select event.id
			Case EVENT_WINDOWCLOSE ; End
			Case EVENT_WINDOWSIZE ; SetGadgetShape c,0,0,event.x-200,event.y
		End Select
End Select
End Function

Function drawcanvas()
	SetGraphics CanvasGraphics (c) ; glLoadIdentity ; glClear GL_COLOR_BUFFER_BIT ; glTranslatef x,y,0 ; glEnableClientState GL_VERTEX_ARRAY
        glEnableClientState GL_COLOR_ARRAY ; glColorPointer 3,GL_FLOAT,0,Colors ; glVertexPointer 3,GL_FLOAT,0,Vertices
	glDrawArrays GL_QUADS,0,4 ; glDisableClientState GL_VERTEX_ARRAY ; glDisableClientState GL_COLOR_ARRAY

       DrawImage img,0,0 ; DrawQuad img,32,32,350,64,512,380,32,318
        glflush ; Flip
End Function

Function DrawQuad(tex:TImage,x0:Float,y0:Float,x1:Float,y1:Float,x2:Float,y2:Float,x3:Float,y3:Float)
	id = TGLImageFrame(tex.frame(0)).name ; glEnable GL_TEXTURE_2D ; glBindTexture GL_TEXTURE_2D,id ; glBegin GL_QUADS
	glTexCoord2f 0.0,0.0 ; glVertex2f x0,y0 ; glTexCoord2f 1.0,0.0 ; glVertex2f x1,y1
	glTexCoord2f 1.0,1.0 ; glVertex2f x2,y2 ; glTexCoord2f 0.0,1.0 ; glVertex2f x3,y3 ; glEnd ; glDisable GL_TEXTURE_2D
End Function
|
| ||
| GUI is all new territory for me I wanted to try it out and see if it worked the same. It seems so? I really hope it does because that would make for some interesting apps with user interfaces in the future. |
| ||
| Casaber, I can't get this last program to run because it exceeds my resolution and you have hardwired this resolution all across the code. Could you please use window size 800x600 or smaller to test. Thanks ! |
| ||
| I have 800 600 hardwired (overridden) in this one? What happens? I get a 800x600 window and no screen whatsoever shoulod pop up. just a 800x600 window. That would fit your 800x600 screen no? |
| ||
Here, I'll send photo. You can see it's attempting to draw off the edge of the screen. ... Found problem. I was running in DEBUG mode. Disabling debug and it runs. Does it just draw the Google circle ? That is all I'm receiving here. If it's all the same with you, let's work on the QUADS and find out how to get a proper 3D stretch effect, Mode 7, as you said. |
| ||
| Odd that it gives debug error, something slipped by me for sure. By the way, this is how it should look like;  |
| ||
It does in your first code, Casaber. But how to make a trapezoid for a good 3D effect ? That's the ticket. Gotta run, BBL. |
| ||
| Thinking alloud now.. I guess you could change the ortho perspective temporarily and use "X-plane" and "Q coordinates" which uses extra coordinates that's not actually used and just thrown away. That's all 3d mumbo jumbo to me right now. But I have no problem to dive into that if I feel that's the ticket. I guess that's the GLUperspective way. But it does not seem to be a perfect solution it only looks very similiar it. There's probably a way to make it correct, or it might simply be "good enough". It seem to be a common solution. Then you could use shader.. http://glslsandbox.com/e#26532. ..or you could use a tehcnique which uses affine and do it line by line. This is the one I´m leaning towards. Think ripping apart an image and stretch each line or chunk of an image into a new image (which then becomes the map from an birds point of view, or a parallal looking floor) |
| ||
| I'm back, nice Sunday. trying your link. That's some amazingly small code. Not sure how that would get converted. But no, not a checkerboard. Just tilting a single image - that to start with. |
| ||
| If you do it with shaders, the procedure would be to have shader that processes textures, and throwing them with correct perspective onto quads. But that's not interesting yet. It's just one of many possible shaders later. That's not where I am now. I wanted something more simple but ya, I got back to pixelling for a few secs to try to grasp this. I found a simpler model (the one on the forum is nice, it is complex though) I found something simpler. I have to play with it to unsderstand it as it uses negative coordinates and my heads spins when I think about that. 0,0 is the centre of the screen. The PIXELWRITE line in use, is a 1:1 pixel copy transformation with only offset. (press left mouse button) The commented line is the one I need to get working to get more than offset (projection, scale, rotation) but i cant get it to work just yet. It's supposedly a working algorithm and it is the same as the shader one. By the same author at least. And it is refreshingly simple I like it, I would love to get this working as soon as I can. I thought I'll throw it out here as It's bedtime. It was a good few hours of head scratching I dislike that I didn't any immediete results. These things takes time to learn correctly. You see where I´m in the middle of trying to keep the values inside the box (with ABS and MOD) but it still crashes.. I dont´know..
Graphics 800,600
tile:TPixmap = LoadPixmap(LoadBank("http::epicwallpapers.com/file/154/600x338/16:9/the-world-map-from-legend-of-zelda-links-awakening_8743972.png"))
buffer = CreatePixmap (800,600,PF_RGBA8888)
Local horizon:Float , fov:Float , px:Float , py:Float , pz:Float , scaling:Float, x:Float , y:Float
Local sx:Float , sy:Float , xres:Float , yres:Float = 512 , xoff:Float = 512, yoff:Float , angle:Float

Repeat
Cls
'For y = -yres/2 To y < yres/2 ; For x = -xres/2 To x < xres/2
For y = -256 To 256 ; For x = -256 To 256
      horizon = 20 ; fov = 200 ; px = x ; py = fov ; pz = y + horizon ; sx = px / pz ; sy = py / pz ; scaling = 100
      newsx = sx*Cos(angle)-sy*Sin(angle) ; newsy = sx*Sin(angle)+sy*Cos(angle) ' When rotation is wanted aswell

      WritePixel(buffer,256+x ,256+y,ReadPixel(tile,256+((x+xoff) Mod 256),256+y Mod 256))

    ' WritePixel(buffer,256+x, 256+y,ReadPixel(tile,256+   ((Abs(sx*scaling+xoff)) Mod 256) , 256+ ((Abs(sy*scaling+yoff)) Mod 256)  ))

Next ; Next
If MouseDown(1) Then xoff=xoff+1
DrawPixmap buffer,0,0
Flip
Until MouseDown(2)
|
| ||
| I'm getting a crash here on that code, Casaber. Unhandled Exception:Pixmap coordinates out of bounds Here's a tilter I made sometime ago. It's not perfect but it does work. This uses your map image. |
| ||
| Your using setviewport as a clipper to get lines out instead of Drawsubimage I LOVE THAT. Actually Viewport is really cheap nowadays so I might pick up on that for some occasion. My attempt to convert the Bmax code is just a big crash at the moment ya, I know I posted it anyway becuase the algorithm is so damn visible and It might give some inspiration to others while I´m working on it. I like yours. I wonder if that could be used somehow to animate it within that trapezoid doing a fly by or something. I was thinking to convert your scale + setviewport into a DrawsubImagerect, which scales a source rectangle out of an image onto the screen within a ceretain rectangle, scaling it to fit. DrawSubImageRect img, x,y,w,h, x,y,w,h But my brain began to seriosly hurt. You have a gift far superior than anything I´ve never EVER seen in making graphical solutions. Fly by ^^
' David's nifty little Tilter (01-18-16) - needs work
Strict
Global x,y,i
Global img:TImage=LoadImage(LoadBank("http::epicwallpapers.com/file/154/600x338/16:9/the-world-map-from-legend-of-zelda-links-awakening_8743972.png"))
Graphics 1024,768

Repeat
Cls
For i=0 To 383
  SetScale .5+i/1024.0,1
  SetViewport 0,192+i,1024,1
  DrawImage img,(384+x)-i/4.0,(192+y)
Next
x=x+0 ; y=y +1
Flip
Until MouseDown(1)
|
| ||
| Pretty cool fly by, Casaber. But yes, you can see watching the animation that merely tilting the horizontal axis solely does not in any way merit Mode 7. Your using setviewport as a clipper to get lines out instead of Drawsubimage I LOVE THAT. I started messing with SetViewport really about a year ago. Setting it smaller than an image size shows only the portion you reveal. I thought I could do something interesting with that. Now, if REAL math could get involved in the vertical and start to close up the top of it, it just MIGHT become true 3D without the need for quads. You have a gift far superior than anything I´ve never EVER seen in making graphical solutions. Well thank you ! :) That's very kind of you. Sometimes the simplest solutions are the right ones. I'll always be an old-school programmer I'm afraid though. Not really ready for TYPE or OBJECT ORIENTED programming, and yet - I still get manage to squeak by. Slight variation to erase trail: |
| ||
Just got life in the code, still very "buggy" but it seem to work. Well starting to..
Graphics 800,600
tile:TPixmap = LoadPixmap(LoadBank("http::epicwallpapers.com/file/154/600x338/16:9/the-world-map-from-legend-of-zelda-links-awakening_8743972.png"))
buffer = CreatePixmap (800,600,PF_RGBA8888)
Local horizon:Float , fov:Float , px:Float , py:Float , pz:Float , scaling:Float, x:Float , y:Float
Local sx:Float , sy:Float , xres:Float , yres:Float = 512 , xoff:Float = 512, yoff:Float , angle:Float

Repeat
Cls
'For y = -yres/2 To y < yres/2 ; For x = -xres/2 To x < xres/2
For y = -256 To 256 ; For x = -256 To 256
      horizon = 20 ; fov = 200 ; px = x ; py = fov ; pz = y + horizon ; sx = px / pz ; sy = py / pz ; scaling = 100
      newsx = sx*Cos(angle)-sy*Sin(angle) ; newsy = sx*Sin(angle)+sy*Cos(angle)

   '  WritePixel(buffer,256+x ,256+y,ReadPixel(tile,256+((x+xoff) Mod 256),256+y Mod 256))

     WritePixel(buffer,256+x, 256+y,ReadPixel(tile,0+   ((Abs(newsx*scaling+xoff)) Mod 256) , 0+ ((Abs(newsy*scaling+yoff)) Mod 256)  ))

Next ; Next
angle = angle +1
If MouseDown(1) Then xoff=xoff+1
DrawPixmap buffer,0,0
Flip
Until MouseDown(2)
EDIT did some work with the Quad now, it uses fixed coordinates right now, but it might be correct perspective I will try get time later this week to open the Openg book and read up on texture correction and related guff.
' Init Graphics ------------------------------------------------------------------------------------
Global xres:Int = DesktopWidth() ; yres:Int = 1080 ; SetGraphicsDriver GLMax2DDriver(),0 ' Add the 0 when you want to use frontbuffer directly instead of backbuffer
' It Seem To give about 30% additional performance without tearing And making the difference from 30 fps And 60 fps at
' times especially in windowed mode where opengl is weaker than,fullscreen are given a boost aswell.
xres=800 ; yres = 600 ; Graphics xres,yres,0,60,GRAPHICS_BACKBUFFER + GRAPHICS_DEPTHBUFFER ; glewinit ; AutoImageFlags MASKEDIMAGE

' Load Images --------------------------------------------------------------------------------------
exampleimage:TImage = LoadImage(LoadBank("http::icons.iconarchive.com/icons/google/chrome/64/Google-Chrome-icon.png")) ; If Not exampleimage Then RuntimeError "Unable to download file" ; End

Cls
DrawImage exampleimage,0,0
DrawQuad exampleimage,32,32,350,64,512,380,32,318
glflush ; Flip ; WaitKey
End

Function DrawQuad(tex:TImage,x0:Float,y0:Float,x1:Float,y1:Float,x2:Float,y2:Float,x3:Float,y3:Float)
id = TGLImageFrame(tex.frame(0)).name ; glEnable GL_TEXTURE_2D ; glBindTexture GL_TEXTURE_2D,id

glBegin GL_TRIANGLES
glTexCoord4f 0,0,0,600-500 ; glVertex2f 500,200				' Top Left (Triangle 1 starts here)
glTexCoord4f 0,1000-50,0,1000-50 ; glVertex2f 50,700		' Bottom Left
glTexCoord4f 1000-50,1000-50,0,1000-50 ; glVertex2f 1000,700	' Bottom Right
glTexCoord4f 1000-50,1000-50,0,1000-50 ; glVertex2f 1000,700	' Bottom Right (Triangle 2 starts here)
glTexCoord4f 600-500,0,0,600-500 ; glVertex2f 600,200		' Top Right
glTexCoord4f 0,0,0,600-500 ; glVertex2f 500,200				' Top Left
glEnd

Rem Old
glBegin GL_QUADS
glTexCoord2f 0.0,0.0 ; glVertex2f x0,y0
glTexCoord2f 1.0,0.0 ; glVertex2f x1,y1
glTexCoord2f 1.0,1.0 ; glVertex2f x2,y2
glTexCoord2f 0.0,1.0 ; glVertex2f x3,y3
glEnd
EndRem

glDisable GL_TEXTURE_2D
End Function
' Init Graphics ------------------------------------------------------------------------------------
Global xres:Int = DesktopWidth() ; yres:Int = 1080 ; SetGraphicsDriver GLMax2DDriver(),0 ' Add the 0 when you want to use frontbuffer directly instead of backbuffer
' It Seem To give about 30% additional performance without tearing And making the difference from 30 fps And 60 fps at
' times especially in windowed mode where opengl is weaker than, fullscreen are given a boost aswell.
xres=800 ; yres = 600 ; Graphics xres,yres,0,60,GRAPHICS_BACKBUFFER + GRAPHICS_DEPTHBUFFER ; glewinit ; AutoImageFlags MASKEDIMAGE

' Load Images --------------------------------------------------------------------------------------
exampleimage:TImage = LoadImage(LoadBank("http::icons.iconarchive.com/icons/google/chrome/64/Google-Chrome-icon.png")) ; If Not exampleimage Then RuntimeError "Unable to download file" ; End

Cls
DrawImage exampleimage,0,0
DrawQuad exampleimage,32,32,350,64,512,380,32,318
glflush ; Flip ; WaitKey
End

Function DrawQuad(tex:TImage,x0:Float,y0:Float,x1:Float,y1:Float,x2:Float,y2:Float,x3:Float,y3:Float)
id = TGLImageFrame(tex.frame(0)).name ; glEnable GL_TEXTURE_2D ; glBindTexture GL_TEXTURE_2D,id
glBegin GL_QUADS

' probably this one is the correct one
glTexCoord3f 0,0,0 ; glVertex3f x0,y0,0
glTexCoord3f 0,1,0 ; glVertex3f x1,y1,0
glTexCoord3f 1,1,0 ; glVertex3f x2,y2,0
glTexCoord3f 1,0,0 ; glVertex3f x3,y3,0

' glTexCoord3f 0,0,0 ; glVertex3f x0,y0,0
' glTexCoord3f 0,1,0 ; glVertex3f x1,y1,0
' glTexCoord3f 1,1,0 ; glVertex3f x2,y2,0
' glTexCoord3f 0,1,0 ; glVertex3f x3,y3,0

glEnd
glDisable GL_TEXTURE_2D
End Function
|
| ||
| No it´s still very much like a folding paper. They behave like 2 triangles. I will declare this to be a problem of its own. I didn't anticipate warping to be a problem. I´ve done this 25+ years ago but I can´t remember one thing of it. |
| ||
| I might do the Shader just to get an easy way out of it, but I really hate to leave this problem behind. I want to solve this. |
| ||
' Init Graphics ------------------------------------------------------------------------------------
Global xres:Int = DesktopWidth() ; yres:Int = 1080 ; SetGraphicsDriver GLMax2DDriver(),0 ' Add the 0 when you want to use frontbuffer directly instead of backbuffer
' It Seem To give about 30% additional performance without tearing And making the difference from 30 fps And 60 fps at
' times especially in windowed mode where opengl is weaker than, fullscreen are given a boost aswell.
xres=800 ; yres = 600 ; Graphics xres,yres,0,60,GRAPHICS_BACKBUFFER + GRAPHICS_DEPTHBUFFER ; glewinit ; AutoImageFlags MASKEDIMAGE

Global trap_wide:Float = 600 ; Global trap_narrow:Float = 300 ; Global Midd:Float = 320

' Load Images --------------------------------------------------------------------------------------
exampleimage:TImage = LoadImage(LoadBank("http::icons.iconarchive.com/icons/google/chrome/64/Google-Chrome-icon.png")) ; If Not exampleimage Then RuntimeError "Unable to download file" ; End
Local qx0:Float = 0.0,qy0:Float = 64.0 , qx1:Float =100.0,qy1:Float = 100.0 , qx2:Float = 640.0,qy2:Float = 512.0 , qx3:Float = 0.0,qy3:Float = 320.0

Repeat
Cls
' DrawImage exampleimage,0,0
DrawQuad exampleimage,qx0,qy0,qx1,qy1,qx2,qy2,qx3,qy3

trap_wide = MouseX()
glflush ; Flip
Until MouseDown(1)

Function DrawQuad(tex:TImage,x0:Float,y0:Float,x1:Float,y1:Float,x2:Float,y2:Float,x3:Float,y3:Float)
id = TGLImageFrame(tex.frame(0)).name ; glEnable GL_TEXTURE_2D ; glBindTexture GL_TEXTURE_2D,id
glMatrixMode GL_PROJECTION ; glLoadIdentity ; glOrtho 0,640,0,480,1,1000 ; glMatrixMode GL_MODELVIEW ; glLoadIdentity
glBegin GL_TRIANGLE_STRIP ' ; glColor3f 1,1,-1

' HARDCODED WORKING EXAMPLE THAT MIGHT HELP UNDERSTAND HOW TO DO IT
' COMMENTED LINES ARE 2d COORDINATES
' THE 2 LINES UNDERNETH EACH COMMENT ARE PROJECTIVE COORDINATES THAT NEEDS TO BE SOMEHOW CALCUALTED PROGRAMTICALLY

' Correct trapzoid (but 4 hardcoded coordinates)

' glTexCoord4f 0,0,0,1   < 2d coordinate
glTexCoord4f 0,0,0,trap_wide ; glVertex3f Midd - trap_wide/2,10,-10 ' < magically calculated projection coordinate from that 2d coordinate..

' glTexCoord4f 1,0,0,1
glTexCoord4f trap_narrow,0,0,trap_narrow ; glVertex3f Midd - trap_narrow/2,470,-10

' glTexCoord4f 0,1,0,1
glTexCoord4f 0,trap_wide,0,trap_wide ; glVertex3f Midd + trap_wide/2,10,-10

' glTexCoord4f 1,1,0,1
glTexCoord4f trap_narrow,trap_narrow,0,trap_narrow ; glVertex3f Midd + trap_narrow/2,470,-10

glEnd
glDisable GL_TEXTURE_2D
End Function
|
| ||
| I´m thinking.. this now. As 2 triangles are so inseparatble when warping perspectives. Let's not have two but one for a sprite. And cut the edges instead. This will also demand some serious downtime with openg few weeks from nowl. But I like the idea.  |
| ||
| Or one could skip the idea of quads until all shaders are coming along nicely? Maybe that's a good idea to NOT have quads for awhile. I would really like that. One could have software quads, easy peasy, they are fast enough for Nintendo graphics and then some. And we may have shader quads soon enough, but let's not have these triangular problems. The solutions are ugly and old, soon non-existent, They seem to be shaders underneath the surface anyway so nothing is lost. |
| ||
I wanted to see If I could learn some Monkey while at it, and convert something. Almost there. Very nice.
' Simple Mode 7 (buggy conversion from Monkey)

Local XRes:Float = 640 , YRes:Float = 480 , YLines:Float = 240 , X:Float = 930 , Y:Float = 700 , Height:Float = 32 , r:Float = 90-45 , HFOV:Float = 60 , VFOV:Float = 45
Local vas:Float[Ylines] , vd:Float[Ylines] , VScale:Float[Ylines] , VDelta:Float = VFOV / YLines , va:Float = VDelta , hl:Float
Local camd:Float , camx:Float , camy:Float , cosine:Float , sine:Float , xhit:Float , yhit:Float , xpos:Float , ypos:Float

For a = 0 To YLines-1 ; vas[a] = va ; vd[a] = Height / Tan(vas[a]) ; hl = (vd[a]*Tan(HFOV)) * 2 ; VScale[a] = (1024/hl) * (1024/XRes) ; va = va + VDelta ; Next

SetGraphicsDriver GLMax2DDriver(),0 ; Graphics xres,yres,0,60,GRAPHICS_BACKBUFFER + GRAPHICS_DEPTHBUFFER ; glewinit ; AutoImageFlags MASKEDIMAGE

Local map:TImage = LoadImage(LoadBank("http::epicwallpapers.com/file/154/600x338/16:9/the-world-map-from-legend-of-zelda-links-awakening_8743972.png"))
mapw = ImageWidth(map) ; maph = ImageHeight(map)

Repeat

If MouseDown(1) Then x = x + Cos(r) * 2 ; y = y + -Sin(r) * 2 ; r = r- ((MouseX() - (xres/2.0)) / xres)*2
x = x + (KeyDown(KEY_UP)-KeyDown(KEY_DOWN)) * Cos(r) * 4
y = y + (KeyDown(KEY_UP)-KeyDown(KEY_DOWN)) * -Sin(r) * 4
r = r - (KeyDown(KEY_RIGHT) - KeyDown(KEY_LEFT)) * 2

camd = Tan(22.5) * Height * 5 ; camX = X - (camd * Cos(r)) ; camY = Y - (camd * -Sin(r)) ; camDir = r ; cosine = Cos(camDir) ; sine = -Sin(camDir) ' Cam pos

For a = 8 To YLines-1 Step 1
	XHit = camX + (Cosine*vd[a]) ; yhit = camY + (Sine*vd[a]) ; xpos = XHit Mod mapw ; ypos = YHit Mod maph
	If XHit < 0 Then xpos = 1024-xpos
	If YHit < 0 Then ypos = 1024-ypos

    ' Clip, rotate, scale, translate before drawing
 	  SetViewport 0,yres/2+a,xres,1 ' CLIP
      SetHandle xpos,ypos '(MOVE) ''  SetImageHandle map,xpos,ypos '(MOVE)
    ' Translate xres/2,240+a ' TRANSLATE (another MOVE)
      SetRotation -(camDir-90) ' ROTATE
      SetScale VScale[a],VScale[a] ' SCALE
    ' DrawImage map,xres/2,240+a ' TRANSLATE IS INBUILT HERE NOW
	  TileImage map,0,0,0
Next

SetViewport 0,0,xres,yres
Flip
Until MouseDown(2)

' Replacement for the inbuilt TILEIMAGE which otherwise ignores current SCALE and ROTATION settings.
Function TileImage(image:TImage, x:Float=0# ,y:Float=0#, frame:Int=0)
    Local scale_x#, scale_y#
    GetScale(scale_x#, scale_y#)
    Local viewport_x%, viewport_y%, viewport_w%, viewport_h%
    GetViewport(viewport_x, viewport_y, viewport_w, viewport_h)
    Local origin_x#, origin_y#
    GetOrigin(origin_x, origin_y)
    Local handle_X#, handle_y#
    GetHandle(handle_X#, handle_y#)
    Local image_h# = ImageHeight(image)
    Local image_w# = ImageWidth(image)
    Local w#=image_w * Abs(scale_x#)
    Local h#=image_h * Abs(scale_y#)
    Local ox#=viewport_x-w+1
    Local oy#=viewport_y-h+1
    origin_X = origin_X Mod w
    origin_Y = origin_Y Mod h
    Local px#=x+origin_x - handle_x
    Local py#=y+origin_y - handle_y
    Local fx#=px-Floor(px)
    Local fy#=py-Floor(py)
    Local tx#=Floor(px)-ox
    Local ty#=Floor(py)-oy
    If tx>=0 tx=tx Mod w + ox Else tx = w - -tx Mod w + ox
    If ty>=0 ty=ty Mod h + oy Else ty = h - -ty Mod h + oy
    Local vr#= viewport_x + viewport_w, vb# = viewport_y + viewport_h
    SetOrigin 0,0
    Local iy#=ty
    While iy<vb + h
        Local ix#=tx
        While ix<vr + w
            DrawImage(image, ix+fx,iy+fy, frame)
            ix=ix+w
        Wend
        iy=iy+h
    Wend
    SetOrigin origin_x, origin_y
End Function
Original .Monkey |
| ||
| This is how the Nintendo did it in hardware. Changing offset, rotation and scaling per scanline, it also matches nicely what is good practice with modern GPU's. It's the perfect match and, It's simple. Not bugfree yet though, not that simple. |
| ||
| You definitely got something going on there, Casaber. I'll mention this in the hopes it helps. Not trying to promote another programming language. There is however one called B4GL or as some people call it BAGEL. It is geared very heavily for 3D but misses a lot of the good and powerful functions BlitzMAX has (otherwise I would be there instead of here). I'll post one of its demos and source for you. https://www.mediafire.com/?7a1dds7d8rjszup |
| ||
| @dw817 what features do you miss from the other BASIC's you´ve used? is there some certain things that are important? What do you find BMax lacks? About the Mode7 and graphics-wwise me tell you graphics is about covered since few last days. This is just for fun and learning Bmax and Monkey mainly, I thought Mode7 would be fun. It's one of those things I´ve always wanted to do myself from the ground up. I´ve seen numrous implementations. But this one is the best think, It's very close to yours actually as you might noticed. You did it very SNES like. |
| ||
| It's the other way around, Casaber. BlitzMAX has just about everything I need. Almost. There are a few things that are pretty advanced I could do in GFA that I don't think you can do in BlitzMAX. Not easily anyways. No, I was saying that B4GL has some serious limitations that make it unusable for my code. The first of which is the ability to have controls like you can do in MaxGUI. No, you can only make graphic screens. No ability to INCBIN any data, you must use a DLL just to have any audio, and it definitely has no ability to access the Internet or load any files from the Internet either. It truly is a game programming language - and not much more. BlitzMAX on the other hand has been shining through many interesting types of ways to express itself. No, it is with BlitzMAX I will make my home. As for Mode 7, I think the best example you will see of this is Nintendo's shining and epic 3D racer, "F-Zero." https://www.youtube.com/watch?v=BIe4AvKLSa4 |
| ||
| I tried to convert that Mode7 bc it looked good what I saw and it even had that simple Quad that I did at first And yet it was perspectiv correctly, I was half right. 3D is not my area, and this is the perfect entrance now. Just starting touching it abit. I failed to convert everything so it won´t even run, it was close though. I think I know what's missing, the knowledge of matrixes. I should not even try to grasp that just yet. It was interesting to see that old quad there though in all its glory.
Local camera:Float[3*3] , temp:Float[3] , x:Float , y:Float , xaxis:Float , yxais:Float , speed:Float = 0.02
camera = MatrixTranslate 0,5,0

Repeat
    glClear GL_DEPTH_BUFFER_BIT + GL_COLOR_BUFFER_BIT
    glLoadMatrixf RTInvert(camera)

    For x = -10 To 10
        For y = -10 To 10
            glPushMatrix
            glTranslatef x*3,0,y*3
            glBegin GL_QUADS
                glColor3f 1,0,0) ; glVertex2f  1,3
                glColor3f 0,1,0) ; glVertex2f -1,3
                glColor3f 0,0,1) ; glVertex2f -1,0
                glColor3f 1,1,1) ; glVertex2f  1,0
            glEnd
            glPopMatrix
        Next
    Next

    Flip

    While SyncTimer(10)
        camera(3) = camera(3) + -camera(2) * speed
        xaxis = -MouseX() * 30
        yaxis =  MouseY() * 30
        If KeyDown(KEY_LEFT)  Then xaxis =  1
        If KeyDown(KEY_RIGHT) Then xaxis = -1
        If KeyDown(KEY_UP)    Then yaxis = -1
        If KeyDown(KEY_DOWN)  Then yaxis =  1


        camera = camera * MatrixRotateZ (xaxis) * MatrixRotateX (yaxis)
        temp = camera(3)
        camera(3) = vec4 (0,0,0,1)
        camera = MatrixRotateY (camera# (0)(1)) * camera
        camera(3) = temp
        camera = Orthonormalize (camera)

    Wend
Forever
|
| ||
| Ya F-zero is really nice, also Zelda I intenesly remember seeing those for the first time, it was.. just magic. I adds something special to the games. I hope the upcoming bug fix will make a really nice implementation of MODE 7. The next step would to be throw a CRT shader ontop of it. And you got that true retro look. |
| ||
| Ah now you're pushing it, Casaber. What I really like is a filter called 2xSal (Kreed). As it is there are only 2 filters BlitzMAX has for cleaning up graphics, dithered and not. But with an emulator like ZSNES and other game emulators, you have quite a few selections available. 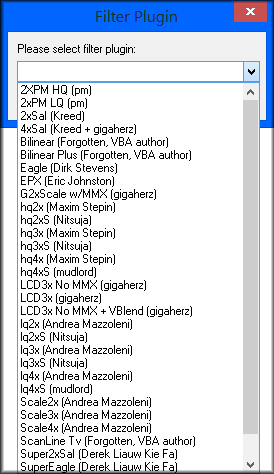 https://en.wikipedia.org/wiki/Image_scaling |
| ||
| I must tell you in before hand, I got the most amazing speed out of those old pixel code, actually you could do probably it all using CPU (at least some of those). And still have time. I got 25 320x240 writes, 25 reads of 320x240 screens so far, with few shaders ontop and offlinebuffers with static pixels, and pushing everything on opengl single (non double buffered) screen . Double buffered works equally well but I seem to push 30% more power when single buffering. Alpha rotation and scale seem to work when you want to throw your offline canvases on the screen (no cost essentially). So you could stretch low resolutions. And you could draw using any image and any primtive and read it back as pixels (all gpu and with alpha rotation blending), do something with the cpu. I only need to setup a few standard shaders now, and add stencil/depth support (I really want that I´m not sure for what yet but it will do much good). But this time I want to give it time to mature and give out something with quality. (I´m often to eager and throw out my code too fast) |
| ||
| For example.. If you use just a single of all your offline buffer as a screen-sized (or bigger) then you have a backbuffer for doublebufferin on your very own, one that you may clear only when you like it. And it won't be a misseehving backbuffer that you hope works on all machines, but a true buffer that does its job on each and every machine quick and easy. About that CRT shader it will actually be a color mask where you could use those older style palettes (I will reuse that mask for a GLOW/BLOOM shader which uses that palette remapper to pick out lighter colors that you would want to glow). So it will actually be CRT/GLOW/Palette shader. Multipurpose :) I forgot !! one of my favorite shaders I'm thinking is something like this (not the bending though, don´t like that so much , but the style otherwise, imagine having a crispness setting and the like you know? ya.. Really nice). It got big, you should view it from about a mile to appriciate it.  But I have big hopes for this, it makes BMax a fun language to use. I really start to enjoy programming again, and I guess that's my little baby haha. It´s a shame it takes abit of time to unwind and get into the mood. I need a few good hours each time to get something sensible done. Anyways hope your weekend treated you good ! :) I'll be signing off |
| ||
| Casaber, I can do that, the old-style CRT look ? Notta problem. Bedtime, c-ya on the morrow. |
| ||
| Rememeber that font you liked? I do that with it already. I do a harsch scanline (black) I really enjoy that. Glow is better than anliasing I think So I rather have it harsch and/or glowing. Wanna see? This is also a good example I think what you can to do without ANY hardware, just pixels all the way by hand. EDIT About the inlined function, it's nothing, just move it if you want to, it won't mind. I was doing something. Also notice it's not optimised or anything (i even left some MOD's in there). Still runs smooth. This is part of my little baby so be good to it ;)
Global buffer:Int[128*128]
Local img2:TPixmap=LoadPixmap(LoadBank("http::s14.postimg.org/xotmro9vh/128x1282.png"))
For y=0 To 127 ; For x=0 To 127 ; buffer(x+y*128) = ReadPixel(img2,x,y) ; Next ; Next

AddHook FlipHook,irq,Null

Global fps:Int , fpstotal:Int , msstart:Float , ms:Float = MilliSecs()
Global map[4096,4096] ; For y=0 To 316 ; For x=0 To 475; map[x,y]=Rnd(127) ; Next ; Next
For temp=0 To 255 ; map[temp,0]=temp ; Next
Global cmap[4096,4096] ; For y=0 To 316 ; For x=0 To 475; cmap[x,y]=Rnd(15) ; Next ; Next
Global wx:Int , wy:Int , cx:Int , c:Int = buffer[0] , cols:Int[16]
RestoreData colors ; For temp=0 To 15 ; ReadData cols[temp] ; Next
writetomap "                                        ",0,0
writetomap "    **** COMMODORE 64 BASIC V2 ****     ",0,1
writetomap "                                        ",0,2
writetomap " 64K RAM SYSTEM  38911 BASIC BYTES FREE ",0,3
writetomap "                                        ",0,4
writetomap "READY.                                  ",0,5
writetomap "                                        ",0,4
Global xres:Int = 1280 , yres:Int = 800 , pixels:Int[xres*yres] , s:Int = 2
GLGraphics xres,yres,0,60,GRAPHICS_BACKBUFFER | GRAPHICS_DEPTHBUFFER ' Fullscreen, change 32 into 0 for windowed.
glViewport 0,0,xres,yres ; glMatrixMode GL_PROJECTION ; glLoadIdentity ; glOrtho 0,xres,yres,0,0,1 ; glPixelZoom 1,-1 ; glRasterPos2i 0,0

Repeat
For y = 0 To yres-1 Step 1 ; For x = 0 To xres-1 Step 1 ; pixels[y*xres+x] = 0 ; Next ; Next

Function readinputs()
wx=wx-s*KeyDown(KEY_LEFT)+s*KeyDown(KEY_RIGHT) ; wy=wy-s*KeyDown(KEY_UP)+s*KeyDown(KEY_DOWN) ; wx=Max(0,Min(10000,wx)) ; wy=Max(0,Min(10000,wy))
mx = MouseX() ; my = MouseY() ; xxx = (wx+mx) Sar 4 ; yyy = (wy+my) Sar 4 ; If MouseDown(1) Then map(xxx,yyy) = 42 ; cmap(xxx,yyy) = 7
End Function

readinputs ; wx=wx-s*KeyDown(KEY_LEFT)+s*KeyDown(KEY_RIGHT) ; wy=wy-s*KeyDown(KEY_UP)+s*KeyDown(KEY_DOWN) ; wx=Max(0,Min(10000,wx)) ; wy=Max(0,Min(10000,wy))
alive ' Animate tiles, colortiles, and atlas
display wx,wy,0,0,1280,800 ' Create buffer
glDrawPixels xres,yres,GL_BGRA,GL_UNSIGNED_BYTE,Pixels ' Render buffer

Delay 1 ; Flip 1

Until KeyHit(KEY_ESCAPE) Or AppTerminate()
End

Function alive()
For temp=1 To 16 ; buffer[Int(Rand(0,15))+Int((Rand(0,15))*128)]=$ffffffff * Int(Rand(0,1)) ; Next
cx=(cx+1) Mod 128 ; For tempy=0 To 15 ; For temp=0 To 15+32 ; buffer[16+temp+((0+tempy)*128)]=buffer[0+temp+cx+(16+tempy)*128] ; Next ; Next ; For temp=1 To 1600 ; cmap[Rnd(400),Rnd(250)]=Rnd(16) ; Next
End Function

Function display(wx,wy,ofx=0,ofy=0,sx=640,sy=400)
scrx = wx & 15 ; scry = wy & 15 ; mapx = wx Shr 4 ; mapy = wy Shr 4
cnty = 0 ; For y = mapy To mapy+(sy Shr 4+1)
cntx = 0 ; For x = mapx To mapx+(sx Shr 4+1)
tilex = map(x,y) & 15 ; tiley = map(x,y) Shr 4
colour = cols(cmap(x,y)) ; xx = cntx - scrx + ofx ; yy=cnty - scry + ofy
For ty = 0 To 7 ; For tx = 0 To 7
If (xx+tx+tx >= ofx) And (yy+ty+ty >= ofy) And (xx+tx+tx < ofx+sx) And (yy+ty+ty < ofy+sy).. ' Mind the steps
 And buffer[tilex Shl 3 + tx + (tiley Shl 3 + ty)*128] <> c Then pixels[xx+tx+tx+(yy+ty+ty)*xres] = colour
Next ; Next
cntx = cntx+16 ; Next
cnty = cnty+16 ; Next
End Function

Function writetomap(t$,x,y)
	For tempx = 0 To Len(t$)-1 ; temp = Asc(Mid$(t$,1+tempx,1)) ; map[tempx+x,y] = temp ; cmap[tempx+x,y] = 14 ; Next
End Function

#colors
DefData $000000,$FFFFFF,$68372B,$70A4B2,$6F3D86,$588D43,$352879,$B8C76F,$6F4F25,$433900,$9A6759,$444444,$6C6C6C,$9AD284,$6C5EB5,$959595

Function irq:Object(id,data:Object,context:Object)
	Return data
End Function
|
| ||
| That is one cool piece of code! It would make a great screensaver. |
| ||
| Wow, that's a crazy looking thing, Casaber. Reminds me of some screens I've seen when the APPLE used to crash when I was working on zealous machine-code. |
| ||
| Thanks Chalky and Dw817. You can scroll and paint in it too. It's a 16 Megabyte world. Perfect for making some platformer or shootem up :) or anything you want. |
| ||
| My thumb hurts from coding today, I think it's time to rest. I´m glad that you enjoyed that piece of code. The Mode 7 though is only halfdebugged, on the good side that means that only turns are wrong now.
' Simple Mode 7 (buggy conversion from Monkey)

Local XRes:Float = 640 , YRes:Float = 480 , YLines:Float = 240 , X:Float = 930 , Y:Float = 700 , Height:Float = 32 , r:Float = 90-45 , HFOV:Float = 60 , VFOV:Float = 45
Local vas:Float[Ylines] , vd:Float[Ylines] , VScale:Float[Ylines] , VDelta:Float = VFOV / YLines , va:Float = VDelta , hl:Float
Local camd:Float , camx:Float , camy:Float , cosine:Float , sine:Float , xhit:Float , yhit:Float , xpos:Float , ypos:Float

For a = 0 To YLines-1 ; vas[a] = va ; vd[a] = Height / Tan(vas[a]) ; hl = (vd[a]*Tan(HFOV)) * 2 ; VScale[a] = (1024/hl) * (1024/XRes) ; va = va + VDelta ; Next

SetGraphicsDriver GLMax2DDriver(),0 ; Graphics xres,yres,0,60,GRAPHICS_BACKBUFFER + GRAPHICS_DEPTHBUFFER ; glewinit ; AutoImageFlags MASKEDIMAGE

Local map:TImage = LoadImage(LoadBank("http::epicwallpapers.com/file/154/600x338/16:9/the-world-map-from-legend-of-zelda-links-awakening_8743972.png"))
mapw = ImageWidth(map) ; maph = ImageHeight(map)

Repeat
If MouseDown(1) Then x = x + Cos(r) * 2 ; y = y + -Sin(r) * 2 ; r = r- ((MouseX() - (xres/2.0)) / xres)*2
x = x + (KeyDown(KEY_UP)-KeyDown(KEY_DOWN)) * Cos(r) * 4
y = y + (KeyDown(KEY_UP)-KeyDown(KEY_DOWN)) * -Sin(r) * 4
r = r - (KeyDown(KEY_RIGHT) - KeyDown(KEY_LEFT)) * 2

camd = Tan(22.5) * Height * 5 ; camX = X - (camd * Cos(r)) ; camY = Y - (camd * -Sin(r)) ; camDir = r ; cosine = Cos(camDir) ; sine = -Sin(camDir) ' Cam pos

For a = 8 To YLines-1 Step 1
	XHit = camX + (Cosine*vd[a]) ; yhit = camY + (Sine*vd[a]) ; xpos = XHit Mod mapw ; ypos = YHit Mod maph
	If XHit < 0 Then xpos = 1024-xpos
	If YHit < 0 Then ypos = 1024-ypos

    ' Clip, rotate, scale, translate before drawing
 	  SetViewport 0,yres/2+a,xres,1
      SetImageHandle map,xpos,ypos
      SetRotation -(camDir-90)
      SetScale VScale[a],VScale[a]
	  TileImage map,xres/2,240+a
Next

SetViewport 0,0,xres,yres
Flip
Until MouseDown(2)

' Replacement for the inbuilt TILEIMAGE which otherwise ignores current SCALE and ROTATION settings.
Function TileImage(image:TImage, x:Float=0# ,y:Float=0#, frame:Int=0)
    Local scale_x#, scale_y#
    GetScale(scale_x#, scale_y#)
    Local viewport_x%, viewport_y%, viewport_w%, viewport_h%
    GetViewport(viewport_x, viewport_y, viewport_w, viewport_h)
    Local origin_x#, origin_y#
    GetOrigin(origin_x, origin_y)
    Local handle_X#, handle_y#
    GetHandle(handle_X#, handle_y#)
    Local image_h# = ImageHeight(image)
    Local image_w# = ImageWidth(image)
    Local w#=image_w * Abs(scale_x#)
    Local h#=image_h * Abs(scale_y#)
    Local ox#=viewport_x-w+1
    Local oy#=viewport_y-h+1
    origin_X = origin_X Mod w
    origin_Y = origin_Y Mod h
    Local px#=x+origin_x - handle_x
    Local py#=y+origin_y - handle_y
    Local fx#=px-Floor(px)
    Local fy#=py-Floor(py)
    Local tx#=Floor(px)-ox
    Local ty#=Floor(py)-oy
    If tx>=0 tx=tx Mod w + ox Else tx = w - -tx Mod w + ox
    If ty>=0 ty=ty Mod h + oy Else ty = h - -ty Mod h + oy
    Local vr#= viewport_x + viewport_w, vb# = viewport_y + viewport_h
    SetOrigin 0,0
    Local iy#=ty
    While iy<vb + h
        Local ix#=tx
        While ix<vr + w
            DrawImage(image, ix+fx,iy+fy, frame)
            ix=ix+w
        Wend
        iy=iy+h
    Wend
    SetOrigin origin_x, origin_y
End Function
|
| ||
| Reminds me of this thread: http://www.blitzbasic.com/Community/posts.php?topic=99346 Some of the images are down. There's a few additional images in the archived page: http://web.archive.org/web/20130728075410/http://blitzbasic.com/Community/posts.php?topic=99346 But the images in the first post of that thread are definitely gone. |
| ||
| @Kryzon that one looked really nice, hills and valleys where bloody sexy. Back over inflatland I had a last second debug moment here before leaving, I tried away with the - in rotation and BAM, working. Who'd guess. It needs some polishing and understanding now. But I feel really good about this.
' Simple Mode 7 (Conversion from Monkey)

Local XRes:Float = 640 , YRes:Float = 480 , YLines:Float = 240 , X:Float = 930 , Y:Float = 700 , Height:Float = 32 , r:Float = 90-45 , HFOV:Float = 60 , VFOV:Float = 45
Local vas:Float[Ylines] , vd:Float[Ylines] , VScale:Float[Ylines] , VDelta:Float = VFOV / YLines , va:Float = VDelta , hl:Float
Local camd:Float , camx:Float , camy:Float , cosine:Float , sine:Float , xhit:Float , yhit:Float , xpos:Float , ypos:Float

For a = 0 To YLines-1 ; vas[a] = va ; vd[a] = Height / Tan(vas[a]) ; hl = (vd[a]*Tan(HFOV)) * 2 ; VScale[a] = (1024/hl) * (1024/XRes) ; va = va + VDelta ; Next

SetGraphicsDriver GLMax2DDriver(),0 ; Graphics xres,yres,0,60,GRAPHICS_BACKBUFFER + GRAPHICS_DEPTHBUFFER ; glewinit ; AutoImageFlags MASKEDIMAGE

Local map:TImage = LoadImage(LoadBank("http::epicwallpapers.com/file/154/600x338/16:9/the-world-map-from-legend-of-zelda-links-awakening_8743972.png"))
mapw = ImageWidth(map) ; maph = ImageHeight(map)

Repeat
Cls
If MouseDown(1) Then x = x + Cos(r) * 2 ; y = y + -Sin(r) * 2 ; r = r- ((MouseX() - (xres/2.0)) / xres)*2
x = x + (KeyDown(KEY_UP)-KeyDown(KEY_DOWN)) * Cos(r) * 4
y = y + (KeyDown(KEY_UP)-KeyDown(KEY_DOWN)) * -Sin(r) * 4
r = r - (KeyDown(KEY_RIGHT) - KeyDown(KEY_LEFT)) * 2

camd = Tan(22.5) * Height * 5 ; camX = X - (camd * Cos(r)) ; camY = Y - (camd * -Sin(r)) ; camDir = r ; cosine = Cos(camDir) ; sine = -Sin(camDir) ' Cam pos

For a = 8 To YLines-1 Step 1
	XHit = camX + (Cosine*vd[a]) ; yhit = camY + (Sine*vd[a]) ; xpos = XHit Mod mapw ; ypos = YHit Mod maph
	If XHit < 0 Then xpos = 1024-xpos
	If YHit < 0 Then ypos = 1024-ypos

     ' Clip, rotate, scale, translate before drawing.
      SetViewport 0,yres/2+a,xres,1
      SetImageHandle map,xpos,ypos
      SetRotation (camDir-90)
      SetScale VScale[a],VScale[a]
      DrawImage map,xres/2,240+a
      'TileImage map,xres/2,240+a
Next

SetViewport 0,0,xres,yres
Flip
Until MouseDown(2)

' Replacement for the inbuilt TILEIMAGE which otherwise ignores current SCALE and ROTATION settings.
Function TileImage(image:TImage, x:Float=0# ,y:Float=0#, frame:Int=0)
    Local scale_x#, scale_y#
    GetScale(scale_x#, scale_y#)
    Local viewport_x%, viewport_y%, viewport_w%, viewport_h%
    GetViewport(viewport_x, viewport_y, viewport_w, viewport_h)
    Local origin_x#, origin_y#
    GetOrigin(origin_x, origin_y)
    Local handle_X#, handle_y#
    GetHandle(handle_X#, handle_y#)
    Local image_h# = ImageHeight(image)
    Local image_w# = ImageWidth(image)
    Local w#=image_w * Abs(scale_x#)
    Local h#=image_h * Abs(scale_y#)
    Local ox#=viewport_x-w+1
    Local oy#=viewport_y-h+1
    origin_X = origin_X Mod w
    origin_Y = origin_Y Mod h
    Local px#=x+origin_x - handle_x
    Local py#=y+origin_y - handle_y
    Local fx#=px-Floor(px)
    Local fy#=py-Floor(py)
    Local tx#=Floor(px)-ox
    Local ty#=Floor(py)-oy
    If tx>=0 tx=tx Mod w + ox Else tx = w - -tx Mod w + ox
    If ty>=0 ty=ty Mod h + oy Else ty = h - -ty Mod h + oy
    Local vr#= viewport_x + viewport_w, vb# = viewport_y + viewport_h
    SetOrigin 0,0
    Local iy#=ty
    While iy<vb + h
        Local ix#=tx
        While ix<vr + w
            DrawImage(image, ix+fx,iy+fy, frame)
            ix=ix+w
        Wend
        iy=iy+h
    Wend
    SetOrigin origin_x, origin_y
End Function
|
| ||
That's a bit better, Casaber. Here are a few lines to change. As you can see, you will need to use REAL # numbers in order to slow down the movements to normal.x = x + (KeyDown(KEY_UP)-KeyDown(KEY_DOWN)) * Cos(r/10.0) y = y + (KeyDown(KEY_UP)-KeyDown(KEY_DOWN)) * -Sin(r/1000.0) r = r - (KeyDown(KEY_RIGHT) - KeyDown(KEY_LEFT))/10.0 Looking forward to seeing your next installment soon ! |
| ||
| another debugged one this one does not behave like the original, but to me looks more stable, the controls are off though. |
| ||
| @DW817 those lines only adds slow hickups to my movement? I defined all as floats already? How do you mean real numbers they should be already? |
| ||
| Hey in the new one, the hickups does not appear when I throw in those lines. I think that's a good sign. But this is not how the original behave, and I did a one on one comparison? I must have dreamt it. I run the Monkey original code beside the Bmax, and i get the 1st version, not the 2nd one. Could there have been a bug in the original Monkey code? I'm abit lost 1st I thought that it was all about truth values being different in Monkey and BMax (1 vs -1). But then this 2nd (which I got by trying negating the trigonometry directly) made me.. confused. I´m not sure what was the original bug now. |
| ||
| hah add in an x=x+1 or y=y+1 and enjoy your ride :) Seem to work alright, now it's the controls only left to do. Happy as can be. It can endless tile fine aswell. But not with that png it get black areas for some reason. EDIT I think it wants square pictures, the original SNES had 128x128 tiles with 8x8 tiles, making a 1024x1024). That's the hardcoded 1024 I'll bet changing those to width and height of the image would be half the fix, and having square image would be the other half I have the feeling. |
| ||
| r I think is still buggy, you cant do r=r+1, it circles instead of swirling the camera |
| ||
| The original Monkey code Swirls with r=r+1 but.. it has a buggy horizon instead (it can´t tile forever it gives alot of graphic errors at the horizon), which the latest post here fixes (not intended but it happened). Maybe the original had an bug, I´m not the one to ask, but it looks like it might. But the camera rotation are circling in this one. That's the only thing left to fix now. |
| ||
| this is just a retouched one, where I will contine with later fixed the small things I´ve said above in it. |
| ||
| Testing height (it was fixed in Monkey version but actually it's real nice to use it dynamically. Okay, time to leave I´m hooked on this. It still has areas inbetween them if you look carefully you see it at those great heights.. okay the bug level might best be unsaid now. But it's something visually comprehensible at least now, I like that. Also trying this, it might be correctly tiling, the dark areas i saw might have been just the gray shadings of the pic I´m currently using. I need more time to test. But right now it looks okay. It has some kind of bendyness to it though. The world belongs to bugs.. |
| ||
| GOOD JOB ON THAT LAST ONE !! You are definitely getting there. Get the rotation down and I think you'll have the whole thing, Casaber ! |
| ||
| Thanks, but this was HARD. Any rotation expert in the house? I´m exhausted here. I would really like to get this specific implementation working, It's the one that's true to the SNES how it did it too. |
| ||
| So I did this instead, which is based on a tutorial I found on the web for MODE 7. I think the previous MODE7 on this forum was based on the same tutorial. (It has a bug btw in it's rotation AND ffffff should be MOD 360 in it) But here I went for another simple approach (the only thing I skimped on was the X scale and Y Scale, i mashed them together because I don´t need to scale x and y differently. So there's just "scale", which is nice. It's a simple (but complete) MODE 7 which uses pixelling, based on a great tutorial. I'm very pleased to have a software too. It's FAST. I'm just intrigued by the concept of the previous version though so any help would be appreciated.
' Simple Mode 7 using software rendering (quick, 60 fps+)

Local a:Float = 0 , x:Float = 0 , y:Float = 0 , dx:Float = 0 , dy:Float = 0 , speed:Float = 0
Global space_z:Float = 50 , horizon:Int = 20, scale:Float = 1000 , obj_scale:Float = 50 ' Set view and scale here.
Global map:Int[1024*1024] ; Global img:TPixmap = LoadPixmap(LoadBank("http::static.monstermmorpg.com/images/maps/Meteor-Falls.png"))
For y=0 To 1023 ; For x=0 To 1024 ; map(x+y*1024) = ReadPixel(img,x,y) ; Next ; Next ' Load png 1024 x 1024

Global xres:Int = 1024 , yres:Int = 768 , pixels:Int[xres*yres]
GLGraphics xres,yres,0,60,GRAPHICS_BACKBUFFER | GRAPHICS_DEPTHBUFFER ; glViewport 0,0,xres,yres
glMatrixMode GL_PROJECTION ; glLoadIdentity ; glOrtho 0,xres,yres,0,0,1 ; glPixelZoom 1,-1 ; glRasterPos2i 0,0

x=0 ; y = 0 ; a= 0
Repeat
	speed = speed + KeyDown(KEY_UP)*0.1-KeyDown(KEY_DOWN)*0.1 ; speed=Max(-5,Min(5,speed))
    a = a         - KeyDown(KEY_LEFT)+KeyDown(KEY_RIGHT) ; a = a Mod 360
	dx = speed * Cos (a) ; dy =  speed * Sin (a) ; x :+ dx ; y :+ dy
	drawplane a,x,y
	Delay 1 ; Flip 1
Until KeyHit(KEY_ESCAPE) Or AppTerminate()
End

Function drawplane(a:Float,cx:Float,cy:Float)
	Local sx:Int , sy:Int , d:Float , hs:Float , maskx:Int = 1023 , masky:Int = 1023
	Local dx:Float , dy:Float , spx:Float,spy:Float
	For sy = 0 Until yres-1
		d = space_z*scale / Float(sy + horizon) ; hs = d / scale ; dx = -Sin(a) * hs ; dy = Cos(a) * hs
		spx = cx + d*Cos(a) - Float(xres) / 2 * dx ; spy = cy + d*Sin(a) - Float(xres) / 2 * dy
		For sx = 0 Until xres-1 ; pixels[sx+sy*xres] = map[  (Int(spx) & maskx) + ( (Int(spy) & masky)*1024)]
		spx :+ dx ; spy :+ dy ; Next
	Next
	glDrawPixels xres,yres,GL_BGRA,GL_UNSIGNED_BYTE,pixels
End Function
Everything is presentation so if you want to see it in action fullscreen with some style I personally adore. Here you go. |
| ||
| This is pushing it but (this COULD and SHOULD drop below 60fps on weak machines ..1st draft, heavy optimization is next step. It doesnot have to drop below 60 fps on weak machines , that's the important bit. EDIT If you put this in singlebuffering mode, and fullscreen mode, it will probably push it well above 60 fps wo. optimzation, asis. The point is, these are LIVE tiles, pixel level and tile levelled animated per frame, and colorised live aswell (1 color per tile), could be used for animating ocean tiles for instance. Don´t mind about my retro text, I', using it for a few things, so ya.. it's there Just place youreself somewhere on the map, and stand still for a moment, and look upon the horizon full of ..STUFF.. it looks like waves. Very soothing.
Global buffer:Int[128*128]
Local img2:TPixmap=LoadPixmap(LoadBank("http::s14.postimg.org/xotmro9vh/128x1282.png"))
For yy=0 To 127 ; For xx=0 To 127 ; buffer(xx+yy*128) = ReadPixel(img2,xx,yy) ; Next ; Next
AddHook FlipHook,irq,Null ; Global fps:Int , fpstotal:Int , msstart:Float , ms:Float = MilliSecs()

Global map[4096,4096] ; For yy=0 To 316 ; For xx=0 To 475; map[xx,yy]=Rnd(127) ; Next ; Next
For temp=0 To 255 ; map[temp,0]=temp ; Next
Global cmap[4096,4096] ; For yy=0 To 316 ; For xx=0 To 475; cmap[xx,yy]=Rnd(15) ; Next ; Next
Global wx:Int , wy:Int , cx:Int , c:Int = buffer[0] , cols:Int[16]
RestoreData colors ; For temp=0 To 15 ; ReadData cols[temp] ; Next
writetomap "                                        ",0,0
writetomap "    **** COMMODORE 64 BASIC V2 ****     ",0,1
writetomap "                                        ",0,2
writetomap " 64K RAM SYSTEM  38911 BASIC BYTES FREE ",0,3
writetomap "                                        ",0,4
writetomap "READY.                                  ",0,5
writetomap "                                        ",0,4

Global xres:Int = 1024 , yres:Int = 768 ' Set resolution here.

Local a:Float = 0 , x:Float = 0 , y:Float = 0 , dx:Float = 0 , dy:Float = 0 , speed:Float = 0
Global space_z:Float = 50 , horizon:Int = 20, scale:Float = 1000 , obj_scale:Float = 50 ' Set view and scale here.
Global pmap:Int[1024*1024] ; Global img:TPixmap = LoadPixmap(LoadBank("http::static.monstermmorpg.com/images/maps/Meteor-Falls.png"))
For y=0 To 1023 ; For x=0 To 1024 ; pmap(x+y*1024) = ReadPixel(img,x,y) ; Next ; Next ' Load png 1024 x 1024
Global pixels:Int[xres*yres] ' 1024 x 1024

GLGraphics xres,yres,0,60,GRAPHICS_BACKBUFFER | GRAPHICS_DEPTHBUFFER ; glViewport 0,0,xres,yres ' Set 0 for Windowed, 32 for Fullscreen here.
glMatrixMode GL_PROJECTION ; glLoadIdentity ; glOrtho 0,xres,yres,0,0,1 ; glPixelZoom 1,-1 ; glRasterPos2i 0,0 ; HideMouse

Repeat

Function readinputs()
	wx=wx-s*KeyDown(KEY_LEFT)+s*KeyDown(KEY_RIGHT) ; wy=wy-s*KeyDown(KEY_UP)+s*KeyDown(KEY_DOWN) ; wx=Max(0,Min(10000,wx)) ; wy=Max(0,Min(10000,wy))
	mx = MouseX() ; my = MouseY() ; xxx = (wx+mx) Sar 4 ; yyy = (wy+my) Sar 4 ; If MouseDown(1) Then map(xxx,yyy) = 42 ; cmap(xxx,yyy) = 7
End Function

	alive
        For yy = 0 To 1023 ; For xx = 0 To 1023 ; pmap[yy*1024+xx] = 0 ; Next ; Next ' Clear
        display wx,wy,0,0,1024,1024 ' Render tiles

	speed = speed + KeyDown(KEY_UP)*0.1-KeyDown(KEY_DOWN)*0.1 ; speed=Max(-5,Min(5,speed))
        a = a               - KeyDown(KEY_LEFT)+KeyDown(KEY_RIGHT) ; a = a Mod 360
	dx = speed * Cos (a) ; dy =  speed * Sin (a) ; x :+ dx ; y :+ dy
	drawplane a,x,y
	glDrawPixels xres,yres,GL_BGRA,GL_UNSIGNED_BYTE,pixels

	 Delay 1 ; Flip 1
Until KeyHit(KEY_ESCAPE) Or AppTerminate()
End

Function drawplane(a:Float,cx:Float,cy:Float)
	Local sx:Int , sy:Int , d:Float , hs:Float , maskx:Int = 1023 , masky:Int = 1023
	Local dx:Float , dy:Float , spx:Float,spy:Float
	For sy = 0 Until yres-1 Step 2
		d = space_z*scale / Float(sy + horizon) ; hs = d / scale ; dx = -Sin(a) * hs ; dy = Cos(a) * hs
		spx = cx + d*Cos(a) - Float(xres) / 2 * dx ; spy = cy + d*Sin(a) - Float(xres) / 2 * dy
		For sx = 0 Until xres-1 ; pixels[sx+sy*xres] = pmap[(Int(spx) & maskx) + ( (Int(spy) & masky)*1024)]
		spx :+ dx ; spy :+ dy ; Next
	Next
End Function

Function alive()
	For temp=1 To 16 ; buffer[Int(Rand(0,15))+Int((Rand(0,15))*128)]=$ffffffff * Int(Rand(0,1)) ; Next
	cx=(cx+1) Mod 128 ; For tempy=0 To 15 ; For temp=0 To 15+32 ; buffer[16+temp+((0+tempy)*128)]=buffer[0+temp+cx+(16+tempy)*128] ; Next ; Next ; For temp=1 To 1600 ; cmap[Rnd(400),Rnd(250)]=Rnd(16) ; Next
End Function

Function display(wx,wy,ofx=0,ofy=0,sx=640,sy=400)
	scrx = wx & 15 ; scry = wy & 15 ; mapx = wx Shr 4 ; mapy = wy Shr 4
	cnty = 0 ; For y = mapy To mapy+(sy Shr 4+1)
	cntx = 0 ; For x = mapx To mapx+(sx Shr 4+1)
	tilex = map(x,y) & 15 ; tiley = map(x,y) Shr 4
	colour = cols(cmap(x,y)) ; xx = cntx - scrx + ofx ; yy=cnty - scry + ofy
	For ty = 0 To 7 ; For tx = 0 To 7
	If (xx+tx+tx >= ofx) And (yy+ty+ty >= ofy) And (xx+tx+tx < ofx+sx) And (yy+ty+ty < ofy+sy).. ' Mind the steps
 	 And buffer[tilex Shl 3 + tx + (tiley Shl 3 + ty)*128] <> c Then pmap[xx+tx+tx+(yy+ty+ty)*1024] = colour
	Next ; Next
	cntx = cntx+16 ; Next
	cnty = cnty+16 ; Next
End Function

Function writetomap(t$,x,y)
	For tempx = 0 To Len(t$)-1 ; temp = Asc(Mid$(t$,1+tempx,1)) ; map[tempx+x,y] = temp ; cmap[tempx+x,y] = 14 ; Next
End Function

Function irq:Object(id,data:Object,context:Object)
	Return data
End Function

#colors
DefData $000000,$FFFFFF,$68372B,$70A4B2,$6F3D86,$588D43,$352879,$B8C76F,$6F4F25,$433900,$9A6759,$444444,$6C6C6C,$9AD284,$6C5EB5,$959595
|
| ||
There's a bug in that code:For y=0 To 1023 ; For x=0 To 1024 ; pmap(x+y*1024) = ReadPixel(img,x,y) ; Next ; Next ' Load png 1024 x 1024should be: For y=0 To 1023 ; For x=0 To 1023 ; pmap(x+y*1024) = ReadPixel(img,x,y) ; Next ; Next ' Load png 1024 x 1024Very nice effect though. |
| ||
Ya I've been buzy with alot of versions, it slipped in., there was a few more, I fixed them all here.
Rem ------------------------------------------
 ___     ____  _____  _____   ______   ______
|    \  /    |/     \|     \ |   ___| |___   |
|     \/     ||     ||      \|   ___|   /   /
|__/\__/|____|\_____/|______/|______|  |___|

EndRem

Global buffer:Int[128*128]
Local img2:TPixmap=LoadPixmap(LoadBank("http::s14.postimg.org/xotmro9vh/128x1282.png"))
For yy=0 To 127 ; For xx=0 To 127 ; buffer(xx+yy*128) = ReadPixel(img2,xx,yy) ; Next ; Next
AddHook FlipHook,irq,Null ; Global fps:Int , fpstotal:Int , msstart:Float , ms:Float = MilliSecs()

Global map[4096,4096] ; For yy=0 To 316 ; For xx=0 To 475; map[xx,yy]=Rnd(127) ; Next ; Next
For temp=0 To 255 ; map[temp,0]=temp ; Next
Global cmap[4096,4096] ; For yy=0 To 316 ; For xx=0 To 475; cmap[xx,yy]=Rnd(15) ; Next ; Next
Global wx:Int , wy:Int , cx:Int , c:Int = buffer[0] , cols:Int[16] , s:Int = 2
RestoreData colors ; For temp=0 To 15 ; ReadData cols[temp] ; Next
writetomap "                                        ",0,0
writetomap "    **** COMMODORE 64 BASIC V2 ****     ",0,1
writetomap "                                        ",0,2
writetomap " 64K RAM SYSTEM  38911 BASIC BYTES FREE ",0,3
writetomap "                                        ",0,4
writetomap "READY.                                  ",0,5
writetomap "                                        ",0,4

Global xres:Int = 1024 , yres:Int = 768 , pixels:Int[xres*yres] ' Set resolution here.
Local a:Float = 0 , x:Float = 0 , y:Float = 0 , dx:Float = 0 , dy:Float = 0 , speed:Float = 0
Global space_z:Float = 50 , horizon:Int = 20, scale:Float = 1000 , obj_scale:Float = 50 ' Set view and scale here.
Global pmap:Int[1024*1024] ; Global img:TPixmap = LoadPixmap(LoadBank("http::static.monstermmorpg.com/images/maps/Meteor-Falls.png"))
For y=0 To 1023 ; For x=0 To 1023 ; pmap(x+y*1024) = ReadPixel(img,x,y) ; Next ; Next ' Load png 1024 x 1024

GLGraphics xres,yres,0,60,GRAPHICS_BACKBUFFER | GRAPHICS_DEPTHBUFFER ; glViewport 0,0,xres,yres ' Set 0 for Windowed, 32 for Fullscreen here.
glMatrixMode GL_PROJECTION ; glLoadIdentity ; glOrtho 0,xres,yres,0,0,1 ; glPixelZoom 1,-1 ; glRasterPos2i 0,0 '; HideMouse

Repeat

Function readinputs()
	wx=wx-s*KeyDown(KEY_LEFT)+s*KeyDown(KEY_RIGHT) ; wy=wy-s*KeyDown(KEY_UP)+s*KeyDown(KEY_DOWN) ; wx=Max(0,Min(10000,wx)) ; wy=Max(0,Min(10000,wy))
	mx = MouseX() ; my = MouseY() ; xxx = (wx+mx) Sar 4 ; yyy = (wy+my) Sar 4 ; If MouseDown(1) Then map(xxx,yyy) = 42 ; cmap(xxx,yyy) = 7
End Function

	' Comment if you want static landscape, uncomment for live tile landscape
	For yy = 0 To 1023 ; For xx = 0 To 1023 ; pmap[yy*1024+xx] = 0 ; Next ; Next ; alive ; display wx,wy,0,0,1024,1024 ' Render tiles

	speed = speed + KeyDown(KEY_UP)*0.1-KeyDown(KEY_DOWN)*0.1 ; speed=Max(-5,Min(5,speed))
        a = a               - KeyDown(KEY_LEFT)+KeyDown(KEY_RIGHT) ; a = a Mod 360
	dx = speed * Cos (a) ; dy =  speed * Sin (a) ; x :+ dx ; y :+ dy
	drawplane a,x,y
       ' readinputs ; for yy = 0 To yres ; For xx = 0 To 1023 ; pixels[yy*xres+xx] = pmap[yy*1024+xx]  ; Next ; Next
	glDrawPixels xres,yres,GL_BGRA,GL_UNSIGNED_BYTE,pixels
	Delay 1 ; Flip 1
Until KeyHit(KEY_ESCAPE) Or AppTerminate()
End

Function drawplane(a:Float,cx:Float,cy:Float)
	Local sx:Int , sy:Int , d:Float , hs:Float , maskx:Int = 1023 , masky:Int = 1023
	Local dx:Float , dy:Float , spx:Float,spy:Float
	For sy = 0 Until yres-1 Step 2
		d = space_z*scale / Float(sy + horizon) ; hs = d / scale ; dx = -Sin(a) * hs ; dy = Cos(a) * hs
		spx = cx + d*Cos(a) - Float(xres) / 2 * dx ; spy = cy + d*Sin(a) - Float(xres) / 2 * dy
		For sx = 0 Until xres-1 ; pixels[sx+sy*xres] = pmap[(Int(spx) & maskx) + ( (Int(spy) & masky)*1024)] ; spx :+ dx ; spy :+ dy ; Next
	Next
End Function

Function alive()
	For temp=1 To 16 ; buffer[Int(Rand(0,15))+Int((Rand(0,15))*128)]=$ffffffff * Int(Rand(0,1)) ; Next
	cx=(cx+1) Mod 128 ; For tempy=0 To 15 ; For temp=0 To 15+32 ; buffer[16+temp+((0+tempy)*128)]=buffer[0+temp+cx+(16+tempy)*128] ; Next ; Next ; For temp=1 To 1600 ; cmap[Rnd(400),Rnd(250)]=Rnd(16) ; Next
End Function

Function display(wx,wy,ofx=0,ofy=0,sx=640,sy=400)
	scrx = wx & 15 ; scry = wy & 15 ; mapx = wx Shr 4 ; mapy = wy Shr 4
	cnty = 0 ; For y = mapy To mapy+(sy Shr 4+1)
	cntx = 0 ; For x = mapx To mapx+(sx Shr 4+1)
	tilex = map(x,y) & 15 ; tiley = map(x,y) Shr 4
	colour = cols(cmap(x,y)) ; xx = cntx - scrx + ofx ; yy=cnty - scry + ofy
	For ty = 0 To 7 ; For tx = 0 To 7
	If (xx+tx+tx >= ofx) And (yy+ty+ty >= ofy) And (xx+tx+tx < ofx+sx) And (yy+ty+ty < ofy+sy).. ' Mind the steps
 	 And buffer[tilex Shl 3 + tx + (tiley Shl 3 + ty)*128] <> c Then pmap[xx+tx+tx+(yy+ty+ty)*1024] = colour
	Next ; Next
	cntx = cntx+16 ; Next
	cnty = cnty+16 ; Next
End Function

Function writetomap(t$,x,y)
	For tempx = 0 To Len(t$)-1 ; temp = Asc(Mid$(t$,1+tempx,1)) ; map[tempx+x,y] = temp ; cmap[tempx+x,y] = 14 ; Next
End Function

Function irq:Object(id,data:Object,context:Object)
	Return data
End Function

#colors
DefData $000000,$FFFFFF,$68372B,$70A4B2,$6F3D86,$588D43,$352879,$B8C76F,$6F4F25,$433900,$9A6759,$444444,$6C6C6C,$9AD284,$6C5EB5,$959595
|
| ||
Ya I've been buzy with alot of versions, it slipped in., there was a few more, I fixed them all here.
Rem ------------------------------------------
 ___     ____  _____  _____   ______   ______
|    \  /    |/     \|     \ |   ___| |___   |
|     \/     ||     ||      \|   ___|   /   /
|__/\__/|____|\_____/|______/|______|  |___|

EndRem

Global buffer:Int[128*128]
Local img2:TPixmap=LoadPixmap(LoadBank("http::s14.postimg.org/xotmro9vh/128x1282.png"))
For yy=0 To 127 ; For xx=0 To 127 ; buffer(xx+yy*128) = ReadPixel(img2,xx,yy) ; Next ; Next
AddHook FlipHook,irq,Null ; Global fps:Int , fpstotal:Int , msstart:Float , ms:Float = MilliSecs()

Global map[4096,4096] ; For yy=0 To 316 ; For xx=0 To 475; map[xx,yy]=Rnd(127) ; Next ; Next
For temp=0 To 255 ; map[temp,0]=temp ; Next
Global cmap[4096,4096] ; For yy=0 To 316 ; For xx=0 To 475; cmap[xx,yy]=Rnd(15) ; Next ; Next
Global wx:Int , wy:Int , cx:Int , c:Int = buffer[0] , cols:Int[16] , s:Int = 2
RestoreData colors ; For temp=0 To 15 ; ReadData cols[temp] ; Next
writetomap "                                        ",0,0
writetomap "    **** COMMODORE 64 BASIC V2 ****     ",0,1
writetomap "                                        ",0,2
writetomap " 64K RAM SYSTEM  38911 BASIC BYTES FREE ",0,3
writetomap "                                        ",0,4
writetomap "READY.                                  ",0,5
writetomap "                                        ",0,4

Global xres:Int = 1024 , yres:Int = 768 , pixels:Int[xres*yres] ' Set resolution here.
Local a:Float = 0 , x:Float = 0 , y:Float = 0 , dx:Float = 0 , dy:Float = 0 , speed:Float = 0
Global space_z:Float = 50 , horizon:Int = 20, scale:Float = 1000 , obj_scale:Float = 50 ' Set view and scale here.
Global pmap:Int[1024*1024] ; Global img:TPixmap = LoadPixmap(LoadBank("http::static.monstermmorpg.com/images/maps/Meteor-Falls.png"))
For y=0 To 1023 ; For x=0 To 1023 ; pmap(x+y*1024) = ReadPixel(img,x,y) ; Next ; Next ' Load png 1024 x 1024

GLGraphics xres,yres,0,60,GRAPHICS_BACKBUFFER | GRAPHICS_DEPTHBUFFER ; glViewport 0,0,xres,yres ' Set 0 for Windowed, 32 for Fullscreen here.
glMatrixMode GL_PROJECTION ; glLoadIdentity ; glOrtho 0,xres,yres,0,0,1 ; glPixelZoom 1,-1 ; glRasterPos2i 0,0 '; HideMouse

Repeat

Function readinputs()
	wx=wx-s*KeyDown(KEY_LEFT)+s*KeyDown(KEY_RIGHT) ; wy=wy-s*KeyDown(KEY_UP)+s*KeyDown(KEY_DOWN) ; wx=Max(0,Min(10000,wx)) ; wy=Max(0,Min(10000,wy))
	mx = MouseX() ; my = MouseY() ; xxx = (wx+mx) Sar 4 ; yyy = (wy+my) Sar 4 ; If MouseDown(1) Then map(xxx,yyy) = 42 ; cmap(xxx,yyy) = 7
End Function

	' Comment if you want static landscape, uncomment for live tile landscape
	For yy = 0 To 1023 ; For xx = 0 To 1023 ; pmap[yy*1024+xx] = 0 ; Next ; Next ; alive ; display wx,wy,0,0,1024,1024 ' Render tiles

	speed = speed + KeyDown(KEY_UP)*0.1-KeyDown(KEY_DOWN)*0.1 ; speed=Max(-5,Min(5,speed))
        a = a               - KeyDown(KEY_LEFT)+KeyDown(KEY_RIGHT) ; a = a Mod 360
	dx = speed * Cos (a) ; dy =  speed * Sin (a) ; x :+ dx ; y :+ dy
	drawplane a,x,y
       ' readinputs ; for yy = 0 To yres ; For xx = 0 To 1023 ; pixels[yy*xres+xx] = pmap[yy*1024+xx]  ; Next ; Next
	glDrawPixels xres,yres,GL_BGRA,GL_UNSIGNED_BYTE,pixels
	Delay 1 ; Flip 1
Until KeyHit(KEY_ESCAPE) Or AppTerminate()
End

Function drawplane(a:Float,cx:Float,cy:Float)
	Local sx:Int , sy:Int , d:Float , hs:Float , maskx:Int = 1023 , masky:Int = 1023
	Local dx:Float , dy:Float , spx:Float,spy:Float
	For sy = 0 Until yres-1 Step 2
		d = space_z*scale / Float(sy + horizon) ; hs = d / scale ; dx = -Sin(a) * hs ; dy = Cos(a) * hs
		spx = cx + d*Cos(a) - Float(xres) / 2 * dx ; spy = cy + d*Sin(a) - Float(xres) / 2 * dy
		For sx = 0 Until xres-1 ; pixels[sx+sy*xres] = pmap[(Int(spx) & maskx) + ( (Int(spy) & masky)*1024)] ; spx :+ dx ; spy :+ dy ; Next
	Next
End Function

Function alive()
	For temp=1 To 16 ; buffer[Int(Rand(0,15))+Int((Rand(0,15))*128)]=$ffffffff * Int(Rand(0,1)) ; Next
	cx=(cx+1) Mod 128 ; For tempy=0 To 15 ; For temp=0 To 15+32 ; buffer[16+temp+((0+tempy)*128)]=buffer[0+temp+cx+(16+tempy)*128] ; Next ; Next ; For temp=1 To 1600 ; cmap[Rnd(400),Rnd(250)]=Rnd(16) ; Next
End Function

Function display(wx,wy,ofx=0,ofy=0,sx=640,sy=400)
	scrx = wx & 15 ; scry = wy & 15 ; mapx = wx Shr 4 ; mapy = wy Shr 4
	cnty = 0 ; For y = mapy To mapy+(sy Shr 4+1)
	cntx = 0 ; For x = mapx To mapx+(sx Shr 4+1)
	tilex = map(x,y) & 15 ; tiley = map(x,y) Shr 4
	colour = cols(cmap(x,y)) ; xx = cntx - scrx + ofx ; yy=cnty - scry + ofy
	For ty = 0 To 7 ; For tx = 0 To 7
	If (xx+tx+tx >= ofx) And (yy+ty+ty >= ofy) And (xx+tx+tx < ofx+sx) And (yy+ty+ty < ofy+sy).. ' Mind the steps
 	 And buffer[tilex Shl 3 + tx + (tiley Shl 3 + ty)*128] <> c Then pmap[xx+tx+tx+(yy+ty+ty)*1024] = colour
	Next ; Next
	cntx = cntx+16 ; Next
	cnty = cnty+16 ; Next
End Function

Function writetomap(t$,x,y)
	For tempx = 0 To Len(t$)-1 ; temp = Asc(Mid$(t$,1+tempx,1)) ; map[tempx+x,y] = temp ; cmap[tempx+x,y] = 14 ; Next
End Function

Function irq:Object(id,data:Object,context:Object)
	Return data
End Function

#colors
DefData $000000,$FFFFFF,$68372B,$70A4B2,$6F3D86,$588D43,$352879,$B8C76F,$6F4F25,$433900,$9A6759,$444444,$6C6C6C,$9AD284,$6C5EB5,$959595
Here's the Mode7, which is much simpler on its own, static only. It might be useful for people when learning. (This is normal MODE7 without any bells and whistles). |
| ||
| Congratulations, Casaber ! You do realize you are likely the only programmer that has solved mode 7 =AND= posted the source code to show how it's done ! When you're up to it, next challenge. Take a good look at F-Zero. See how they have a static background (not 3D) above the horizon (vertical 3rd of screen), and that everything below is true and lovely 3D.  |
| ||
| dw817 :) Well there was a previous post here, I learned alot from that. Or, at least I got the idea roughly, I didn't learn from it becuase it was very complex source. But I found the blog behind it, and got the ideas clearly from there. I had to look around quiet a few nights before finding a good simple solution. Still, I want that HW solution that reminds me of SNES concepts (and yours too actually). You use the same mindset as they did with setting scale (and they also use rotation) and set it once differently per scanline. It's a real headscratcher to get it working (and the Monkey original has it's flaw so I cannot rely 100% on it either). It's a rare solution The SNES engineers knew what they did. They kind of started the whole thing and made 3d more readily available.. MODE7..inspired into Raycasting DOOM I guess etc and before we know it we ended up have amazing 3d games in 2016, and get all nostagic about 1980's again. That's how it works ;) If anyone wants to try check it out and help, I would be most grateful and sleep better at night. PS the TileiImage is robust and perfect condition. So it's not much code to look through actually, I guess good matrix knowledge and a clear mind is what's sought after, I have neither ;) |
| ||
| So far the best code I've seen of the bunch you've done so far, Casaber, is this one. Perfect acceleration and rotation. Works great here ! What really astounds me about this code is you can choose any vector to rotate, start accelerating, and it is flawless and seamless tiling despite the angle chosen. |
| ||
| Thanks, I like that too, havn't seen any simpler mode7 example so far so I am abit proud of that one. Terseness important for clearity. There are parallals in this to the hardware of course, so I could fix the hw later when the math feels like home. Which would take a few years ;) |
| ||
| I'll bet someone will take this and make an even shorter now ;) That's how things work haha. I only wanted to have a good demo for my little project.. you know, I made this into a a few sleepless nights instead :s You're planning to use this kind of graphics in you RPG project? |
| ||
| Perhaps, Casaber. It depends. As I am ultimately working on a new RPG Maker, I would use it to tilt the screen for when you travel by Airship, just like Final Fantasy. Yet ... your code could also yield a great racing game with a bit of work involved. Might be interesting to see. :) |
| ||
| Nice !! if you need help later with something just shout :) keep in touch!! Over here things are quickly getting more and more into being normal so I won´t have as much time to spend on coding. I learnt alot about Bmax this week I feel. A very descent platform to do stuff on, and I hope Monkey2 will only improve on it ! |
| ||
| I've changed my public email my old died, it's CassandrawCastell@... This is my new trash mail but I check it at times. |
| ||
| Urrf ... Notta good idea to post your Email in the forum,Casaber. I know you can publicly list it in your account but SPAM 'bots often do cull through the Internet for any stray Emails to add to the collective. And is it Cassandra ? That's fine. :) Once again some very fine coding you've done up there. I spent about an hour last night looking it over - trying to understand it. It's all very advanced to me. |
| ||
| Awesome demos here! |
| ||
| Want to show one last thing how I did (halfway I´m in the middle of things) optimize the slow IF..THEN and show the difference. This is only true for emmense loops, "inner" loops, "long" loops, you know those times when extreme amounts of things just needs to get done within a timeframe. It's easy too look at modern machine as gods of infinite speed. Or rather they *are* extremely fast but what we throw at them (invisibly sometimes in the code) makes them very sad, and it's hard to know sometimes as the rules are complex and hidden , you just have to test/measure and be surprised. Some things got learned with exprience sure. But not all. They use every kind of odd thing to try speed them up.. caches, predictions, aligments, parallal instructions (SSE/NEON) which very nice actually but have so very mechanical rules in what order registers should be used to get best speed. Everything gets very unhumane and these things are left best to the compilers to handle, but when the compiler fails it really bites your tail. This is the original code with not too much thought into (well actually there are much thought gone into details in this one and that hit it with the ugly bat. you can's see every intention in the code. Which I hate, but it was needed to bring things up to speed. And it didn't quiet make even then. It can't keep up with 60 fps. If it does you have a strong machine. Exremely strong. I get almost 60fps with loads of dropouts on my 3Ghz Mac. This though, which I leave unravelled to be read.. This is the horror that happened when I wanted to get ONE IF .. THEN out of a very very intense loop. In the above. This is what slowed it down (the major cause at least, there lots left you could do, but as you see in other place you could even have trigonometry without problem). We're talking scale of about 300.000 x 8 x 8 times that an IF..THEN happens. that was the slowdown. This one below should run fine. Even if it's in the middle of the optimizing process. Don't even try to grasp that code. I need to code this within few days or I will forget what I was doing forever. So ya, just wanted to show, that optimizing is needed when it really counts. This brought this code up to speed. 60 fps here we come.
Global buffer:Int[256*256] ; Local img2:TPixmap=LoadPixmap(LoadBank("http::www.foxhack.net/files/blog/2008/01-09-charadata.png"))  ' Load a 256x256 Atlas with 8x8 tiles
For yy=0 To 255 ; For xx=0 To 255 ; buffer(xx+yy*256) = ReadPixel(img2,xx,yy) ; Next ; Next
Global map[4096,4096] , wx:Int , wy:Int , cx:Int , c:Int = buffer[0] , s:Int = 2 , xres:Int = 1024 , yres:Int = 768 , pixels:Int[xres*yres]
Local a:Float = 0 , x:Float = 0 , y:Float = 0 , dx:Float = 0 , dy:Float = 0 , speed:Float = 0
Global space_z:Float = 50 , horizon:Int = 20, scale:Float = 1000 , obj_scale:Float = 50 , pmap:Int[1024*1024]

' Fill world with atlas 1:1 side by side
For worldy=0 To 4095 Step 32 ; For worldx=0 To 4095 Step 32 ; For temp2=0 To 31 ; For temp=0 To 31 ;	map(temp+worldx,temp2+worldy)=temp+temp2*32 ; Next ; Next ; Next ; Next
GLGraphics xres,yres,0,60,GRAPHICS_BACKBUFFER | GRAPHICS_DEPTHBUFFER ; glViewport 0,0,xres,yres
glMatrixMode GL_PROJECTION ; glLoadIdentity ; glOrtho 0,xres,yres,0,0,1 ; glPixelZoom 1,-1 ; glRasterPos2i 0,0

Repeat
	For yy = 0 To 1023 ; For xx = 0 To 1023 ; pmap[yy*1024+xx] = 0 ; Next ; Next
	display wx,wy,    0,0,1024,1024 ' DRAW INTO AN NON-TILE ALIGNED RECTANGLE TO VIEW BUG
	speed = speed + KeyDown(KEY_UP)*0.1-KeyDown(KEY_DOWN)*0.1 ; speed=Max(-5,Min(5,speed))
	a = a - KeyDown(KEY_LEFT)+KeyDown(KEY_RIGHT) ; a = a Mod 360
	dx = speed * Cos (a) ; dy =  speed * Sin (a) ; x :+ dx ; y :+ dy
	drawplane a,x,y
	alive
	' readinputs ; For yy = 0 To yres ; For xx = 0 To 1023 ; pixels[yy*xres+xx] = pmap[yy*1024+xx]  ; Next ; Next ' Show 2D
	glDrawPixels xres,yres,GL_BGRA,GL_UNSIGNED_BYTE,pixels
	Delay 1 ; Flip 1
Until KeyHit(KEY_ESCAPE) Or AppTerminate()
End

Function readinputs()
	wx=wx-s*KeyDown(KEY_LEFT)+s*KeyDown(KEY_RIGHT) ; wy=wy-s*KeyDown(KEY_UP)+s*KeyDown(KEY_DOWN) ; wx=Max(0,Min(10000,wx)) ; wy=Max(0,Min(10000,wy))
	mx = MouseX() ; my = MouseY() ; xxx = (wx+mx) Sar 3 ; yyy = (wy+my) Sar 3; If MouseDown(1) Then map(xxx,yyy) = 42
End Function

Function alive()
	For temp=1 To 16 ; buffer[Int(Rand(0,15))+Int((Rand(0,15))*256)]=$ffffffff * Int(Rand(0,1)) ; Next
	cx=cx+1 Mod 256 ; For tempy=0 To 15 ; For temp=0 To 15+32 ; buffer[16+temp+((0+tempy)*256)]=buffer[0+temp+cx+(16+tempy)*256] ; Next ; Next
	'For temp=1 To 100 ; map[Rnd(1023),Rnd(1023)]=Rnd(1023) ; Next ' Change few tiles each frame (this could be thousands no problem, mind the rnd when it gets large though.)
End Function

Function drawplane(a:Float,cx:Float,cy:Float) ' This might need optimzation too but it has not as intens loops so actually it does not need at all as much as display() does.
	Local sx:Int , sy:Int , d:Float , hs:Float , maskx:Int = 1023 , masky:Int = 1023
	Local dx:Float , dy:Float , spx:Float,spy:Float
	For sy = 0 Until yres-1 Step 2
		d = space_z*scale / Float(sy + horizon) ; hs = d / scale ; dx = -Sin(a) * hs ; dy = Cos(a) * hs
		spx = cx + d*Cos(a) - Float(xres) / 2 * dx ; spy = cy + d*Sin(a) - Float(xres) / 2 * dy
		For sx = 0 Until xres-1 ; pixels[sx+sy*xres] = pmap[(Int(spx) & maskx) + ( (Int(spy) & masky)*1024)] ; spx :+ dx ; spy :+ dy ; Next
	Next
End Function

Function display(wx,wy,ofx=0,ofy=0,sx=640,sy=400) ' Here's where most optimization is needed (as it is it can't keep up with steady 60 fps on average machines,
' every teeny fraction of Bmax knowledge should be put in here. Unrolling helps, less conditions helps.
	scrx = wx & 7 ; scry = wy & 7 ; mapx = wx Shr 3 ; mapy = wy Shr 3

	' Draw 99% of the tiles, inside the frame so we don´t need any conditions
	cnty = 8 ; For y = mapy+1 To mapy+(sy Shr 3-1)
	cntx = 8 ; For x = mapx+1 To mapx+(sx Shr 3-1)
	tilex = map(x,y) & 31 ; tiley = map(x,y) Shr 5 ' 32 tiles per line in atlas
	xx = cntx - scrx + ofx ; yy=cnty - scry + ofy


' IN THE MIDDLE OF THE OPTIMIZATION PROCESS..

' Doing many tiles and the horror below is half-simplified and unrolled (partly improved) of what the CPU does.
' What was before an invisible mess that the CPU had To go through.
' What slowed everything down mostly was         300.000 x 8 x 8 IF THEN, nothing else mostly.

' 2 Inner most loops of code have been partly unrolled here, and here we see something in the middle of the optimizing process, and its' towards the end actually.
' Very messy and the need to do these kind of thought processes are intense, and might even hide the intention of code (not always though), but often. Sometimes they actually clear things up. But we're are in the middle of things now. So, very messy.

' 99 % of the tiiles need no clipping, meaning no expansive IF THEN.

For ty = 0 To 7
a = (tiley Shl 3 + ty) Shl 8 ; a = a + tilex Shl 3 ; b = xx+(yy+ty) Shl 10
pmap[b] = buffer[a] ; pmap[b+1] = buffer[a+1] ; pmap[b+2] = buffer[a+2] ; pmap[b+3] = buffer[a+3]
pmap[b+4] = buffer[a+4] ; pmap[b+5] = buffer[a+5] ; pmap[b+6] = buffer[a+6] ; pmap[b+7] = buffer[a+7]
Next
cntx = cntx+8 ; Next
cnty = cnty+8 ; Next

' Now most is draw, we still have the outer "frame" of tiles, th edges, the top, bottom, left and right and these needs clipping.

' Let's get saucy.

' TOP FRAME OF TILES W. CLIPPING
cnty = 0 ; For y = mapy To mapy '  Nothing here to loop, but middle of work so KEEP loops while working to see symmetry of code. This is messy enough already.
cntx = 0 ; For x = mapx To mapx+ sx Shr 3 + 0
tilex = map(x,y) & 31 ; tiley = map(x,y) Shr 5 ; xx = cntx- scrx + ofx ; yy=cnty - scry + ofy
For ty = 0 To 7
a = (tiley Shl 3 + ty) Shl 8 ; a = a + tilex Shl 3 ; b = xx+(yy+ty) Shl 10
If   xx >= ofx And yy+ty >= ofy And   xx < ofx+sx And yy+ty < ofy+sy   Then pmap[b] =  buffer[a]
If xx+1 >= ofx And yy+ty >= ofy And xx+1 < ofx+sx And yy+ty < ofy+sy	 Then pmap[b+1] = buffer[a+1]
If xx+2 >= ofx And yy+ty >= ofy And xx+2 < ofx+sx And yy+ty < ofy+sy	 Then pmap[b+2] = buffer[a+2]
If xx+3 >= ofx And yy+ty >= ofy And xx+3 < ofx+sx And yy+ty < ofy+sy	 Then pmap[b+3] = buffer[a+3]
If xx+4 >= ofx And yy+ty >= ofy And xx+4 < ofx+sx And yy+ty < ofy+sy	 Then pmap[b+4] = buffer[a+4]
If xx+5 >= ofx And yy+ty >= ofy And xx+5 < ofx+sx And yy+ty < ofy+sy	 Then pmap[b+5] = buffer[a+5]
If xx+6 >= ofx And yy+ty >= ofy And xx+6 < ofx+sx And yy+ty < ofy+sy	 Then pmap[b+6] = buffer[a+6]
If xx+7 >= ofx And yy+ty >= ofy And xx+7 < ofx+sx And yy+ty < ofy+sy	 Then pmap[b+7] = buffer[a+7]
Next
cntx = cntx+8 ; Next
cnty = cnty+8 ; Next

' BOTTOM FRAME OF TILES W. CLIPPING
cnty = sy ; For y = mapy+sy Shr 3 + 0 To mapy + sy Shr 3 + 0
cntx = 0 ; For x = mapx To mapx+ sx Shr 3 + 0
tilex = map(x,y) & 31 ; tiley = map(x,y) Shr 5 ; xx = cntx- scrx + ofx ; yy=cnty - scry + ofy
For ty = 0 To 7
a = (tiley Shl 3 + ty) Shl 8 ; a = a + tilex Shl 3 ; b = xx+(yy+ty) Shl 10
If   xx >= ofx And yy+ty >= ofy And   xx < ofx+sx And yy+ty < ofy+sy   Then pmap[b] =  buffer[a]
If xx+1 >= ofx And yy+ty >= ofy And xx+1 < ofx+sx And yy+ty < ofy+sy	 Then pmap[b+1] = buffer[a+1]
If xx+2 >= ofx And yy+ty >= ofy And xx+2 < ofx+sx And yy+ty < ofy+sy	 Then pmap[b+2] = buffer[a+2]
If xx+3 >= ofx And yy+ty >= ofy And xx+3 < ofx+sx And yy+ty < ofy+sy	 Then pmap[b+3] = buffer[a+3]
If xx+4 >= ofx And yy+ty >= ofy And xx+4 < ofx+sx And yy+ty < ofy+sy	 Then pmap[b+4] = buffer[a+4]
If xx+5 >= ofx And yy+ty >= ofy And xx+5 < ofx+sx And yy+ty < ofy+sy	 Then pmap[b+5] = buffer[a+5]
If xx+6 >= ofx And yy+ty >= ofy And xx+6 < ofx+sx And yy+ty < ofy+sy	 Then pmap[b+6] = buffer[a+6]
If xx+7 >= ofx And yy+ty >= ofy And xx+7 < ofx+sx And yy+ty < ofy+sy	 Then pmap[b+7] = buffer[a+7]
Next
cntx = cntx+8 ; Next
cnty = cnty+8 ; Next

' LEFT FRAME OF TILES W. CLIPPING
cnty = 0 ; For y = mapy To mapy+sy Shr 3 + 0
cntx = 0 ; For x = mapx+0 To mapx+0
tilex = map(x,y) & 31 ; tiley = map(x,y) Shr 5 ; xx = cntx - scrx + ofx ; yy=cnty - scry + ofy
For ty = 0 To 7
a = (tiley Shl 3 + ty) Shl 8 ; a = a + tilex Shl 3 ; b = xx+(yy+ty) Shl 10
If   xx >= ofx And yy+ty >= ofy And   xx < ofx+sx And yy+ty < ofy+sy   Then pmap[b] =  buffer[a]
If xx+1 >= ofx And yy+ty >= ofy And xx+1 < ofx+sx And yy+ty < ofy+sy	 Then pmap[b+1] = buffer[a+1]
If xx+2 >= ofx And yy+ty >= ofy And xx+2 < ofx+sx And yy+ty < ofy+sy	 Then pmap[b+2] = buffer[a+2]
If xx+3 >= ofx And yy+ty >= ofy And xx+3 < ofx+sx And yy+ty < ofy+sy	 Then pmap[b+3] = buffer[a+3]
If xx+4 >= ofx And yy+ty >= ofy And xx+4 < ofx+sx And yy+ty < ofy+sy	 Then pmap[b+4] = buffer[a+4]
If xx+5 >= ofx And yy+ty >= ofy And xx+5 < ofx+sx And yy+ty < ofy+sy	 Then pmap[b+5] = buffer[a+5]
If xx+6 >= ofx And yy+ty >= ofy And xx+6 < ofx+sx And yy+ty < ofy+sy	 Then pmap[b+6] = buffer[a+6]
If xx+7 >= ofx And yy+ty >= ofy And xx+7 < ofx+sx And yy+ty < ofy+sy	 Then pmap[b+7] = buffer[a+7]
Next
cntx = cntx+8 ; Next
cnty = cnty+8 ; Next

' RIGHT FRAME OF TILES W. CLIPPING
cnty = 0 ; For y = mapy To mapy + sy Shr 3 + 0
cntx = sx ; For x = mapx+ sx Shr 3 + 0 To mapx + sx Shr 3 + 0
tilex = map(x,y) & 31 ; tiley = map(x,y) Shr 5 ; xx = cntx - scrx + ofx ; yy=cnty- scry + ofy
For ty = 0 To 7
a = (tiley Shl 3 + ty) Shl 8 ; a = a + tilex Shl 3 ; b = xx+(yy+ty) Shl 10
If   xx >= ofx And yy+ty >= ofy And   xx < ofx+sx And yy+ty < ofy+sy   Then pmap[b] =  buffer[a]
If xx+1 >= ofx And yy+ty >= ofy And xx+1 < ofx+sx And yy+ty < ofy+sy	 Then pmap[b+1] = buffer[a+1]
If xx+2 >= ofx And yy+ty >= ofy And xx+2 < ofx+sx And yy+ty < ofy+sy	 Then pmap[b+2] = buffer[a+2]
If xx+3 >= ofx And yy+ty >= ofy And xx+3 < ofx+sx And yy+ty < ofy+sy	 Then pmap[b+3] = buffer[a+3]
If xx+4 >= ofx And yy+ty >= ofy And xx+4 < ofx+sx And yy+ty < ofy+sy	 Then pmap[b+4] = buffer[a+4]
If xx+5 >= ofx And yy+ty >= ofy And xx+5 < ofx+sx And yy+ty < ofy+sy	 Then pmap[b+5] = buffer[a+5]
If xx+6 >= ofx And yy+ty >= ofy And xx+6 < ofx+sx And yy+ty < ofy+sy	 Then pmap[b+6] = buffer[a+6]
If xx+7 >= ofx And yy+ty >= ofy And xx+7 < ofx+sx And yy+ty < ofy+sy	 Then pmap[b+7] = buffer[a+7]
Next
cntx = cntx+8 ; Next
cnty = cnty+8 ; Next

End Function
|
| ||
| Just wanted to share that optimizing experience and thoughts, hope that's okay and interesting for some. |
| ||
| I reliased (afterwards of course what else) that you could made another approach here, and that would been to have a larger array with an extra unusued space around it, and just go wild on it, and only draw the middle. Becuase it's far cheaper to do more pixels and no conditions. I'm not gonna try implement that now as Im all sick of optimizing for today. But that it might have been a better idea. Or worse I don´t know. I wanted a perfect sized array solution, but it would have kept the code size down. If you could have just used hw clipping then I would have died. actually I really needed to use arrays internally before actually throwing anything on the screen so neat handling was needed before the actual screen. Otherwise HW clipping is practically free today I guess. You could clip all day long. |
| ||
| But this one single IF..THEN, killed the performance. |
| ||
| You're peaking out at 24%, Casaber, on that last entry. Turned off DEBUG to run it. My that thing really flies ! :D I know you don't want to fight this right now, but at some point you might consider seeing how difficult it is to plot a sprite in the middle, like a sprite facing up (we see its back, not the front) and to circumnavigate the 3D terrain acknowledging obstacle tiles when touched. Also I changed your STEP 2 back to STEP 1 to see how much slower it is to draw the entire screen without skipping every other line. It's not very slow at all, the CPU here only increased by 4% and maintained the same speed. |
| ||
| without pseudo3d you could EASLY plot 128 128x128 sprites with pixelwrite ontop. no problem with this added mode7.. Im not sure, i might woik the same, i would not like to try without optimizing further. But you know.. still not in the optimizing mood today, haha. If you want to know why, I have other plans to use other graphics (using my little project) so that would allow mixing HW and software. Not this week though.. but it's planned.I even named the project now Graphene (one of the strongest materials in the world, and lightest too) I´m focus on readable simple power code. I think you're one of the ppl who KNOWS the strength of short terse code. When you know all the other rules by heart. This is the one most true rule of them all. K.I.S.S. |
| ||
| The way to KISS is often messy in the middle. And most ppl leave the stage before even trying. It needs a pro to get through the mess haha. Coding is the perfect life analogy ;) |
| ||
| I think you're one of the ppl who KNOWS the strength of short terse code. Well thank you Casaber, I try. :) But yes, I am a bit of a lazy SOB and I REALLY hate to write long code, whether it's mine or a routine I am making use of. That's one reason I have such short solutions often. I may be able to cull that code of yours down very succinctly, and you may lose rotation but not the scrolling up down left right - and that's fine for what I might try with it. |
| ||
| There's a very nasty floating point bug in that mode7. It shows up only after awhile, so that's a clue in itself. Keep it going for some time and you'll see it. And oh you'll see it.. haha. Things gets sawtooth shaped all over the place. That's one for later, I want to grasp the 3D fully first. I didn't expect me wanting to learn 3D ever in life, but you know It's not that weird and strange to me anymore. It feels abit closer now, more within the range of possiblities so to speak. |
| ||
| Can you send a screenshot of it please, Casaber ? The Floating Point bug you are running into. |
| ||
| sure , haha now I'm having hard time to lure it. I'm not sure if its pure time, or if you need to move around alot, or if it's about changing window forth and back. One or a combination of those 3, and it comes in several flavors; minor, which just has abit odd edges, almost "okay looking" and a severe version which makes the whole screen look sawtoothed, like if you had broken glass shards ontop of the screen. And theres inbetween aswell. Right now I couldn't get none of those. The hour before I had all of them. No wait I think I just had one now, the minor one..  |
| ||
Looks good here, Casaber. BTW be aware that REAL and DOUBLE numbers in BlitzMAX are far from accurate. Try out this simple code:Strict Local i! For i!=0! To 1! Step .01! Print i! NextNow if it was working correctly, you would have a simple display of: 0 0.01 0.02 0.03 etc. But as you can see, you do not. There is no 0.03, 0.15, or even just "1" at all. This then is something to consider when using your REAL or DOUBLE math variables. |
| ||
| Ya i Know, it's tricky sometimes. Have you used fixedpoint ever? Those seemed to have vanished though, I guess they have uses and they're still there hidden behind types like INT and 64bit versions of INT so they are possible. But they are not actually used much. They're abit counter intuitive, I guess in how they are presented and used. But same goes with floats/doubles with those "hidden" incorrectness lurking inside them despite all cleverness. But this must be some ackumulating bug so float should suffice I'm thinking. Float would be great not even doubles would be needed, and throwing doubles on the mix would only make it better when it's bugfree. I think it's some kind of ackumulation problem here. |
| ||
| BTW be aware that REAL and DOUBLE numbers [...] are far from accurate. This is the same for any language using floating point numbers -- they are inaccurate, and that's how they work within only 32/64 bits. Now if it was working correctly, you would have a simple display of: 0 0.01 0.02 0.03 etc. It is working correctly: In computing, floating point is the formulaic representation that approximates a real number so as to support a trade-off between range and precision. You would need a software-based 'bignum'-type library for this kind of accuracy, not hardware-based floating-point numbers. |
| ||
| I shall look into that when I´m clear in the head, I had too many sleepless nights at the hospital recently. Th waiting kills me. Coding really helps you from keeping worrying about things. But i would nevver had the energy to focus and make things like this otherwise. bignum is powerful, noone would ever trust floats for handling currencies and the like. I don´t even hink there have been a better idea yet since 1986 how to store numbers efficiently. But I do hate my floats. Oh yes. Did I tell you that I´m starting doing alot of DSP recently and need to become friends with them. *Shivering* But floats has speeds nowadays, so I just put my hat on and pretend they work. |
| ||
| But there's precision in them when you know what you do I've noticed. I was so suprised. I´m not the one to know those rules, but I´ve seen it in action enough to believe it. Those floats knew what they did. Nothing escaped them. But that's not how they are used by most ppl and I would never expect ppl to learn them. That would be to ask for too much anyway. I don´t even think there's much literature on that kind of aspect of floats. How to USE THEM. If those books exist they are proably using big academic words and a boring language, making sure that noone ever EVER actually learn from them. |
| ||
| global cx, i think thats the bug. |
| ||
| Stupid bug, so very human of me. |
| ||
| Well now Blitz, I have heard this in the past, and I might believe it if it weren't for the fact that GFA gives flawless results. And no, there was no way I could prove it - until now. Watch out because I finally have GFA working in Windows 8 so I can prove its flawless execution and handing of real variables. 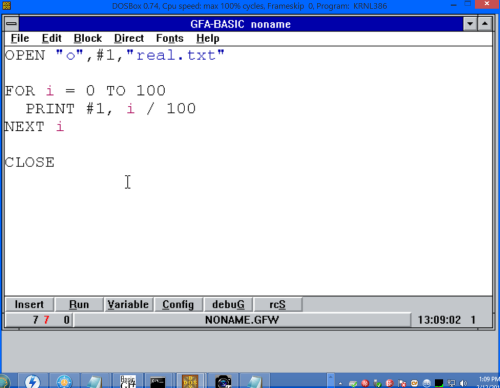 Here is the text file pasted: 0 0.01 0.02 0.03 0.04 0.05 0.06 0.07 0.08 0.09 0.1 0.11 0.12 0.13 0.14 0.15 0.16 0.17 0.18 0.19 0.2 0.21 0.22 0.23 0.24 0.25 0.26 0.27 0.28 0.29 0.3 0.31 0.32 0.33 0.34 0.35 0.36 0.37 0.38 0.39 0.4 0.41 0.42 0.43 0.44 0.45 0.46 0.47 0.48 0.49 0.5 0.51 0.52 0.53 0.54 0.55 0.56 0.57 0.58 0.59 0.6 0.61 0.62 0.63 0.64 0.65 0.66 0.67 0.68 0.69 0.7 0.71 0.72 0.73 0.74 0.75 0.76 0.77 0.78 0.79 0.8 0.81 0.82 0.83 0.84 0.85 0.86 0.87 0.88 0.89 0.9 0.91 0.92 0.93 0.94 0.95 0.96 0.97 0.98 0.99 1 This is the part where you tell me now that BlitzMAX still isn't flawed in real variables and that GFA is the one with the problem. :) |
| ||
| dw817 Nice, actually that's the kind of precision you want as a stable base for doing math. I looked around quickliy on the surface and it loosk like GFA solved it using some clever storage of their own? If I understood this right. http://forum.purebasic.com/english/viewtopic.php?p=236491 This will become a nice reading later. I put it here. https://randomascii.wordpress.com/2012/03/08/float-precisionfrom-zero-to-100-digits-2/ If I got it right. Bmax uses the standard float/double nothing special, and GFA made an extra effort behind the scenes. I wonder if that slowed things down much if it where so. |
| ||
| No kidding, Casaber ! All this talk of 'it's my fault I don't like BlitzMAX's real numbers.' Well I guess it got me off my duff to install GFA to show if any programming language is doing it correctly, THEY are. :D And that's a good thing. I have available ATM a little over 700 programs I wrote in GFA and now I can finally examine, modify, and run them and in time transfer their code to BlitzMAX. Also, as for GFA being slow. NO. It is not. It has (or had ?) really REALLY fast execution. |
| ||
| Sounds fun :) 700 programs haha, take a deep dive. |
| ||
| Instead of blaming BlitzMax (or any other langage for that matter) for "not having accurate floating point numbers" you should instead blame your CPU, as that is what BlitzMax uses to implement floats. IE It uses hardware floating point for speed. Just like C, C++ or any other systems langauge. And about GFA, they are probably doing it all in software. IE its not very fast. And if you really need accurate floats, YOU can do it in software too ;) |
| ||
| Aaand we come back to it again. Can ANYONE take up the challenge, take up the mantle and write a program in BlitzMAX (a page of length or less) that can reproduce the results GFA just gave ? That is, count from 0 to 1 by decimal 01. Count from 0 (zero) percent to 100 percent, with no weird or stray numbers interfering the output. |
| ||
| All this talk of 'it's my fault I don't like BlitzMAX's real numbers.' so very tired of this That's because it is. You are wilfully ignoring the facts of how real numbers work. BlitzMax's math works correctly. Your expectations of it are wrong. This has been explained to you at length in another thread, there's no excuse for spreading misinformation further. BlitzMax is giving the correct results for what you asked it to do. If you want perfect decimal math, use a number format that supports decimal representation, rather than complaining that a number type neither designed nor intended for what you want doesn't do what you want! To specifically count from 0 to 100 (or any range in perfect fixed steps), use integers, that's exactly what they're for. GFA BASIC is an interpreter. It will be hiding more involved, slower, operations underneath those operators. You can replicate the results in software, but because BlitzMax's math operators are mapped to hardware operations, it will look like math implemented in software. This is also what has already been pointed out. |
| ||
| I might become slow dq817.. would speed be an issue? GFA might have done a pure software solution or something like using the hw in some other fashion (which is hard to imagein bc its very hardwired how CPU's wants their math done but nonetheless) And if it did things fast using harware it would have gone more famous bc that would have been amazing. SO I´m thinking. it was probably software and not using IEEE/HW much at all. More like something like a bigint with decimalpoint? |
| ||
| There have been som many amazing minds trying to bend IEEE to do its best, so I´m not that positive its possible to use HW and get perfect results. They kinda of decided that years and years ago, that its' "okay". |
| ||
| GFA being a learners tool (and a professional tool at once) I think they reliased that they needed somthing that showed numbers very truthfully and not infuse confusion. |
| ||
| GFABasic has a compiler I purchased, Yasha, so no, you cannot say that it is only an interpreter. I know this because I have compiled code in it that runs differently from interpreted. And the compiler wasn't cheap. It was American currency converted to Deutsche marks. To do the total pixel demo, Grable ? Where you fill the screen completely w random colors, I got about 15 frames-per-second, minju, this was on a 500mhz computer so that is pretty good. That was with compilation though, not interpreted. GFA also could run so fast it would tie up the entire CPU which is why you needed the command PEEKEVENT to give some CPU back to the rest of the OS. I wrote S2 with it, so it's no slouch for programming.  Also understand that I've been using GFA for nearly 18-years and not once, not once did it give me 'correct' floating point numbers as BlitzMAX delivers them. And I am glad for that. Now if SOMEONE will write a small bit of code to achieve the same results as BlitzMAX, then it can be written off, just as with BlitzMAX you have no native ability to go frameless - but a solution was found. Yasha, can you post a code example that reproduces the same results as GFA ? Using 'decimal number format' if that so helps you ? But =IF= this simple task of counting from zero to 1 by 1% is so immensely difficult for BlitzMAX to accomplish correctly - then you can spout all you want, there is a PROBLEM and I know I'm not alone in this belief. a!=1 b!=3 If a!/b!<>1!/3! Then Print"flawed" |
| ||
| Yes. It's a serious problem of IEEE, and it should be solved. These kind of problems pop up everywhere, and libraries such as BIGINT and so on comes along. What does Bmax use for correct roundings? |
| ||
Hmmm...It seems to work ?Local a:Double = 1, b:Double = 3 If String(a/b) <> String(1.0!/3.0!) Then Print "Oh no!" -Henri |
| ||
| I tried the for i=0 to 100 print i/100 next It's the more interesting problem for me, to be able to show at least 2 decimals correctly. |
| ||
You have something good there, Henri. I am trying this though:Local i! For i!=0 To 1 Step .01 Print String(i!) NextAnd still getting the same results. Hmm ... Let's try this using your String method: Local i!,a$ For i!=0.0! To 1.0! Step .01! a$=String(i!+.01!) Print Left$(a$,Instr(a$,".")+2) NextAlmost perfect. |
| ||
| dw817 I just got the same results indpendely searching the forum Local i2:Float' = 10.3 For i2=0 To 100 Print Left(i2/100,Instr(i2,".")+2) Next WaitKey Which is interresing I guess.. on a string conversion level |
| ||
| I need to go now, but this was interesting actually. This thread has approved to discuss this matter, it's very MODE 7 related. The IEEE enigma continues. But I'm SO fond of integers right now, you wouldn´t believe it. |
| ||
Local i!,a$,c
For i!=0.0! To 1.0+.01! Step .01!
  a$=String(i!+.01)
  Print c+" "+Left$(a$,Instr(a$,".")+2)
  c:+1
Next
Awright, I got it. But yeah, whatta way to fudge the numbers. :/ |
| ||
| Casaber, when I was working on the early TRS 80, there were no float values. I remember writing a program to emulate it. And yes, you are on the right track, I used INTEGER variables to emulate the float. How did I do it ? It was all a matter of using a$ and b$ (the only two strings available in the language), and putting a visual decimal point between the two of them. The same method of building a float might be done in BlitzMAX but perhaps not so easily. Integers can act as FLOAT if treated properly. It is a blessing that BlitzMAX has integers that count past 999999999. Have a good rest, I think I need one too. :) |
| ||
| I hope we find an elegant solution, Personally I have'nt tried libraries yet on Bmax, I figure that will help but I hope there's also a more direct solution. Btw the funny thing is.. the bug was not even floating point error, don't global CX and its' gone. Well.. I hope. haven't throughly tested it yet ;) Have a good weekend everyone. |
| ||
| Ya have a good rest dw817 :) We'll talk later about those 700 golden tresures of yours muHAHAAH. |
   |