Texturing A hexagon
Blitz3D Forums/Blitz3D Beginners Area/Texturing A hexagon
| ||
| Hi, I'm working with RealmCrafter engine. I'm new to blitz3d and I've created a hexagon mesh for the ability buttons on the interface. My first problem is. I'm having problems with the U, and V Texture options on Addvertex. and getting the texture to actually fit. Any help would be appreciated, if you need more info I can do that. ~Juoni |
| ||
| Well, two things would help greatly if you could possibly post them: 1) A description of how you'd like your texture to fit the hexagon. A picture of the texture itself with the hexagon outline drawn over it would help a lot, actually. 2) A wireframe shot of the hexagon itself, so we can see just how the polygons are arranged. If you can get these then I'll bet we can fix your problem in no time! |
| ||
| It's actually very easy to do, if your hexagon is orientated along an axis. You just find the width and height of the hexagon, and use the actual vertex co-ords to make the UV's. More info would help! |
| ||
 Okay here is our prototype interface. The design is ours but the character pictures aren't. Here is what I have so far(lol) a long way to go  Thank you hope this helps Last edited 2012 Last edited 2012 Last edited 2012 |
| ||
| Writing a reply now; could take a half-hour or so because I'm multitasking, so stay tuned. |
| ||
| Those hexagons are not regular, they're kinda stretched. Any square texture you apply to these stretched hexagons will be distorted. The ones in your prototype interface are regular, so let's keep them that way. The benefits of using regular hexagons: it'll be easier to find the right UV values, and you can scale it later on in case you really want it the way it's in the screenshot. This hexagon will be inscribed in a circle of radius 0.5. This means this circle is inscribed in a square of 1.0 x 1.0, which is analogous to the UV space. This will make it easier for your artist to paint a texture for this hexagon - all he needs is a square texture with a regular hexagon inscribed on it. We'll start creating the leftmost vertex and then proceed in a clockwise fashion. The hexagon will be centered at [0,0,0]. v0 = AddVertex(s, -0.5, 0, 0, 0, 0.5) ;Extreme left vertex. v1 = AddVertex(s, -0.25, 0.44, 0, 0.25, 0) v2 = AddVertex(s, 0.25, 0.44, 0, 0.75, 0) v3 = AddVertex(s, 0.5, 0, 0, 1.0, 0.5) ;Extreme right vertex. v4 = AddVertex(s, 0.25, -0.44, 0, 0.75, 1.0) v5 = AddVertex(s, -0.25, -0.44, 0, 0.25, 1.0) ;Bottom-left vertex. ;Vertex orders for creating triangles (each trio is a triangle, 4 triangles total): ;v0,v1,v2 ;v0,v2,v3 ;v0,v3,v4 ;v0,v4,v5Try this and tell me what happens. The value of '0.44' is obtained from Sin(60) * 0.5 (0.5 being the radius of the circle). It's used as vertical distance for the diagonal vertices; the horizontal distance for these vertices is half the radius, so 0.25. Last edited 2012 |
| ||
| Alright, getting work now. Thank you :) |
| ||
| I have a demo that I use to see what I'm creating with out having to recompile the RC source every time. The red hexagon is a screen shot from that. Below is the code you provided with the trinagles(i'm about 70% sure they're correct) After I got the hexagon to show on the demo I pasted the code to the source and recompiled. My result is on the left side of the screen shot. ~juoni  Hexa = CreateMesh() s = CreateSurface(Hexa) v0 = AddVertex(s, -0.5, 0, 0, 0.5) ;Extreme left vertex. v1 = AddVertex(s, -0.25, 0.44, 0.25, 0) v2 = AddVertex(s, 0.25, 0.44, 0.75, 0) v3 = AddVertex(s, 0.5, 0, 1.0, 0.5) ;Extreme right vertex. v4 = AddVertex(s, 0.25, -0.44, 0.75, 1.0) v5 = AddVertex(s, -0.25, -0.44, 0.25, 1.0) ;Bottom-left vertex. AddTriangle(s,v0,v1,0) AddTriangle(s,v1,v2,0) AddTriangle(s,v2,v3,0) AddTriangle(s,v3,v4,0) AddTriangle(s,v4,v5,0) AddTriangle(s,v5,v0,0) |
| ||
Alright, here we go. Sorry for the wait. First off, your hexagon meshes are easily fixed with some really simple (thanks to Blitz) trig. Take a look at this picture, showing the positions of the seven vertices: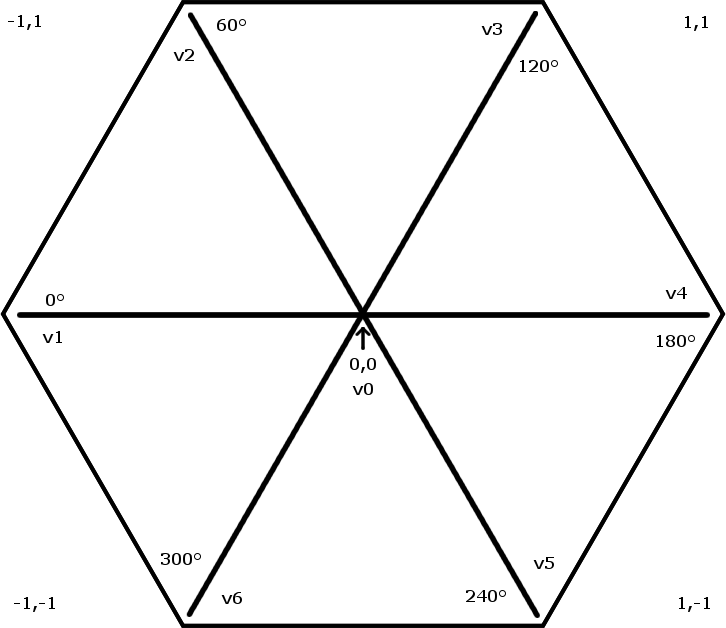 With that, you can see that each vertex lies at a specific "angle" around the hexagon. Since you know the angle of each vertex, here's where the trig happens: you can use Cos() and Sin() to get the X and Y positions for each vertex, respectively. It'll look like this: v0 (centrepoint): 0,0 v1 (far left) : -Cos(0),Sin(0) v2 (upper left) : -Cos(60),Sin(60) v3 (upper right): -Cos(120),Sin(120) v4 (far right) : -Cos(180),Sin(180) v5 (lower right): -Cos(240),Sin(240) v6 (lower left) : -Cos(300),Sin(300) With that in mind, it's a fairly simple matter to actually use that in code. After you create the central vertex at 0,0, you can slap the remaining six in like this: AddVertex HexagonSurface,0,0,0
For angle = 0 to 300 Step 60
AddVertex HexagonSurf,-Cos(angle),Sin(angle),0
NextThat'll create a perfect hexagon just like this one, easy as pie: 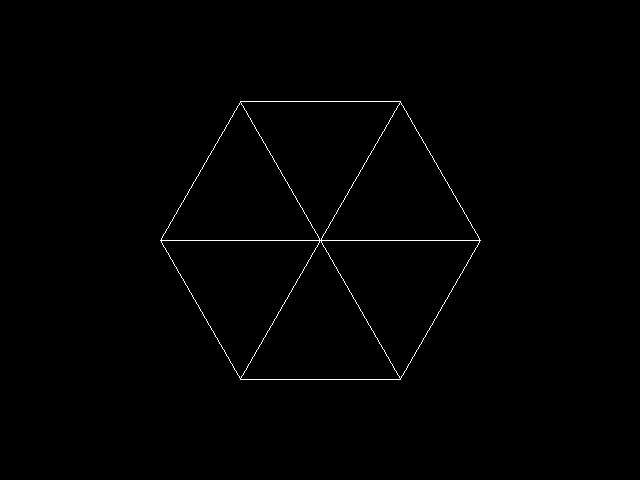 Alright, so now we've got ourselves a perfect hexagon mesh, but how to texture it? Well, you may already know some of this, but here's a nutshell version of how UV works. As you already know, when you're making a mesh (or at least a flat one like these polygons), 0,0 X,Y is at the very centre, with X and Y radiating outwards, usually within the range of -1 to 1, like this: 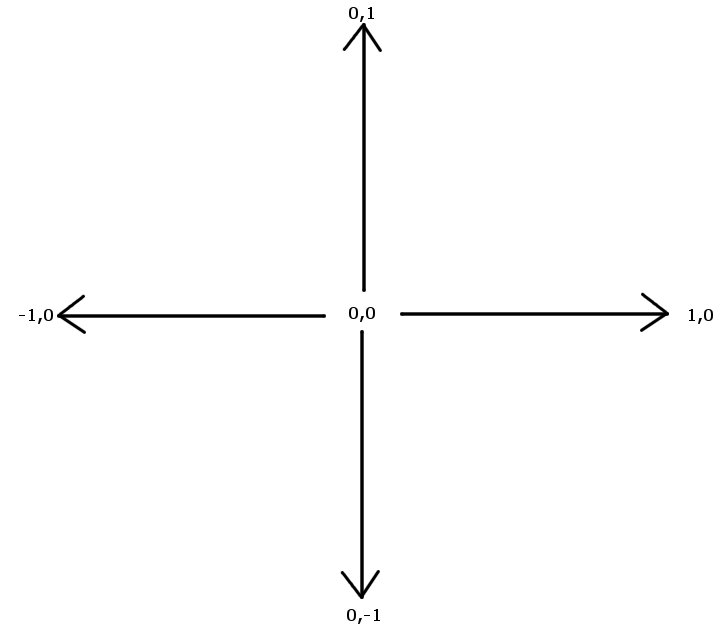 A texture, on the other hand, is a 2D image, so 0,0 is at the top left, with X and Y radiating to the right and down, respectively: 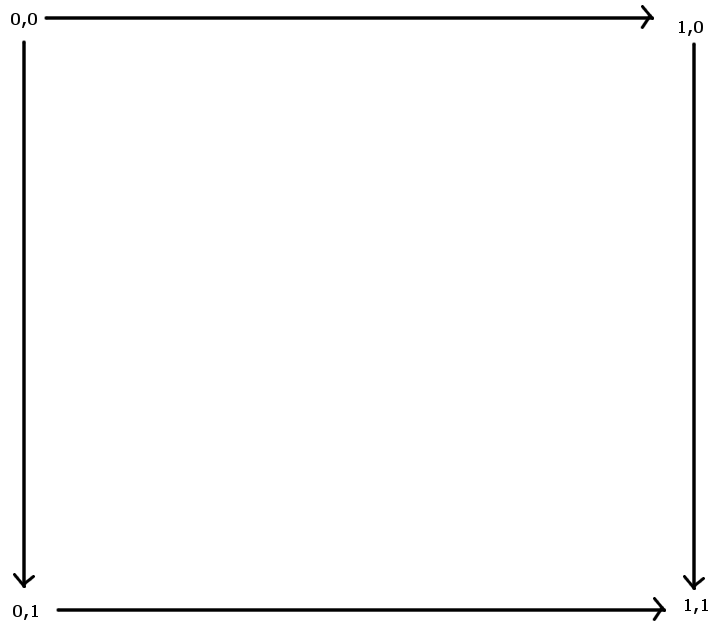 Now, imagine that you put your newly perfected hexagon over that image, like this. That's how the UV mapping will work, albeit in reverse by putting the image over the hexagon: 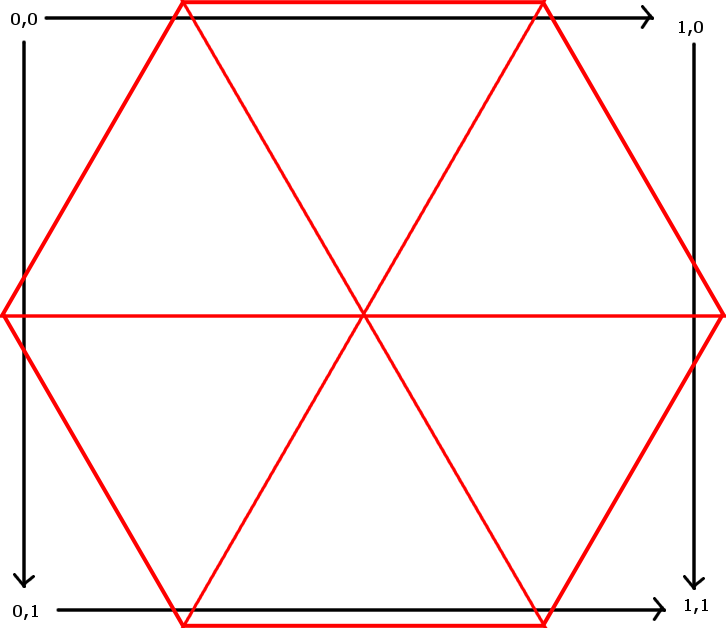 So, we have two sets of coords that don't match up. The hexagon goes from -1,1 to 1,-1, while the texture goes from 0,0 to 1,1. So, how to solve this? Well, texture-wise, the central vertex on the hexagon is at 0.5,0.5, so that gives us something to work with. Cutting a very long story short, the XY to UV formula is: U = (-Cos(angle) / 2.0) + .5 V = -(Sin(angle) / 2.0) + .5 Put it all together and you finally get this nifty little function! Function CreateHexagon() Local Angle# Local HexMesh = CreateMesh() ; Make the mesh Local HexSurf = CreateSurface(HexMesh) ; Add the surface AddVertex HexSurf,0,0,0,.5,.5 ; Add the centrepoint centrepoint For Angle = 0 To 300 Step 60 ; Add the six outer vertices, including UV mapping AddVertex HexSurf,-Cos(Angle),Sin(Angle),0,(-Cos(Angle) / 2.0) + .5,-(Sin(Angle) / 2.0) + .5 Next ; Now define the actual triangles AddTriangle HexSurf,0,1,2 AddTriangle HexSurf,0,2,3 AddTriangle HexSurf,0,3,4 AddTriangle HexSurf,0,4,5 AddTriangle HexSurf,0,5,6 AddTriangle HexSurf,0,6,1 ; And finally, return the hexagon itself! Return HexMesh End Function I realize that may have gone a little fast; hopefully it'll help. Feel free to ask more questions! :D Last edited 2012 |
| ||
| The red hexagon looks fine, so the problem is in the positioning code. What are you using to position the hexagons on screen? @Adam: nice guide! I don't think the center vertex is necessary, you can get away with just six. Last edited 2012 |
| ||
| Well Thanks a lot everyone it puts everything in perspective. @Adam, I never though of actually using a formula to build the hexagons it makes a lot more sense now, especially since you expressed that you know all of Vertices and Degrees. @Kryzon You helped me understand how the actually building of the meshes go, in the docs it talks clockwise/counter however I never fully grasped it. Now, if I'm correct I believe that if is clockwise you must start with the shared vertex(if there is one) and then go from there. They're all positioned on the screen right now based on a for next loop I created because the stock one was for small quads. the stretching occurred because I didn't actually place them proportionally except for the center hexagon Adam after reading your guide here are the results. Thanks for clearing up the UV cords, vs the actually mesh.  Now to have the artists redo the textures slightly, then reset the boarders(which shouldn't be much Just turnentity(0,0,Roll) and the degrees are in this guide. Once again thanks for the knowledge, and speedy replies :D ~Juoni Last edited 2012 |
| ||
| No problem, Juoni; glad it helped so much! I never though of actually using a formula to build the hexagons You've spotted a very important principle of programming here: any repetitive task should be reduced to a formula of some sort. Always make your code do the work for you. If you keep an open mind like that, you'll go a long way! :D |
| ||
| in the docs it talks clockwise/counter however I never fully grasped it. Now, if I'm correct I believe that if is clockwise you must start with the shared vertex(if there is one) and then go from there. I just noticed this bit of your post, and I think I may be able to illuminate the subject. As you probably know, clockwise is this:So, with that in mind, let's take a triangle, like from this Blitz sphere: 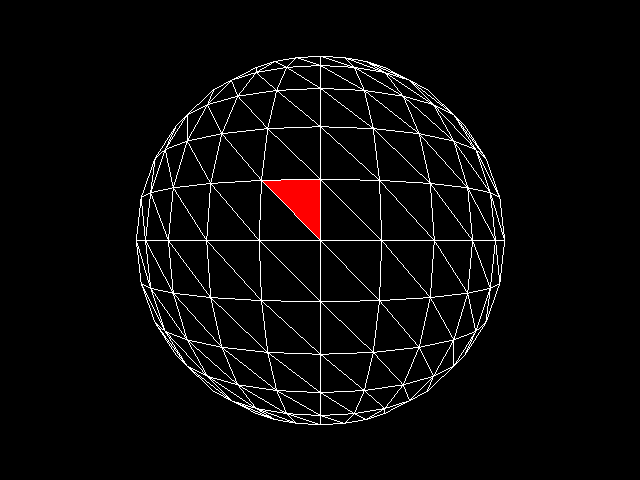 Look at the three vertices. For the triangle to be "clockwise," they just have to be counted in one of the following ways: 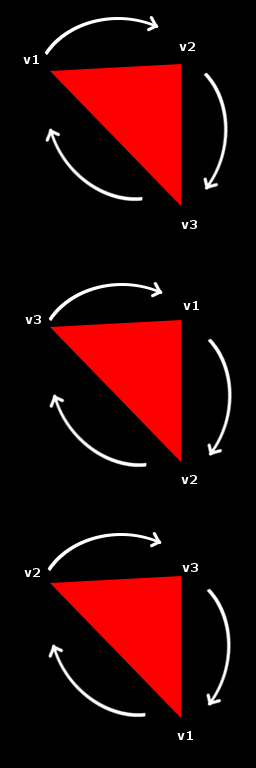 See the connection now? Now, here's the kicker. When a triangle is clockwise, the 3D renderer knows that it's "facing" the camera. However, if the sphere turns around so that the triangle is facing AWAY from the camera, the triangle faces the other way. Look what happens to the vertices:  As you can see, they're now going counter-clockwise. This is how the renderer knows that the triangle is facing away from the camera; it's now called a "backface," and isn't rendered unless the mesh has special instructions (EntityFX 16, to be specific). I don't think the center vertex is necessary, you can get away with just six. Very true, but once I drew out the hexagon diagram, I realized that a central vertex would make the whole thing a lot easier to understand visually. Since he only needs this for buttons and icons, an extra vertex and triangle won't hurt much, although if I was doing this for my own benefit I'd definitely only use six vertices.Last edited 2012 |
   |